3 個注入點 + 4 層疊加 :用 OpenSpec Schema 把 Superpowers TDD 焊進編碼工作流(實測一半有效)
整理版優先睇
用 OpenSpec 自訂 Schema 喺規劃階段強制 TDD 思維,但執行階段 AI 唔會跟足紅綠重構循環
呢篇文章係術哥嘅實戰分享,佢係一個專注 AI 編程、Agent Skills、MCP 嘅技術實踐者。佢想解決嘅問題係:點樣令 AI 編碼工作流自動跟足 TDD 紀律,而唔係靠人手喺兩個工具之間切換。整體結論係:自訂 schema 喺規劃階段(propose)有效,AI 會產出包含 WHEN/THEN、測試描述同 TDD 微步驟嘅 artifact;但喺執行階段(apply),instruction 只係文字提示,AI 唔會嚴格執行 RED-GREEN-REFACTOR 循環,而係一次過寫曬所有源碼同測試再驗證。
文章用 Todo CRUD 應用做實測,先用 OpenSpec CLI 建立自訂 schema.yaml,定義五個 artifact(proposal→specs→design→tasks→plans),每個都嵌入 TDD 指引。然後 propose 一個 change,觀察到 specs 用咗 GIVEN/WHEN/THEN 格式、tasks 包含測試描述同預期行為、plans 自動調用 Superpowers 嘅 writing-plans skill 生成詳細微步驟。但 apply 時,AI 冇跟 RED→GREEN→REFACTOR 順序,而係一次過寫完 types.ts、store.ts、routes.ts 同測試檔,再 run test 修正。最終測試通過,但執行路徑唔係嚴格 TDD。
術哥提醒,…
- 自訂 OpenSpec schema 可以喺規劃階段強制 AI 產出 TDD 風格嘅 specs 同 plans,包括 WHEN/THEN 格式同測試描述
- 三個注入點分工:instruction(schema.yaml)→ rules(config.yaml)→ context(config.yaml),四層疊加越後越具體
- 執行階段 AI 唔會嚴格跟 RED-GREEN-REFACTOR 循環,而係一次過寫代碼再驗證,instruction 係軟約束
- Plans artifact 依賴 Superpowers 嘅 writing-plans skill,如果冇裝可以刪走 PRECHECK 改用純文字指令
- 方案實用場景:規範 artifact 輸出格式、管理變更流程;唔適用:強制 AI 嘅編碼行為
TDD-driven Schema 完整配置
包含 schema.yaml、config.yaml 同五個模板檔(proposal.md、spec.md、design.md、tasks.md、plan.md),用嚟令 AI 喺規劃階段跟 TDD 思路產出 artifact。
Plans artifact 嘅 TDD instruction
要求 AI 按 RED-GREEN-REFACTOR 循環拆解 2-5 分鐘微任務,每個任務寫測試→最小實現→重構。
MiniMax 模型優惠連結
比官網平 10%,適合日常輕量使用,但指令遵循能力比 GLM 差。
點解要自訂 Schema?
OpenSpec 內置嘅 spec-driven schema 只管寫乜文檔,唔管寫代碼嘅紀律。AI 可以先寫實現再補測試,甚至跳過測試。想強制 TDD 紀律,就要用自訂 schema 嘅 instruction 字段,喺每個 artifact 嵌入 TDD 指引。
建立 TDD-driven Schema
首先喺 openspec/schemas/tdd-driven/ 下建立 schema.yaml,定義五個 artifact:proposal、specs、design、tasks、plans。每個 artifact 嘅 instruction 都嵌入 TDD 要求,例如 proposal 要列出 WHEN/THEN 格式嘅可測試行為,tasks 要跟 RED→GREEN→REFACTOR 順序。
artifacts:
 - id: proposal
 generates: proposal.md
 instruction: |
 Create a proposal that explains WHY this change is needed.
 Focus on the problem, not the solution.
 TDD REQUIREMENT:
 - Identify testable behaviors this change will introduce
 - List acceptance criteria in WHEN/THEN format
 - Do NOT describe implementation details
 - id: plans
 generates: plan.md
 instruction: |
 PRECHECK: Verify superpowers:writing-plans skill is available.
 If not available, STOP and report the missing skill.
 Create a detailed execution plan using 2-5 minute micro-tasks.
 Each task must follow the RED-GREEN-REFACTOR cycle
config.yaml 要用 schema: tdd-driven 指向自訂 schema,仲要提供 context 同 rules。
模板檔(proposal.md、tasks.md 等)只需提供基本骨架,AI 會根據 instruction 填充內容。注意計劃 artifact 嘅 instruction 有 PRECHECK 檢查 Superpowers skill 是否存在,如果冇裝可以刪走。
Propose 一個 Change 驗證效果
用 Todo CRUD 應用做實測,執行 /opsx:propose todo-crud。AI 會按 DAG 依序生成 proposal → design → specs → tasks → plans,大約 2-5 分鐘。
- Proposal 包含 WHEN/THEN 格式嘅 acceptance criteria
- Specs 用 GIVEN/WHEN/THEN 寫場景,每個 scenario 獨立可測試
- Tasks 包含測試描述同預期行為,例如「Test TodoStore.create() with valid title」,唔係直接寫實現
- Plans artifact 自動調用 Superpowers 嘅 writing-plans skill,拆成詳細嘅 RED→GREEN→REFACTOR 微步驟,仲附有完整測試代碼
同內置 schema 對比,tasks 唔再係「創建 Todo 接口實現 POST /todos 路由」,而係先定義測試預期
用 openspec instructions specs --change todo-crud --json 可以睇到 AI 收到嘅完整指令,包括 context、rules、instruction、template 四層。
Apply 執行階段嘅現實
執行 /opsx:apply todo-crud 後,AI 冇跟 RED-GREEN-REFACTOR 循環。佢一次過寫曬所有源碼檔(types.ts、store.ts、errorHandler.ts、routes.ts)同測試檔(store.test.ts、routes.test.ts),然後 run npm test,發現失敗就編輯修復,直到全部通過,最後 commit。
Git log 顯示提交係按功能模塊(feat: add TodoStore),冇交替嘅 test/feat commit
- 1 檢查文件創建時間:src/*.ts 同 test/*.test.ts 幾乎同時出現
- 2 openspec status 顯示所有 artifact 完成,但內部任務進度唔會逐步更新
- 3 確認測試通過:npm test 全部通過
常見問題同解決方法
- AI 跳過 TDD 步驟:喺 config.yaml 加更具體 rules,例如「Never create a .ts file without a corresponding .test.ts file」,或者將 tasks 拆得更細
- Plans artifact 太長被截斷:喺 instruction 限制「Maximum 15 micro-tasks per plan」,或者喺 proposal 階段收窄變更範圍
- PRECHECK 失敗:確認 Superpowers 已安裝,或者刪走 plans instruction 嘅 PRECHECK 同 skill 引用
- 唔想依賴 Superpowers:將 plans instruction 改為純文字 TDD 指令,OpenSpec 本身支援 25+ 工具
簡單講,如果你用其他 AI 工具(Cursor、Codex),instruction 仍然有效,因為係純文字。Superpowers 只係提供更細粒度嘅 TDD 方法論。
總結:值得用嘅地方同限制
呢個方案喺規劃階段(propose)有效:自訂 schema 透過 instruction 改變咗 AI 產出 specs、tasks、plans 嘅內容同格式,令佢哋帶有 TDD 痕跡。但喺執行階段(apply),instruction 係軟約束,AI 唔會嚴格跟 RED-GREEN-REFACTOR 循環。
適合想統一 artifact 輸出格式、用 OpenSpec 管理複雜變更流程嘅團隊
唔適合想強制 AI 按 TDD 逐個步驟寫代碼嘅情況——呢個係 LLM 指令遵循能力嘅邊界
如果你用更聽話嘅模型(例如 GLM 5.1),apply 階段嘅效果可能會好啲。但本質上,instruction 唔係硬約束,最終都要人工檢查。
🚩 2026 年「術哥無界」系列實戰文檔 X 篇原創計劃 第 102 篇,AI 編程最佳實戰「2026」系列第 27
大家好,歡迎嚟到 術哥無界 | ShugeX | 運維有術。
我是術哥,一個專注於 AI 編程、AI 智能體、Agent Skills、MCP、雲原生、AIOps、Milvus 向量數據庫嘅技術實踐者同開源佈道者!
Talk is cheap, let's explore。無界探索,有術而行。
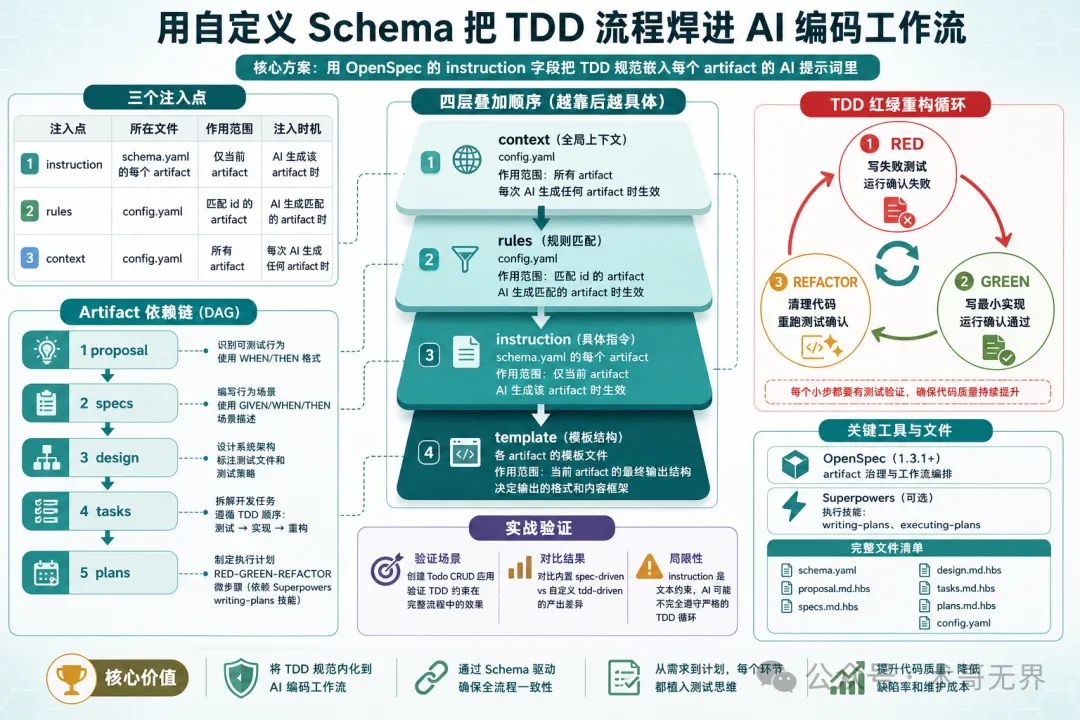
圖 1:OpenSpec Schema + Superpowers TDD 工作流示意圖
讀完之後你會攞到一個完整嘅 schema.yaml,放佢入 project 度,AI 就會喺 propose 階段跟 TDD 思路寫 spec,喺 apply 階段跟 plan-driven 流程執行——唔使手動編排,唔使喺兩個工具之間來回切換。
先講結論:呢個方案喺規劃階段(propose)係有效嘅——自定義 schema 透過 instruction 字段確實改變咗 AI 產出 specs、tasks、plans 嘅內容同格式。但係喺執行階段(apply),instruction 係文本提示唔係硬約束,AI 唔會嚴格遵守 TDD 嘅紅綠重構循環。所以呢篇文章嘅定位係:教你用 OpenSpec 嘅自定義 schema 機制改善 AI 編碼工作流嘅規劃質量,而唔係強制 AI 嘅編碼行為。
說明:本文內容係基於 OpenSpec 源碼(Fission-AI/OpenSpec)、Superpowers 源碼(obra/superpowers)同實際操作驗證分析整理而成。實測已完成 propose 同 apply 嘅完整流程,但 AI 執行路徑並唔係嚴格嘅 TDD 循環。文入面嘅配置模板同參數建議僅供參考,實際效果請以你嘅業務數據同環境測試結果為準。如果有實際使用經驗,歡迎喺評論區分享交流。
順便提一句,今次實測係用 MiniMax 2.7 模型。講真整體效果同 GLM 5.1 仲有差距,尤其是 apply 階段嘅指令遵循能力,GLM 明顯更加聽話。但 MiniMax 勝在性價比,日常可以湊住用,算係買唔到 GLM 時嘅平替。有興趣可以透過 https://platform.minimaxi.com/subscribe/token-plan?code=8nzRbxE4m1&source=link 買,比官網直接買平 10%。(如果想做大事、重嘢,就唔好考慮啦)
下面一步步嚟。
1. 你會完成啲乜
✅ 建立一個自定義 OpenSpec schema,喺 artifact 生成階段嵌入 TDD 規範 ✅ 用呢個 schema propose 一個 change,觀察 AI 點樣按 TDD 思路產出 spec 同 tasks ✅ 執行 apply,體驗由 spec 到測試到實現嘅完整閉環 ✅ 理解 OpenSpec 嘅 instruction/rules 注入機制
2. 環境準備
2.1 你需要準備
Claude Code(已安裝 Superpowers 插件,可選) OpenSpec CLI(1.3.1+) Node.js 18+ 一個空項目目錄
關於 Superpowers:佢係可選依賴。本文嘅
plansartifact 會調用 Superpowers 嘅writing-plansskill 嚟生成更細粒嘅 TDD 微步驟,但如果你唔裝 Superpowers,其他 artifact 仍然可以正常運作——只係 plan 嘅粒度會粗啲。具體取捨睇後面「故障排除」嘅分析。
2.2 安裝 OpenSpec
# 全局安裝 OpenSpec CLI
npm install -g openspec

# 確認版本
openspec --version
輸出應該係純數字,例如 1.3.1 或者更高。
2.3 安裝 Superpowers(可選)
喺 Claude Code 度安裝 Superpowers 插件,然後執行 /reload-plugins 刷新。
安裝完成後,喺 Claude Code 度輸入 /superpowers,如果睇到 skill 列表就代表安裝成功。
2.4 預計時間
⏱️ 完成呢個實戰大約需要 30 分鐘
2.5 難度等級
⭐⭐ 中級 - 需要了解 YAML 配置同基本嘅 CLI 操作
3. 第一步:建立自定義 Schema
點解要自定義?OpenSpec 內置嘅 spec-driven schema 只係管寫啲乜文檔,不管按咩紀律寫代碼。佢嘅 proposal → specs → design → tasks 流程入面冇任何 TDD 約束——AI 完全有可能先寫實現再補測試,甚至 skip 咗測試。
我哋嘅目標:用 instruction 字段話畀 AI 知,每個 artifact 都要體現 TDD 思路。
3.1 建立 schema 目錄
# 在項目根目錄下創建 tdd-driven schema 的目錄結構
mkdir -p openspec/schemas/tdd-driven/templates
3.2 編寫 schema.yaml(全文核心)
呢個係整篇文章最重要嘅文件。先搞清楚三個注入點嘅分工,再逐字段睇 schema.yaml 嘅結構。
三個核心注入點:
instruction | |||
rules | rules.specs 隻影響 specs) | ||
context |
注入嘅疊加順序係 context → rules → instruction → template。即係話,AI 收到嘅 prompt 入面先有項目背景,再有針對當前 artifact 嘅規則,再有 schema 入面嘅指令,最後係模板骨架。四層疊加,越靠後越具體。
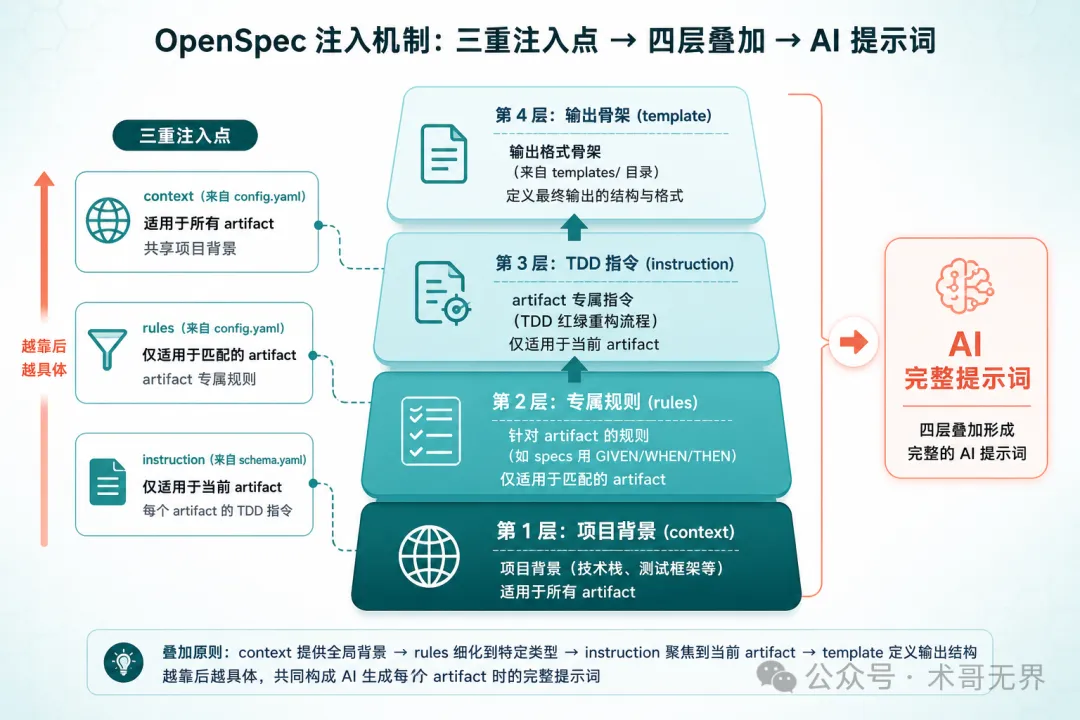
圖 2:context → rules → instruction → template 四層疊加機制
關鍵設計決策:
artifacts 保持 4 個基礎節點(proposal → specs → design → tasks),但每個嘅 instruction都嵌入咗 TDD 指引新增 plansartifact(依賴 tasks),用嚟建立 TDD 微步驟計劃apply 階段嘅 requires包含 plans,確保 plan 就緒先開始實現apply 嘅 instruction引用executing-plans規範,等 AI 跟 plan 執行
呢度有個容易混淆嘅地方:依賴係賦能者,唔係門控。OpenSpec 嘅 DAG 依賴唔會阻止你跳步。requires: [proposal] 嘅意思係 proposal 嘅內容會作為上下文傳入,不是 proposal 唔存在就唔畀行。
完整 schema.yaml:
name: tdd-driven
version:1
description:Spec-drivenworkflowwithTDDdisciplineembeddedateveryartifactstage

artifacts:
-id:proposal
    generates:proposal.md
    description:Initialchangeproposal
    template:proposal.md
    instruction:|
      Create a proposal that explains WHY this change is needed.
      Focus on the problem, not the solution.

      TDD REQUIREMENT:
      -Identifytestablebehaviorsthischangewillintroduce
      -ListacceptancecriteriainWHEN/THENformat
      -DoNOTdescribeimplementationdetails
    requires:[]

-id:specs
    generates:specs/**/*.md
    description:Behavioralspecificationsforthechange
    template:spec.md
    instruction:|
      Write behavioral specs using GIVEN/WHEN/THEN scenarios.

      TDD REQUIREMENT:
      -Eachscenariomustbeindependentlytestable
      -Expressexpectedbehavior,notimplementation
      -Cover:happypath,edgecases,errorcases
      -Referenceexistingpatternsbeforecreatingnewones
    requires:
      -proposal

-id:design
    generates:design.md
    description:Technicaldesigndocument
    template:design.md
    instruction:|
      Create a technical design explaining HOW to implement.

      TDD REQUIREMENT:
      -Identifytestfilesthatneedtobecreatedormodified
      -Specifyteststrategy(unit,integration,e2e)
      -Designmustsupportincrementaltesting
    requires:
      -proposal

-id:tasks
    generates:tasks.md
    description:ImplementationchecklistwithTDDordering
    template:tasks.md
    instruction:|
      Break work into tasks following TDD order:
      1. Write failing test
      2. Write minimal implementation to pass
      3. Refactor
      4. Commit

      Each task must include:
      -Testdescription(whattotest)
      -Expectedbehavior(whatshouldhappen)
      -Implementationnotes(minimalcodetopass)
    requires:
      -specs
      -design

-id:plans
    generates:plan.md
    description:DetailedexecutionplanwithTDDmicro-steps
    template:plan.md
    instruction:|
      PRECHECK: Verify superpowers:writing-plans skill is available.
      If not available, STOP and report the missing skill.

      Createadetailedexecutionplanusing2-5minutemicro-tasks.
      Each task must follow the RED-GREEN-REFACTOR cycle:

      RED phase:
      -Writeaspecificfailingtest
      -Runittoconfirmfailure

      GREEN phase:
      -Writeminimalcodetomaketestpass
      -Runtesttoconfirmpass

      REFACTOR phase:
      -Cleanupwithoutchangingbehavior
      -Re-runteststoconfirmstillpassing

      EnforceYAGNI(YouAren'tGonnaNeedIt)andDRYprinciples.
    requires:
      -tasks

apply:
requires:[plans]
tracks:tasks.md
instruction:|
    Execute the plan following TDD discipline:

    1. For each task in plan.md:
       a. RED:Writefailingtestfirst
       b. GREEN:Writeminimalimplementation
       c. REFACTOR:Cleanupcode
       d.Runfulltestsuitetoconfirmnoregressions
       e.Commitwithdescriptivemessage

    2. After all tasks complete:
       a.Runfulltestsuite
       b.Verifyallspecsaresatisfied
       c.CheckforanyTODOmarkersleftbehind

    Rules:
    -Neverwriteproductioncodewithoutafailingtest
    -NeverskiptheREDphase
    -CommitaftereachGREENphase
3.3 建立模板文件
templates/ 目錄下需要為每個 artifact 提供模板骨架。模板嘅作用係畀 AI 一個輸出格式嘅起點——模板內容會作為 <template> 注入到 prompt 嘅最後一層。
# 創建模板文件
touch openspec/schemas/tdd-driven/templates/proposal.md
touch openspec/schemas/tdd-driven/templates/spec.md
touch openspec/schemas/tdd-driven/templates/design.md
touch openspec/schemas/tdd-driven/templates/tasks.md
touch openspec/schemas/tdd-driven/templates/plan.md
模板文件唔需要太多內容,AI 會根據 instruction 填充。但畀一個好嘅骨架可以令 AI 嘅輸出更穩定、格式更一致。
proposal.md 模板:
# Proposal

## Problem
<!-- 描述要解決的問題 -->

## Testable Behaviors
<!-- WHEN/THEN 格式列出可測試行為 -->

## Acceptance Criteria
<!-- 驗收標準 -->
tasks.md 模板:
# Tasks

## TDD Task List

<!-- AI will populate tasks following RED-GREEN-REFACTOR order -->

### Task 1: [AI fills]
- [ ] RED: [test description]
- [ ] GREEN: [implementation notes]
- [ ] REFACTOR: [cleanup notes]
- [ ] Commit
plan.md 模板:
# Execution Plan

## Micro-tasks (2-5 min each)

### Phase 1: [AI fills]
- [ ] RED: ...
- [ ] GREEN: ...
- [ ] REFACTOR: ...
模板係純文字,OpenSpec 唔做變量插值。AI 會根據 instruction 自動填充內容,所以用 HTML 註釋作為佔位提示就夠。
3.4 配置 project config
創建 openspec/config.yaml,等項目默認使用 tdd-driven schema:
schema: tdd-driven

context:|
  Tech stack: TypeScript, Node.js, Jest
  Testing framework: Jest
  API style: RESTful
  All new code must have corresponding tests.

rules:
proposal:
    -Includetestableacceptancecriteria
    -UseWHEN/THENformatforexpectedbehaviors
specs:
    -UseGIVEN/WHEN/THENformat
    -Eachscenariomustbeindependentlytestable
    -Referenceexistingpatternsbeforeinventingnewones
tasks:
    -Order tasks by TDD cycle:test→implement→refactor
    -Eachtaskmusthaveatestdescription
plans:
    -Breakeachtaskinto2-5minutemicro-steps
    -Everystepmustproduceatestableoutcome
注意 context 和 rules 嘅分工:
context:所有 artifact 共享嘅資訊(技術棧、測試框架等) rules:只注入到匹配 id 嘅 artifact(例如 rules.specs只會喺 specs 嘅 prompt 出現)
注入順序係 context → rules → instruction → template,四層疊加。
3.5 初始化項目
# 初始化 OpenSpec(--tools 參數配置 AI 工具適配,按需選擇)
openspec init --tools claude
--tools 參數需要傳值:all 配置曬所有工具,claude 只配置 Claude Code,都可以傳逗號分隔嘅列表例如 claude,cursor。
驗證點
提示:
schema系列命令目前係實驗性功能,執行時會顯示Note: Schema commands are experimental and may change.提示,呢個係正常嘅。
# 檢查 schema 文件是否存在
openspec schema which tdd-driven

# 驗證 schema 語法
openspec schema validate tdd-driven

# 檢查項目狀態
openspec status
✅ schema.yaml 存在而且語法正確 ✅ 模板文件齊全(5 個) ✅ config.yaml 指向 tdd-driven schema ✅ openspec status 不報錯
到呢度,骨架搭好咗。接下來等佢行得鬱。
4. 第二步:Propose 一個 Change
用一個由零開始嘅示例嚟驗證 TDD 約束係咪生效。我哋嚟建立一個 Todo CRUD 應用——支援建立、查看、完成、刪除待辦事項。
4.1 執行 propose
# 創建新 change
/opsx:propose todo-crud
執行之後,AI 會根據 change 名稱自動推斷需求,按 DAG 依賴順序依次生成所有 artifact——唔需要手動描述需求,唔需要逐步確認。
佢會自動完成以下步驟:
調用 openspec new change建立 change 目錄按依賴順序讀取每個 artifact 嘅 instruction 依次生成 proposal → design → specs → tasks → plans plans 生成時會自動調用 Superpowers 嘅 writing-plansskill
成個過程大約 2-5 分鐘,完成之後你會見到 5 個文件出現喺 openspec/changes/todo-crud/ 目錄下面。
4.2 觀察關鍵差異
呢個係驗證自定義 schema 係咪生效嘅核心環節。比較一下用自定義 schema 同內置 spec-driven schema 嘅產出差異:
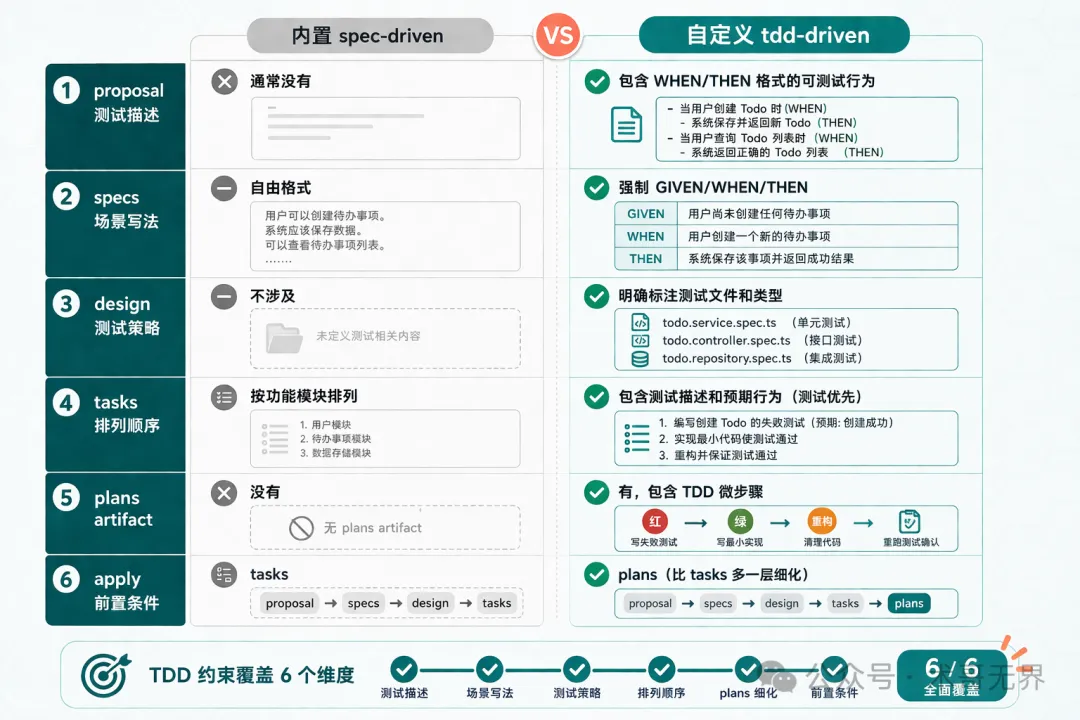
圖 3:內置 spec-driven vs 自定義 tdd-driven 六維度對比
重點看 tasks.md——如果 TDD 約束生效咗,你會見到類似咁嘅結構:
### Task 2: Create TodoStore class

**Test description**: Test TodoStore.create() with valid title

**Expected behavior**: Returns a new Todo with generated UUID, current timestamps, completed=false

**Implementation notes**:
- Create `src/store.ts`
- Export `class TodoStore`
每個 task 都包含測試描述同預期行為,而唔係直接跳到實現細節。對比內置 schema 產出嘅:
### Task 1: 創建 Todo 接口
實現 POST /todos 路由...
分別:前者每一步都先定義測試預期,後者直接寫實現。具體嘅 RED-GREEN-REFACTOR 微步驟喺 plan.md 度展開。
再看 plan.md——呢個係內置 schema 根本唔會生成嘅 artifact。佢將 tasks 進一步拆成詳細嘅 TDD 微步驟,包含完整嘅測試代碼同實現代碼示例:
## Task 2: Create TodoStore with create()

- [ ] **Step 1: Write failing test for TodoStore.create()**
      (附完整測試代碼)

- [ ] **Step 2: Run test to verify it fails**

- [ ] **Step 3: Write minimal TodoStore with create()**
      (附完整實現代碼)

- [ ] **Step 4: Run test to verify it passes**
plan.md 生成時 AI 會自動調用 Superpowers 嘅 writing-plans skill,所以粒度比普通 instruction 生成嘅要細好多——每個 task 都有明確嘅 RED → GREEN 步驟同可運行嘅代碼。
4.3 查看 artifact instructions
想確認 instruction 係咪被正確注入,可以用 CLI 檢查:
# 查看 specs artifact 的完整 instruction
openspec instructions specs --change todo-crud --json
呢個命令會顯示 AI 喺生成 specs 時收到嘅完整指令。輸出應該包含四個部分:
<context>- 來自 config.yaml 嘅項目背景<rules>- 來自 config.yaml 嘅 specs 專屬規則<instruction>- 來自 schema.yaml 嘅 specs instruction<template>- 來自 templates/spec.md 嘅模板骨架
如果你只見到 instruction 但冇 context 同 rules,檢查下 config.yaml 嘅位置係咪正確(必須喺 openspec/ 目錄下面)。
注意:喺驗證中發現
openspec instructions命令輸出咗Rules for 'tasks' must be an array of strings警告。雖然 config.yaml 中 tasks 嘅 rules 確實係數組格式,但個警告可能影響 rules 嘅注入效果。如果發現 tasks 嘅 TDD 約束冇生效,可以嘗試簡化 rules 內容。
驗證點
✅ specs 中嘅 scenario 用 GIVEN/WHEN/THEN 格式 ✅ tasks 中包含測試描述同預期行為 ✅ plans artifact 已生成 ✅ openspec status --change todo-crud 顯示所有 artifact 狀態
5. 第三步:Apply(體驗 TDD 閉環)
頭兩步都係寫文檔同計劃,呢一步係真正寫代碼。
5.1 執行 apply
# 開始按 plan 執行
/opsx:apply todo-crud
注意 apply 嘅 requires 是 plans 而不是 tasks——呢個意味住 plan.md 嘅內容會作為上下文傳入 apply 階段。但 OpenSpec 嘅設計係「依賴係賦能者,唔係門控」,所以就算 plan 未生成,apply 都未必會被阻止。
執行 /opsx:apply todo-crud 後,AI 會加載 superpowers:executing-plans skill,然後按照 plan.md 嘅內容編寫代碼。
5.2 觀察執行行為
喺實際執行中,AI 嘅行為可能同你想像嘅唔一樣。喺驗證中觀察到嘅係:
AI 首先將所有源碼文件同測試文件一次過寫曬(types.ts、store.ts、errorHandler.ts、routes.ts、test/*.test.ts) 然後執行 npm test,部分測試失敗透過 Edit 修復代碼,再執行測試直到全部通過 最後提交代碼
這不是嚴格嘅 TDD RED-GREEN-REFACTOR 循環。AI 冇先寫一個失敗測試、執行確認失敗、再寫最小實現。佢更加似係一次過寫曬再用測試驗證。
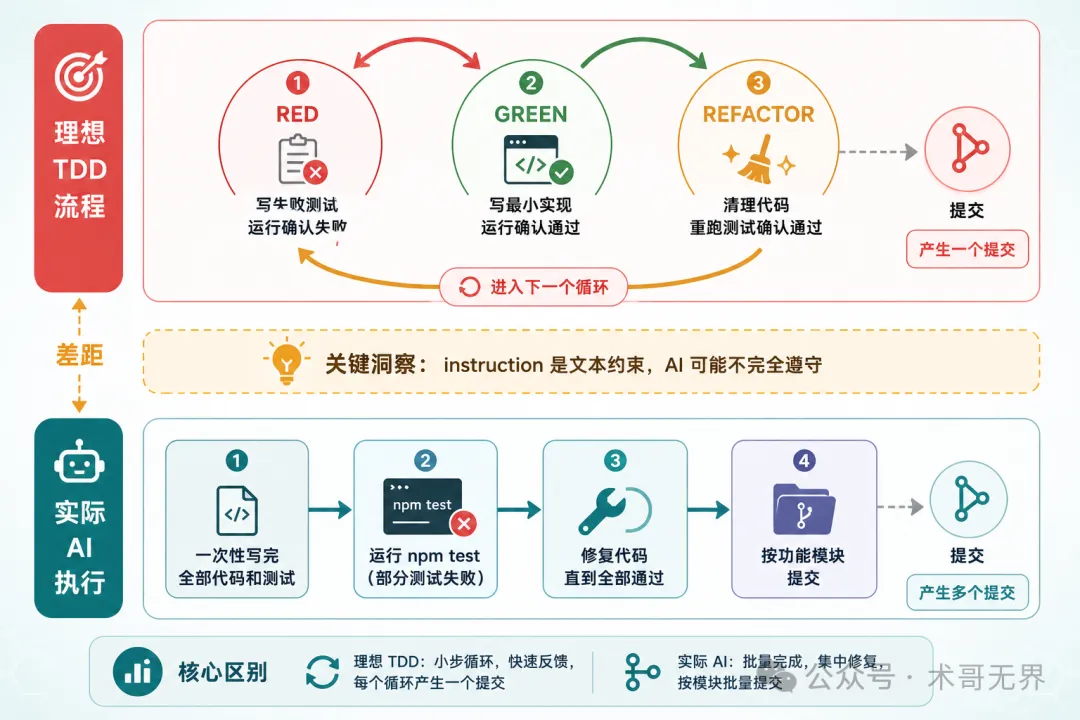
圖 4:理想 TDD RED-GREEN-REFACTOR 循環 vs 實際 AI 線性執行
講真,呢度有個唔可以迴避嘅問題:instruction 係文本指令,唔係硬約束。AI 可能唔遵守。
例如佢可能一口氣將測試同實現寫曬,skip 咗 RED 階段先 run 測試嘅步驟。或者佢可能喺 GREEN 階段寫咗超出最小實現範圍嘅代碼。呢個唔係 bug——係當前 LLM 嘅固有侷限。instruction 嘅約束力取決於模型嘅指令遵循能力。
所以 apply 之後一定要人手檢查。
5.3 中途驗證
# 查看 change 的執行狀態
openspec status --change todo-crud
呢個命令會顯示當前 change 嘅所有 artifact 狀態。
輸出類似:
Change: todo-crud
Schema: tdd-driven
Progress: 5/5 artifacts complete
[x] proposal
[x] design
[x] specs
[x] tasks
[x] plans
呢個係 artifact 級別嘅完成狀態。注意:tasks.md 內部嘅任務進度(例如 checkbox 打勾)取決於 AI 係咪按計劃逐個執行任務——喺驗證中,AI 係一次過寫曬所有代碼嘅,所以呢度睇唔到逐步推進嘅過程。
另外,檢查文件系統嘅變化——確認測試文件確實存在:
# 查看文件創建時間順序
ls -lt src/**/*.ts 2>/dev/null | head -10
仲有一個驗證方式:檢查 git log 嘅提交記錄。
git log --oneline -10
喺驗證中,提交記錄係咁嘅:
feat: add Express server entry point
feat: add global error handler middleware
feat: implement Todo CRUD routes
feat: add in-memory Todo store
feat: add Todo type with timestamps
注意:冇交替嘅 test/feat 提交。AI 按功能模塊提交,測試同實現喺同一個 commit 入面。呢個再次說明 instruction 嘅 TDD 約束冇完全生效。
驗證點
✅ 代碼變更包含測試文件 ✅ 測試文件存在(檢查文件列表) ✅ 所有測試通過 ✅ git log 中有按功能模塊嘅提交記錄
6. 故障排除
6.1 問題 1:AI skip 咗 TDD 步驟
現象:apply 完成後,發現測試同實現係同時寫嘅,或者根本冇測試。
原因:instruction 係文本提示,唔係硬性約束。模型可能忽略。
實測案例:喺驗證 Todo CRUD 嘅過程中,AI 一次過寫曬所有源碼(types.ts、store.ts、errorHandler.ts、routes.ts)同所有測試(store.test.ts、routes.test.ts),然後先執行 npm test。冇 RED→GREEN→REFACTOR 循環。最終結果係測試全部通過,但執行路徑唔係嚴格嘅 TDD。
解決思路:
在 config.yaml的rules度加更具體嘅規則,例如Never create a .ts file without a corresponding .test.ts file將 tasks 拆得更細,每個 task 只包含一個 RED 或 GREEN 步驟 喺 apply 嘅 instruction 度加更強嘅措辭,例如 STOP if no failing test exists before writing production code
6.2 問題 2:plans artifact 太長或者被截斷
現象:plan.md 生成後內容唔完整。
原因:複雜嘅 change 可能產生大量微步驟,超出模型嘅輸出長度限制。
解決思路:
喺 plans 嘅 instruction 度加限制: Maximum 15 micro-tasks per plan. Split into multiple phases if needed.喺 proposal 階段就將 change 嘅範圍收窄
6.3 問題 3:PRECHECK 失敗
現象:plans artifact 嘅 instruction 入面有 PRECHECK 檢測 Superpowers skill,如果 skill 唔存在會 STOP。
原因:Superpowers 插件冇裝或者版本唔匹配。
解決思路:
喺 Claude Code 度執行 /superpowers確認 skill 列表中有writing-plans如果唔想依賴 Superpowers,將 plans 嘅 instruction 入面嘅 PRECHECK 同 skill 引用刪走,改用純文字指令
6.4 問題 4:唔想依賴 Superpowers,只用純 instruction
現象:你冇安裝 Superpowers,或者想用其他 AI 編碼工具(Cursor、Codex 等)。
解決思路:
把 plans artifact 嘅 instruction 入面嘅 PRECHECK 行刪走,將 superpowers:writing-plans 嘅引用都刪走。改成純文字嘅 TDD 指令就夠。schema.yaml 入面嘅 instruction 本身就係純文字,唔依賴任何插件。OpenSpec 官方支援 25+ 種 AI 編碼工具,schema 機制喺所有平台都通用。
呢個都係 OpenSpec 自定義 schema 嘅設計初衷:instruction 係純文字,任何 LLM 都讀得明。Superpowers 只係提供咗更精細嘅 TDD 微步驟方法論,你可以按需要取捨。
7. 完整文件清單
openspec/
├── config.yaml                          # 項目配置
└── schemas/
    └── tdd-driven/
        ├── schema.yaml                  # 核心:artifact DAG + instruction
        └── templates/
            ├── proposal.md
            ├── spec.md
            ├── design.md
            ├── tasks.md
            └── plan.md
總結
方案結論:Propose 有效,Apply 嘅 TDD 循環未生效
用 Todo CRUD 應用做咗完整驗證,結論如下:
| Propose(規劃階段) | writing-plans skill 生成 1098 行詳細計劃 | |
| Apply(執行階段) | npm test,冇 RED→GREEN→REFACTOR 循環,git log 中冇交替嘅 test/feat 提交 |
結論:呢個方案喺規劃階段係有效嘅——自定義 schema 透過 instruction 字段確實影響咗 AI 產出 artifact 嘅內容同格式,令 specs、tasks、plans 都帶上咗 TDD 痕跡。但一到執行階段,instruction 係文本提示而非硬約束,AI 仍然會按自己嘅節奏寫代碼,唔會嚴格遵守 TDD 紅綠重構循環。
幾時值得用
✅ 想令 AI 寫出更規範嘅 spec 同 tasks:有效。instruction 能顯著改善 propose 階段嘅產出質量 ✅ 想幫團隊統一 artifact 嘅輸出格式:有效。WHEN/THEN、測試描述等格式約束可以穩定注入 ✅ 想用 OpenSpec 管理複雜項目嘅變更流程:有效。五個 artifact 嘅 DAG 治理本身就有價值 ❌ 想強制 AI 按 TDD 嚴格循環執行代碼:無效。instruction 約束唔到 apply 階段嘅代碼編寫次序
方案嘅本質
OpenSpec 負責「做啲乜」(artifact 治理),Superpowers 負責「點樣做」(執行技能)。兩者透過 instruction 字段橋接——唔需要改任何一方嘅源碼。
三個注入點分工明確:
instruction(schema.yaml):每個 artifact 嘅專屬指令,嵌入 TDD 紅綠重構循環 rules(config.yaml):針對特定 artifact 嘅附加規則 context(config.yaml):所有 artifact 共享嘅項目背景
呢個橋接機制本身係通嘅,價值亦實在。只係唔好指望佢喺執行階段可以強制 AI 嘅編碼行為——嗰啲係 LLM 指令遵循能力嘅邊界,唔係 schema 設計嘅問題。
你喺項目中用過類似嘅方案嗎?例如用自定義 schema 約束 AI 嘅編碼行為?歡迎喺評論區傾下。
好啦,多謝你睇我篇文章,如果鍾意可以點讚轉發畀需要嘅朋友,我哋下一期再見!敬請期待!
掃碼關注,獲取更多 AI 工具嘅實戰經驗同最佳實踐。唔好錯過每一篇乾貨!

🚩 2026 年「術哥無界」系列實戰文檔 X 篇原創計劃 第 102 篇,AI 編程最佳實戰「2026」系列第 27
大家好,歡迎來到 術哥無界 | ShugeX | 運維有術。
我是術哥,一名專注於 AI 編程、AI 智能體、Agent Skills、MCP、雲原生、AIOps、Milvus 向量數據庫的技術實踐者與開源佈道者!
Talk is cheap, let's explore。無界探索,有術而行。
圖 1:OpenSpec Schema + Superpowers TDD 工作流示意圖
讀完後你會拿到一個完整的 schema.yaml,把它放進項目裏,AI 就會在 propose 階段按 TDD 思路寫 spec,在 apply 階段按 plan-driven 流程執行——不用手動編排,不用在兩個工具之間來回切換。
先說結論:這個方案在規劃階段(propose)是有效的——自定義 schema 通過 instruction 字段確實改變了 AI 產出 specs、tasks、plans 的內容和格式。但在執行階段(apply),instruction 是文本提示不是硬約束,AI 不會嚴格遵守 TDD 的紅綠重構循環。所以這篇文章的定位是:教你用 OpenSpec 的自定義 schema 機制改善 AI 編碼工作流的規劃質量,而不是強制 AI 的編碼行為。
說明:本文內容基於 OpenSpec 源碼(Fission-AI/OpenSpec)、Superpowers 源碼(obra/superpowers)和實際操作驗證分析整理而成。實測已完成 propose 和 apply 的完整流程,但 AI 執行路徑並非嚴格的 TDD 循環。文中的配置模板和參數建議僅供參考,實際效果請以你的業務數據和環境測試結果為準。如果有實際使用經驗,歡迎在評論區分享交流。
順便提一嘴,這次實測跑的是 MiniMax 2.7 模型。說實話整體效果跟 GLM 5.1 還是有差距的,尤其是 apply 階段的指令遵循能力,GLM 明顯更聽話。但 MiniMax 勝在性價比,日常可以湊活用,算是買不到 GLM 時的平替。感興趣可以通過 https://platform.minimaxi.com/subscribe/token-plan?code=8nzRbxE4m1&source=link 購買,比官網直購便宜10%。(如果想幹大活、重活,就不要考慮了)
下面一步步來。
1. 你將完成什麼
✅ 創建一個自定義 OpenSpec schema,在 artifact 生成階段嵌入 TDD 規範 ✅ 用這個 schema propose 一個 change,觀察 AI 如何按 TDD 思路產出 spec 和 tasks ✅ 執行 apply,體驗從 spec 到測試到實現的完整閉環 ✅ 理解 OpenSpec 的 instruction/rules 注入機制
2. 環境準備
2.1 你需要準備
Claude Code(已安裝 Superpowers 插件,可選) OpenSpec CLI(1.3.1+) Node.js 18+ 一個空項目目錄
關於 Superpowers:它是可選依賴。本文的
plansartifact 會調用 Superpowers 的writing-plansskill 來生成更細粒度的 TDD 微步驟,但如果你不裝 Superpowers,其他 artifact 仍然能正常工作——只是 plan 的粒度會粗一些。具體取捨看後面"故障排除"的分析。
2.2 安裝 OpenSpec
# 全局安裝 OpenSpec CLI
npm install -g openspec

# 確認版本
openspec --version
輸出應該是純數字,如 1.3.1 或更高。
2.3 安裝 Superpowers(可選)
在 Claude Code 中安裝 Superpowers 插件,然後執行 /reload-plugins 刷新。
安裝完成後,在 Claude Code 裏輸入 /superpowers,如果能看到 skill 列表就說明安裝成功。
2.4 預計時間
⏱️ 完成本實戰大約需要 30 分鐘
2.5 難度等級
⭐⭐ 中級 - 需要了解 YAML 配置和基本的 CLI 操作
3. 第一步:創建自定義 Schema
為什麼要自定義?OpenSpec 內置的 spec-driven schema 只管寫什麼文檔,不管按什麼紀律寫代碼。它的 proposal → specs → design → tasks 流程裏沒有任何 TDD 約束——AI 完全可能先寫實現再補測試,甚至跳過測試。
我們的目標:用 instruction 字段告訴 AI,每個 artifact 都要體現 TDD 思路。
3.1 創建 schema 目錄
# 在項目根目錄下創建 tdd-driven schema 的目錄結構
mkdir -p openspec/schemas/tdd-driven/templates
3.2 編寫 schema.yaml(全文核心)
這是整篇文章最重要的文件。先搞清楚三個注入點的分工,再逐字段看 schema.yaml 的結構。
三個核心注入點:
instruction | |||
rules | rules.specs 隻影響 specs) | ||
context |
注入的疊加順序是 context → rules → instruction → template。也就是說,AI 收到的 prompt 裏先有項目背景,再有針對當前 artifact 的規則,再有 schema 裏的指令,最後是模板骨架。四層疊加,越靠後越具體。
圖 2:context → rules → instruction → template 四層疊加機制
關鍵設計決策:
artifacts 保持 4 個基礎節點(proposal → specs → design → tasks),但每個的 instruction都嵌入了 TDD 指引新增 plansartifact(依賴 tasks),用於創建 TDD 微步驟計劃apply 階段的 requires包含 plans,確保 plan 就緒後才開始實現apply 的 instruction引用executing-plans規範,讓 AI 按 plan 執行
這裏有個容易搞混的點:依賴是賦能者,不是門控。OpenSpec 的 DAG 依賴不會阻止你跳步。requires: [proposal] 的意思是 proposal 的內容會作為上下文傳入,不是 proposal 不存在就不讓跑。
完整 schema.yaml:
name: tdd-driven
version:1
description:Spec-drivenworkflowwithTDDdisciplineembeddedateveryartifactstage

artifacts:
-id:proposal
    generates:proposal.md
    description:Initialchangeproposal
    template:proposal.md
    instruction:|
      Create a proposal that explains WHY this change is needed.
      Focus on the problem, not the solution.

      TDD REQUIREMENT:
      -Identifytestablebehaviorsthischangewillintroduce
      -ListacceptancecriteriainWHEN/THENformat
      -DoNOTdescribeimplementationdetails
    requires:[]

-id:specs
    generates:specs/**/*.md
    description:Behavioralspecificationsforthechange
    template:spec.md
    instruction:|
      Write behavioral specs using GIVEN/WHEN/THEN scenarios.

      TDD REQUIREMENT:
      -Eachscenariomustbeindependentlytestable
      -Expressexpectedbehavior,notimplementation
      -Cover:happypath,edgecases,errorcases
      -Referenceexistingpatternsbeforecreatingnewones
    requires:
      -proposal

-id:design
    generates:design.md
    description:Technicaldesigndocument
    template:design.md
    instruction:|
      Create a technical design explaining HOW to implement.

      TDD REQUIREMENT:
      -Identifytestfilesthatneedtobecreatedormodified
      -Specifyteststrategy(unit,integration,e2e)
      -Designmustsupportincrementaltesting
    requires:
      -proposal

-id:tasks
    generates:tasks.md
    description:ImplementationchecklistwithTDDordering
    template:tasks.md
    instruction:|
      Break work into tasks following TDD order:
      1. Write failing test
      2. Write minimal implementation to pass
      3. Refactor
      4. Commit

      Each task must include:
      -Testdescription(whattotest)
      -Expectedbehavior(whatshouldhappen)
      -Implementationnotes(minimalcodetopass)
    requires:
      -specs
      -design

-id:plans
    generates:plan.md
    description:DetailedexecutionplanwithTDDmicro-steps
    template:plan.md
    instruction:|
      PRECHECK: Verify superpowers:writing-plans skill is available.
      If not available, STOP and report the missing skill.

      Createadetailedexecutionplanusing2-5minutemicro-tasks.
      Each task must follow the RED-GREEN-REFACTOR cycle:

      RED phase:
      -Writeaspecificfailingtest
      -Runittoconfirmfailure

      GREEN phase:
      -Writeminimalcodetomaketestpass
      -Runtesttoconfirmpass

      REFACTOR phase:
      -Cleanupwithoutchangingbehavior
      -Re-runteststoconfirmstillpassing

      EnforceYAGNI(YouAren'tGonnaNeedIt)andDRYprinciples.
    requires:
      -tasks

apply:
requires:[plans]
tracks:tasks.md
instruction:|
    Execute the plan following TDD discipline:

    1. For each task in plan.md:
       a. RED:Writefailingtestfirst
       b. GREEN:Writeminimalimplementation
       c. REFACTOR:Cleanupcode
       d.Runfulltestsuitetoconfirmnoregressions
       e.Commitwithdescriptivemessage

    2. After all tasks complete:
       a.Runfulltestsuite
       b.Verifyallspecsaresatisfied
       c.CheckforanyTODOmarkersleftbehind

    Rules:
    -Neverwriteproductioncodewithoutafailingtest
    -NeverskiptheREDphase
    -CommitaftereachGREENphase
3.3 創建模板文件
templates/ 目錄下需要為每個 artifact 提供模板骨架。模板的作用是給 AI 一個輸出格式的起點——模板內容會作為 <template> 注入到 prompt 的最後一層。
# 創建模板文件
touch openspec/schemas/tdd-driven/templates/proposal.md
touch openspec/schemas/tdd-driven/templates/spec.md
touch openspec/schemas/tdd-driven/templates/design.md
touch openspec/schemas/tdd-driven/templates/tasks.md
touch openspec/schemas/tdd-driven/templates/plan.md
模板文件不需要太多內容,AI 會根據 instruction 填充。但給一個好的骨架能讓 AI 的輸出更穩定、格式更一致。
proposal.md 模板:
# Proposal

## Problem
<!-- 描述要解決的問題 -->

## Testable Behaviors
<!-- WHEN/THEN 格式列出可測試行為 -->

## Acceptance Criteria
<!-- 驗收標準 -->
tasks.md 模板:
# Tasks

## TDD Task List

<!-- AI will populate tasks following RED-GREEN-REFACTOR order -->

### Task 1: [AI fills]
- [ ] RED: [test description]
- [ ] GREEN: [implementation notes]
- [ ] REFACTOR: [cleanup notes]
- [ ] Commit
plan.md 模板:
# Execution Plan

## Micro-tasks (2-5 min each)

### Phase 1: [AI fills]
- [ ] RED: ...
- [ ] GREEN: ...
- [ ] REFACTOR: ...
模板是純文本,OpenSpec 不做變量插值。AI 會根據 instruction 自動填充內容,所以用 HTML 註釋作為佔位提示就夠了。
3.4 配置 project config
創建 openspec/config.yaml,讓項目默認使用 tdd-driven schema:
schema: tdd-driven

context:|
  Tech stack: TypeScript, Node.js, Jest
  Testing framework: Jest
  API style: RESTful
  All new code must have corresponding tests.

rules:
proposal:
    -Includetestableacceptancecriteria
    -UseWHEN/THENformatforexpectedbehaviors
specs:
    -UseGIVEN/WHEN/THENformat
    -Eachscenariomustbeindependentlytestable
    -Referenceexistingpatternsbeforeinventingnewones
tasks:
    -Order tasks by TDD cycle:test→implement→refactor
    -Eachtaskmusthaveatestdescription
plans:
    -Breakeachtaskinto2-5minutemicro-steps
    -Everystepmustproduceatestableoutcome
注意 context 和 rules 的分工:
context:所有 artifact 共享的信息(技術棧、測試框架等) rules:只注入到匹配 id 的 artifact(比如 rules.specs只出現在 specs 的 prompt 裏)
注入順序是 context → rules → instruction → template,四層疊加。
3.5 初始化項目
# 初始化 OpenSpec(--tools 參數配置 AI 工具適配,按需選擇)
openspec init --tools claude
--tools 參數需要傳值:all 配置全部工具,claude 只配置 Claude Code,也可以傳逗號分隔的列表如 claude,cursor。
驗證點
提示:
schema系列命令目前是實驗性功能,執行時會顯示Note: Schema commands are experimental and may change.提示,這是正常的。
# 檢查 schema 文件是否存在
openspec schema which tdd-driven

# 驗證 schema 語法
openspec schema validate tdd-driven

# 檢查項目狀態
openspec status
✅ schema.yaml 存在且語法正確 ✅ 模板文件齊全(5 個) ✅ config.yaml 指向 tdd-driven schema ✅ openspec status 不報錯
到這裏,骨架搭好了。接下來讓它跑起來。
4. 第二步:Propose 一個 Change
用一個從零開始的示例來驗證 TDD 約束是否生效。我們來創建一個 Todo CRUD 應用——支持創建、查看、完成、刪除待辦事項。
4.1 執行 propose
# 創建新 change
/opsx:propose todo-crud
執行後,AI 會根據 change 名稱自動推斷需求,按 DAG 依賴順序依次生成所有 artifact——不需要手動描述需求,不需要逐步確認。
它會自動完成以下步驟:
調用 openspec new change創建 change 目錄按依賴順序讀取每個 artifact 的 instruction 依次生成 proposal → design → specs → tasks → plans plans 生成時會自動調用 Superpowers 的 writing-plansskill
整個過程大約 2-5 分鐘,完成後你會看到 5 個文件出現在 openspec/changes/todo-crud/ 目錄下。
4.2 觀察關鍵差異
這是驗證自定義 schema 是否生效的核心環節。對比一下用自定義 schema 和內置 spec-driven schema 的產出差異:
圖 3:內置 spec-driven vs 自定義 tdd-driven 六維度對比
重點看 tasks.md——如果 TDD 約束生效了,你會看到類似這樣的結構:
### Task 2: Create TodoStore class

**Test description**: Test TodoStore.create() with valid title

**Expected behavior**: Returns a new Todo with generated UUID, current timestamps, completed=false

**Implementation notes**:
- Create `src/store.ts`
- Export `class TodoStore`
每個 task 都包含測試描述和預期行為,而不是直接跳到實現細節。對比內置 schema 產出的:
### Task 1: 創建 Todo 接口
實現 POST /todos 路由...
區別:前者每步都先定義測試預期,後者直接寫實現。具體的 RED-GREEN-REFACTOR 微步驟在 plan.md 中展開。
再看 plan.md——這是內置 schema 根本不會生成的 artifact。它把 tasks 進一步拆成詳細的 TDD 微步驟,包含完整的測試代碼和實現代碼示例:
## Task 2: Create TodoStore with create()

- [ ] **Step 1: Write failing test for TodoStore.create()**
      (附完整測試代碼)

- [ ] **Step 2: Run test to verify it fails**

- [ ] **Step 3: Write minimal TodoStore with create()**
      (附完整實現代碼)

- [ ] **Step 4: Run test to verify it passes**
plan.md 生成時 AI 會自動調用 Superpowers 的 writing-plans skill,所以粒度比普通 instruction 生成的要細得多——每個 task 都有明確的 RED → GREEN 步驟和可運行的代碼。
4.3 查看 artifact instructions
想確認 instruction 是否被正確注入,可以用 CLI 檢查:
# 查看 specs artifact 的完整 instruction
openspec instructions specs --change todo-crud --json
這個命令會顯示 AI 在生成 specs 時收到的完整指令。輸出應該包含四個部分:
<context>- 來自 config.yaml 的項目背景<rules>- 來自 config.yaml 的 specs 專屬規則<instruction>- 來自 schema.yaml 的 specs instruction<template>- 來自 templates/spec.md 的模板骨架
如果你只看到 instruction 但沒看到 context 和 rules,檢查一下 config.yaml 的位置是否正確(必須在 openspec/ 目錄下)。
注意:在驗證中發現
openspec instructions命令輸出了Rules for 'tasks' must be an array of strings警告。雖然 config.yaml 中 tasks 的 rules 確實是數組格式,但該警告可能影響 rules 的注入效果。如果發現 tasks 的 TDD 約束沒有生效,可以嘗試簡化 rules 內容。
驗證點
✅ specs 中的 scenario 使用 GIVEN/WHEN/THEN 格式 ✅ tasks 中包含測試描述和預期行為 ✅ plans artifact 已生成 ✅ openspec status --change todo-crud 顯示所有 artifact 狀態
5. 第三步:Apply(體驗 TDD 閉環)
前兩步都是在寫文檔和計劃,這一步是真正寫代碼。
5.1 執行 apply
# 開始按 plan 執行
/opsx:apply todo-crud
注意 apply 的 requires 是 plans 而不是 tasks——這意味着 plan.md 的內容會作為上下文傳入 apply 階段。但 OpenSpec 的設計是"依賴是賦能者,不是門控",所以即使 plan 沒生成,apply 也不一定會被阻止。
執行 /opsx:apply todo-crud 後,AI 會加載 superpowers:executing-plans skill,然後按照 plan.md 的內容編寫代碼。
5.2 觀察執行行為
在實際執行中,AI 的行為可能和你想的不一樣。在驗證中觀察到的是:
AI 先把所有源碼文件和測試文件一次性寫完(types.ts、store.ts、errorHandler.ts、routes.ts、test/*.test.ts) 然後運行 npm test,部分測試失敗通過 Edit 修復代碼,再運行測試直到全部通過 最後提交代碼
這不是嚴格的 TDD RED-GREEN-REFACTOR 循環。AI 沒有先寫一個失敗測試、運行確認失敗、再寫最小實現。它更像是一次性寫完再用測試驗證。
圖 4:理想 TDD RED-GREEN-REFACTOR 循環 vs 實際 AI 線性執行
說實話,這裏有個不能迴避的問題:instruction 是文本指令,不是硬約束。AI 可能不遵守。
比如它可能一口氣把測試和實現全寫了,跳過了 RED 階段先跑測試的步驟。或者它可能在 GREEN 階段寫了超出最小實現範圍的代碼。這不是 bug——這是當前 LLM 的固有侷限。instruction 的約束力取決於模型的指令遵循能力。
所以 apply 之後一定要人工檢查。
5.3 中途驗證
# 查看 change 的執行狀態
openspec status --change todo-crud
這個命令會顯示當前 change 的所有 artifact 狀態。
輸出類似:
Change: todo-crud
Schema: tdd-driven
Progress: 5/5 artifacts complete
[x] proposal
[x] design
[x] specs
[x] tasks
[x] plans
這是 artifact 級別的完成狀態。注意:tasks.md 內部的任務進度(如 checkbox 勾選)取決於 AI 是否按計劃逐個執行任務——在驗證中,AI 是一次性寫完所有代碼的,所以這裏看不到逐步推進的過程。
另外,檢查文件系統的變化——確認測試文件確實存在:
# 查看文件創建時間順序
ls -lt src/**/*.ts 2>/dev/null | head -10
還有一個驗證方式:檢查 git log 的提交記錄。
git log --oneline -10
在驗證中,提交記錄是這樣的:
feat: add Express server entry point
feat: add global error handler middleware
feat: implement Todo CRUD routes
feat: add in-memory Todo store
feat: add Todo type with timestamps
注意:沒有交替的 test/feat 提交。AI 按功能模塊提交,測試和實現在同一個 commit 中。這再次說明 instruction 的 TDD 約束沒有完全生效。
驗證點
✅ 代碼變更包含測試文件 ✅ 測試文件存在(檢查文件列表) ✅ 所有測試通過 ✅ git log 中有按功能模塊的提交記錄
6. 故障排除
6.1 問題 1:AI 跳過了 TDD 步驟
現象:apply 完成後,發現測試和實現是同時寫的,或者根本沒有測試。
原因:instruction 是文本提示,不是硬性約束。模型可能忽略。
實測案例:在驗證 Todo CRUD 的過程中,AI 一次性寫完了所有源碼(types.ts、store.ts、errorHandler.ts、routes.ts)和所有測試(store.test.ts、routes.test.ts),然後才運行 npm test。沒有 RED→GREEN→REFACTOR 循環。最終結果是測試全部通過,但執行路徑不是嚴格的 TDD。
解決思路:
在 config.yaml的rules里加更具體的規則,比如Never create a .ts file without a corresponding .test.ts file把 tasks 拆得更細,每個 task 只包含一個 RED 或 GREEN 步驟 在 apply 的 instruction 里加更強的措辭,比如 STOP if no failing test exists before writing production code
6.2 問題 2:plans artifact 太長或被截斷
現象:plan.md 生成後內容不完整。
原因:複雜的 change 可能產生大量微步驟,超出模型的輸出長度限制。
解決思路:
在 plans 的 instruction 里加限制: Maximum 15 micro-tasks per plan. Split into multiple phases if needed.在 proposal 階段就把 change 的範圍收窄
6.3 問題 3:PRECHECK 失敗
現象:plans artifact 的 instruction 裏有 PRECHECK 檢測 Superpowers skill,如果 skill 不存在會 STOP。
原因:Superpowers 插件沒裝或者版本不匹配。
解決思路:
在 Claude Code 裏執行 /superpowers確認 skill 列表中有writing-plans如果不想依賴 Superpowers,把 plans 的 instruction 裏的 PRECHECK 和 skill 引用刪掉,改用純文本指令
6.4 問題 4:不想依賴 Superpowers,只用純 instruction
現象:你沒有安裝 Superpowers,或者想用其他 AI 編碼工具(Cursor、Codex 等)。
解決思路:
把 plans artifact 的 instruction 裏的 PRECHECK 行刪掉,把 superpowers:writing-plans 的引用也刪掉。改成純文本的 TDD 指令就夠了。schema.yaml 裏的 instruction 本身就是純文本,不依賴任何插件。OpenSpec 官方支持 25+ 種 AI 編碼工具,schema 機制在所有平台上都通用。
這也是 OpenSpec 自定義 schema 的設計初衷:instruction 是純文本,任何 LLM 都能讀懂。Superpowers 只是提供了更精細的 TDD 微步驟方法論,你可以按需取捨。
7. 完整文件清單
openspec/
├── config.yaml                          # 項目配置
└── schemas/
    └── tdd-driven/
        ├── schema.yaml                  # 核心:artifact DAG + instruction
        └── templates/
            ├── proposal.md
            ├── spec.md
            ├── design.md
            ├── tasks.md
            └── plan.md
總結
方案結論:Propose 有效,Apply 的 TDD 循環未生效
用 Todo CRUD 應用做了完整驗證,結論如下:
| Propose(規劃階段) | writing-plans skill 生成 1098 行詳細計劃 | |
| Apply(執行階段) | npm test,沒有 RED→GREEN→REFACTOR 循環,git log 中沒有交替的 test/feat 提交 |
結論:這個方案在規劃階段是有效的——自定義 schema 通過 instruction 字段確實影響了 AI 產出 artifact 的內容和格式,讓 specs、tasks、plans 都帶上了 TDD 痕跡。但到了執行階段,instruction 是文本提示而非硬約束,AI 仍然會按自己的節奏寫代碼,不會嚴格遵守 TDD 紅綠重構循環。
什麼時候值得用
✅ 想讓 AI 寫出更規範的 spec 和 tasks:有效。instruction 能顯著改善 propose 階段的產出質量 ✅ 想給團隊統一 artifact 的輸出格式:有效。WHEN/THEN、測試描述等格式約束可以穩定注入 ✅ 想用 OpenSpec 管理複雜項目的變更流程:有效。五個 artifact 的 DAG 治理本身就有價值 ❌ 想強制 AI 按 TDD 嚴格循環執行代碼:無效。instruction 約束不了 apply 階段的代碼編寫順序
方案的本質
OpenSpec 負責"做什麼"(artifact 治理),Superpowers 負責"怎麼做"(執行技能)。兩者通過 instruction 字段橋接——不需要改任何一方的源碼。
三個注入點分工明確:
instruction(schema.yaml):每個 artifact 的專屬指令,嵌入 TDD 紅綠重構循環 rules(config.yaml):針對特定 artifact 的附加規則 context(config.yaml):所有 artifact 共享的項目背景
這個橋接機制本身是通的,價值也實在。只是別指望它能在執行階段強制 AI 的編碼行為——那是 LLM 指令遵循能力的邊界,不是 schema 設計的問題。
你在項目中用過類似的方案嗎?比如用自定義 schema 約束 AI 的編碼行為?歡迎在評論區聊聊。
好啦,謝謝你觀看我的文章,如果喜歡可以點贊轉發給需要的朋友,我們下一期再見!敬請期待!
掃碼關注,獲取更多 AI 工具的實戰經驗和最佳實踐。不錯過每一篇乾貨!