OpenSepc新版本新提升
整理版優先睇
小夥伴們大家好,我是小溪,見字如面。OpenSpec升級到了1.x版本,玩了2天發現相對於老版本來說還是有不小變動的,不僅提供了更靈活的協同工作流程,還支持了自定義工作流模式。習慣使用老版本和對老版本OpenSpec還不瞭解的小夥伴也可以往期內容:初識OpenSpec當前使用版本openspec 1.2.0優勢輕量化、靈活性和可擴展性進一步提高向下兼容,舊版變更可以使用 OPSX 命令繼續,製品結構是兼容的新增Skills技能調用方式更節省tokens提供更細粒度的擴展命令協同工作流程OpenSepc新版本協同工作流程如下:如何使用?需要 Node.js 20.19.0 或更高版本首先更新OpenSpec至最新版本,在命令行終端輸入如下命令:$ npm install -g @fission-ai/openspec@latest更新完成後,新項目直接進入項目根目錄進行初始化$ cd your-project$ openspec init舊項目也是可以用的,作者建議使用新版本命令,可以直接進入項目根目錄進行更新$ cd your-project$ openspec update想了解更多OpenSpec內容,但又看不太習慣英文的小夥伴,可以看OpenSpec社區中文版本,Github倉庫地址:https://github.com/studyzy/OpenSpec-cn,這裏給好心人點個贊基本使用命令行指令OpenSpec擴展了新的命令行指令,在命令行終端輸入 openspec -h 可以查看完整的命令行幫助文檔,這裏只列舉新增的功能,對已存在的指令還不瞭解的小夥伴可以看往期內容:初識OpenSpecconfig:查看並修改全局OpenSpec配置schema:管理工作流程模式feedback:提交OpenSpec反饋completion:管理OpenSpec CLI的Shell補全generate:生成Shell補全腳本install:安裝Shell補全腳本uninstall:卸載Shell補全腳本status:顯示變更的製品完成狀態instructions:輸出用於創建制品或執行任務的增強指引templates:顯示 Schema 中所有制品的解析後模板路徑schemas:列出可用的工作流 Schema 及其描述new:創建一個新的變更OpenSpec新增了CLI Shell自動補管理,我們只需要在命令行終端執行下面命令就會自動安裝$ openspec completion install安裝完成後重啓命令行終端,輸入 openspec comp 按下【Tab】快捷鍵就可以看到命令的自動補全效果了自定義命令和SkillsOpenSpec新版本提供了一套以 /opsx: 前綴的自定義命令 和 以 openspec- 為前綴的SkillsOpenSpec默認提供了4個自定義命令:/opsx:explore:深入思考想法、調查問題、明確需求,用於需求前的頭腦風暴/opsx:propose:開始一個新變更,會一次性生成所有規劃階段的製品如 proposal、specs、design、tasks/opsx:apply:實施變更中的任務,AI 會根據 tasks.md 中的任務清單逐一實現功能/opsx:archive:歸檔已完成的變更,會把整個變更文件夾移入存檔並將增量規範合併到主規範庫除了這套核心命令,OpenSpec還提供了一套更細粒度的擴展命令,需要通過 openspec config命令配置進行開啓。開啓需要在命令行終端輸入 以下命令:$ openspec config profileDelivery:在哪裏安裝工作流,比如在 Skills、CommandsWorkflows:工作流中哪些設計指令是可用的,比如 /opsx:explore、/opsx:new可以靈活選擇配置方式,這裏我選擇【Delivery and workflows】兩者都配置,接下來會先配置Delivery,選擇Both同時生成Skills和Commands然後配置Workflows使用【Space】快捷鍵選中需要的命令最後輸入【Y】確認更新完成後就可以看到更新後的全部配置了OpenSpec其他自定義命令:/opsx:new:開始一個新變更,只創建一個空的變更目錄/opsx:continue:基於依賴關係創建下一個製品,就是一步步創建 proposal、specs、design、tasks/opsx:ff:Fast-Forward 快速一次性創建所有規劃製品 proposal、specs、design、tasks/opsx:verify:校驗實現是否與製品匹配/opsx:sync:將增量規範合併到主規範中,通常不需要手動執行/opsx:bulk-archive:批量歸檔多個變更/opsx:onboard:完整的 OpenSpec 工作流引導教程OpenSpec目錄結構OpenSpec新版本目錄結構也發生了變化,移除了 project.md 和 AGENTS.mdopenspec/├── config.yaml # 新增,項目上下文和規則配置├── project.md # 已移除,項目規範約定├── AGENTS.md # 已移除,為Agent提供的OpenSpec使用說明,├── specs/ # 源規範目錄,每次變更歸檔後會合併到這裏│ ├── spec.md # 源需求和場景規範│ └── design.md # 源技術模式├── changes/ # 提案變更目錄│ ├── [change-name]/ # 單個提案變更│ │ ├── proposal.md # 為什麼,什麼,影響│ │ ├── tasks.md # 實施檢查清單│ │ ├── design.md # 技術決策(可選;見標準)│ │ └── specs/ # 增量變更規範│ │ └── [capability]/│ │ └── spec.md # ADDED/MODIFIED/REMOVED│ └── archive/ # 已完成的提案變更項目初始化使用OpenSpec新版本初始化項目,首先在命令行終端進入到項目根目錄,執行 openspec init,使用【space】快捷鍵選擇自己使用的AI工具確認配置後回車使用IDE打開可以看到如下目錄結構,在 commands/ 目錄下創建了 opsx/ 命令集,在 skills/ 目錄下創建了對應的技能,同時創建了openspec 配置目錄創建變更提案OpenSpec新版本創建變更提案的命令和老版本沒有太大差異,只是做了命令的變更,新版本可以使用 /opsx:propose 需求描述創建 創建變更,也可以使用 /opsx:new 需求描述創建創建變更,甚至可以通過自然語言使用Skills能力創建變更提案創建一個登錄授權功能提案這裏以新版本提供的 /opsx:new 命令為例,記錄一下創建變更提案的流程。首先使用下面命令創建一個變更提案:/opsx:new 創建一個登錄授權功能可以OpenSpec只創建了變更目錄 add-login-auth 和 .openspec.yaml文件並沒有創建我們之前所熟悉的 proposal.md、specs/[capability]/spec.md、design.md 和 tasks.md要創建上面所需的配置文件,我們需要再次執行 /opsx:continue 命令,到這一步OpenSpec才真正開始創建變更提案內容,與AI確定好問題邊界後提交執行完成後,可以看到此時才創建了 add-login-auth/proposal.md相當於單步執行檢查提案沒有問題後再次執行 /opsx:continue 會繼續生成 add-login-auth/design.md待 proposal.md、design.md、tasks.md 都生成後,再次 /opsx:continue OpenSpec會檢查artifacts狀態,告訴我們下一步該執行的操作當然也可以創建提案後直接執行 /opsx:ff,一步完成所有artifacts工作,到這裏變更提案階段就算完成了,下一步就可以實施任務了。實施任務與歸檔實施任務、歸檔操作和舊版本也沒有太大變化,只是將命令調整為了 /opsx:apply 和 /opsx:archive,歸檔後的文件目錄和舊版本也基本是保持一致的自定義項目配置OpenSpec提供了 項目配置、自定義模式、全局覆蓋 3個 級別的自定義:項目配置:針對項目生效,位於 openspec/schemas/,支持設置默認值,注入上下文/規則,適合大多數團隊自定義模式:定義自己的工作流製品,適合有獨特流程的團隊全局模式:針對所有項目生效,位於 ~/.local/share/openspec/schemas/,在所有項目間共享模式,適用於高級用戶項目配置在移除 project.md 和 agent.md 後,OpenSpec新版本中新增了 openspec/config.yaml 文件承擔了部分原本由這些文件負責的“項目常識”管理功能。openspec/config.yaml 文件是為團隊自定義OpenSpec的最簡單方法,它允許我們:設置默認模式:在每個命令上跳過 --schema注入項目上下文:AI 看到你的技術棧、約定等添加每個製品的規則:特定製品的自定義規則默認工作模式的配置方式大致如下:# openspec/config.yamlschema: spec-drivencontext: | 技術棧:TypeScript、React、Node.js API 約定:RESTful、JSON 響應 測試:Vitest 用於單元測試、Playwright 用於端到端測試 代碼風格:ESLint 搭配 Prettier、嚴格 TypeScriptrules: proposal: - 包含回滾計劃 - 識別受影響的團隊 specs: - 使用 Given/When/Then 格式描述場景 design: - 為複雜流程包含序列圖自定義模式當項目配置不夠時,創建具有完全自定義工作流的模式。自定義模式位於項目的 openspec/schemas/ 目錄中,並與代碼一起進行版本控制。your-project/├── openspec/│ ├── config.yaml # 項目配置│ ├── schemas/ # 自定義模式在此│ │ └── my-workflow/│ │ ├── schema.yaml│ │ └── templates/│ └── changes/ # 你的變更└── src/創建自定義模式最快的方法是 派生內置模式,即通過克隆複製一份默認的內置模式$ openspec schema fork spec-driven my-workflow這個命令會將整個 spec-driven 模式複製到 openspec/schemas/my-workflow/ 目錄下文件大致描述如下:openspec/schemas/my-workflow/├── schema.yaml # 工作流定義└── templates/ ├── proposal.md # 提案製品的模板 ├── spec.md # 規範的模板 ├── design.md # 設計的模板 └── tasks.md # 任務的模板系統內置的提示詞模版如下:# schema.yamlname: my-workflowversion: 1description: Default OpenSpec workflow - proposal → specs → design → tasksartifacts:- id: proposal generates: proposal.md description: Initial proposal document outlining the change template: proposal.md instruction: > Create the proposal document that establishes WHY this change is needed. Sections: - **Why**: 1-2 sentences on the problem or opportunity. What problem does this solve? Why now? - **What Changes**: Bullet list of changes. Be specific about new capabilities, modifications, or removals. Mark breaking changes with **BREAKING**. - **Capabilities**: Identify which specs will be created or modified: - **New Capabilities**: List capabilities being introduced. Each becomes a new `specs/<name>/spec.md`. Use kebab-case names (e.g., `user-auth`, `data-export`). - **Modified Capabilities**: List existing capabilities whose REQUIREMENTS are changing. Only include if spec-level behavior changes (not just implementation details). Each needs a delta spec file. Check `openspec/specs/` for existing spec names. Leave empty if no requirement changes. - **Impact**: Affected code, APIs, dependencies, or systems. IMPORTANT: The Capabilities section is critical. It creates the contract between proposal and specs phases. Research existing specs before filling this in. Each capability listed here will need a corresponding spec file. Keep it concise (1-2 pages). Focus on the "why" not the "how" - implementation details belong in design.md. This is the foundation - specs, design, and tasks all build on this. requires: []- id: specs generates: specs/**/*.md description: Detailed specifications for the change template: spec.md instruction: > Create specification files that define WHAT the system should do. Create one spec file per capability listed in the proposal's Capabilities section. - New capabilities: use the exact kebab-case name from the proposal (specs/<capability>/spec.md). - Modified capabilities: use the existing spec folder name from openspec/specs/<capability>/ when creating the delta spec at specs/<capability>/spec.md. Delta operations (use ## headers): - **ADDED Requirements**: New capabilities - **MODIFIED Requirements**: Changed behavior - MUST include full updated content - **REMOVED Requirements**: Deprecated features - MUST include **Reason** and **Migration** - **RENAMED Requirements**: Name changes only - use FROM:/TO: format Format requirements: - Each requirement: `### Requirement: <name>` followed by description - Use SHALL/MUST for normative requirements (avoid should/may) - Each scenario: `#### Scenario: <name>` with WHEN/THEN format - **CRITICAL**: Scenarios MUST use exactly 4 hashtags (`####`). Using 3 hashtags or bullets will fail silently. - Every requirement MUST have at least one scenario. MODIFIED requirements workflow: 1. Locate the existing requirement in openspec/specs/<capability>/spec.md 2. Copy the ENTIRE requirement block (from `### Requirement:` through all scenarios) 3. Paste under `## MODIFIED Requirements` and edit to reflect new behavior 4. Ensure header text matches exactly (whitespace-insensitive) Common pitfall: Using MODIFIED with partial content loses detail at archive time. If adding new concerns without changing existing behavior, use ADDED instead. Example: ``` ## ADDED Requirements ### Requirement: User can export data The system SHALL allow users to export their data in CSV format. #### Scenario: Successful export - **WHEN** user clicks "Export" button - **THEN** system downloads a CSV file with all user data ## REMOVED Requirements ### Requirement: Legacy export **Reason**: Replaced by new export system **Migration**: Use new export endpoint at /api/v2/export ``` Specs should be testable - each scenario is a potential test case. requires: - proposal- id: design generates: design.md description: Technical design document with implementation details template: design.md instruction: > Create the design document that explains HOW to implement the change. When to include design.md (create only if any apply): - Cross-cutting change (multiple services/modules) or new architectural pattern - New external dependency or significant data model changes - Security, performance, or migration complexity - Ambiguity that benefits from technical decisions before coding Sections: - **Context**: Background, current state, constraints, stakeholders - **Goals / Non-Goals**: What this design achieves and explicitly excludes - **Decisions**: Key technical choices with rationale (why X over Y?). Include alternatives considered for each decision. - **Risks / Trade-offs**: Known limitations, things that could go wrong. Format: [Risk] → Mitigation - **Migration Plan**: Steps to deploy, rollback strategy (if applicable) - **Open Questions**: Outstanding decisions or unknowns to resolve Focus on architecture and approach, not line-by-line implementation. Reference the proposal for motivation and specs for requirements. Good design docs explain the "why" behind technical decisions. requires: - proposal- id: tasks generates: tasks.md description: Implementation checklist with trackable tasks template: tasks.md instruction: > Create the task list that breaks down the implementation work. **IMPORTANT: Follow the template below exactly.** The apply phase parses checkbox format to track progress. Tasks not using `- [ ]` won't be tracked. Guidelines: - Group related tasks under ## numbered headings - Each task MUST be a checkbox: `- [ ] X.Y Task description` - Tasks should be small enough to complete in one session - Order tasks by dependency (what must be done first?) Example: ``` ## 1. Setup - [ ] 1.1 Create new module structure - [ ] 1.2 Add dependencies to package.json ## 2. Core Implementation - [ ] 2.1 Implement data export function - [ ] 2.2 Add CSV formatting utilities ``` Reference specs for what needs to be built, design for how to build it. Each task should be verifiable - you know when it's done. requires: - specs - designapply: requires: - tasks tracks: tasks.md instruction: | Read context files, work through pending tasks, mark complete as you go. Pause if you hit blockers or need clarification.# proposal.md## Why<!-- Explain the motivation for this change. What problem does this solve? Why now? -->## What Changes<!-- Describe what will change. Be specific about new capabilities, modifications, or removals. -->## Capabilities### New Capabilities<!-- Capabilities being introduced. Replace <name> with kebab-case identifier (e.g., user-auth, data-export, api-rate-limiting). Each creates specs/<name>/spec.md -->- `<name>`: <brief description of what this capability covers>### Modified Capabilities<!-- Existing capabilities whose REQUIREMENTS are changing (not just implementation). Only list here if spec-level behavior changes. Each needs a delta spec file. Use existing spec names from openspec/specs/. Leave empty if no requirement changes. -->- `<existing-name>`: <what requirement is changing>## Impact<!-- Affected code, APIs, dependencies, systems --># spec.md## ADDED Requirements### Requirement: <!-- requirement name --><!-- requirement text -->#### Scenario: <!-- scenario name -->- **WHEN** <!-- condition -->- **THEN** <!-- expected outcome --> # design.md## Context<!-- Background and current state -->## Goals / Non-Goals**Goals:**<!-- What this design aims to achieve -->**Non-Goals:**<!-- What is explicitly out of scope -->## Decisions<!-- Key design decisions and rationale -->## Risks / Trade-offs<!-- Known risks and trade-offs --># tasks.md## 1. <!-- Task Group Name -->- [ ] 1.1 <!-- Task description -->- [ ] 1.2 <!-- Task description -->## 2. <!-- Task Group Name -->- [ ] 2.1 <!-- Task description -->- [ ] 2.2 <!-- Task description -->當然我們也可以從0開始創建全新的工作流,我們可以自定義一個模式,在每次提案之前需要先進行調研,提案後直接產生tasks為例,在命令行終端輸入如下指令:$ openspec schema init research-first或者$ openspec schema init research-first --description "快速迭代工作流" --artifacts "proposal,specs,tasks"輸入Schema描述,選擇artifacts製品確認配置輸入【y】回車選擇將 research-first 設置為默認Schema創建完成後,我們將得到一個Schema項目# schema.yamlname: research-firstversion: 1description: "調研驅動工作流:Research -> Proposal -> Tasks"artifacts:- id: research generates: research.md description: "初步調研與可行性分析" template: research.md instruction: | 針對用戶需求進行深度調研。 1. 分析當前代碼庫的相關實現。 2. 提出至少兩種可能的實現思路。 3. 評估各方案的優缺點及潛在風險。 requires: []- id: proposal generates: proposal.md description: "最終選定的實施提案" template: proposal.md instruction: | 基於 research.md 的調研結果,確定最終實施方案。 1. 明確變更的具體範圍。 2. 描述對現有系統架構的影響。 3. 定義成功交付的標準。 requires: [ research ]- id: tasks generates: tasks.md description: "可執行的任務清單" template: tasks.md instruction: | 根據 proposal.md 的內容,分解為可直接執行的代碼任務。 1. 任務需具備原子性(每個任務對應 1-2 個文件修改)。 2. 包含必要的測試任務。 requires: [ proposal ]apply: requires: [ tasks ] tracks: tasks.md配置項字段:id:唯一標識符,用於命令和規則generates:輸出文件名(支持通配符如 specs/**/*.md)template:templates/ 目錄中的模板文件instruction:AI 創建此製品的指令requires:依賴項 - 哪些製品必須先存在# research.md# Research: {{change_name}}## 1. 現狀分析## 2. 方案探索### 方案 A: [簡述]- **實現路徑**: - **優點**: - **風險**: ### 方案 B: [簡述]- **實現路徑**: - **優點**: - **風險**: ## 3. 調研結論# proposal.md# Proposal: {{change_name}}## 1. 變更目標## 2. 詳細變更內容- [ ] 修改點 A- [ ] 新增組件 B## 3. 技術約束- 涉及文件: - 性能/安全考慮:# tasks.md# 任務清單## 前置任務- [ ] 完成 research.md 的撰寫和審核- [ ] 完成 proposal.md 的撰寫和審核## 實施任務- [ ] [任務1描述]- [ ] [任務2描述]- [ ] [任務3描述]- [ ] ... ## 測試任務- [ ] [測試任務1描述]- [ ] [測試任務2描述]- [ ] [測試任務3描述]- [ ] ... ## 文檔任務- [ ] 更新相關技術文檔- [ ] 編寫用戶手冊或操作指南- [ ] 記錄變更日誌## 審核任務- [ ] 代碼審核- [ ] 測試報告審核- [ ] 文檔審核接下來修改 openspec/config.yaml 文件,配置 research-first 為默認schema或者使用命令行指定$ openspec new change feature --schema research-first 在使用自定義schema之前,我們需要先對它進行驗證,在命令行終端輸入命令$ openspec schema validate research-first驗證沒有問題後就可以重新創建變更提案了/opsx:propose 添加暗黑模式最終效果如下,OpenSpec按照我們提供的工作流模版輸出了對應的變更提案製品,檢查無誤後就可以實施任務了。全局模式OpenSpec也支持用戶級schema,位於 ~/.local/share/openspec/schemas/,用於跨項目共享,但是更推薦使用項目級schema,因為它們與你的代碼一起進行版本控制,使用方式和自定義一致。點擊關注,及時接收最新消息
小夥伴們大家好,我是小溪,見字如面。OpenSpec升級到了1.x版本,玩了2天發現相對於老版本來說還是有不小變動的,不僅提供了更靈活的協同工作流程,還支持了自定義工作流模式。習慣使用老版本和對老版本OpenSpec還不瞭解的小夥伴也可以往期內容:初識OpenSpec當前使用版本openspec 1.2.0優勢輕量化、靈活性和可擴展性進一步提高向下兼容,舊版變更可以使用 OPSX 命令繼續,製品結構是兼容的新增Skills技能調用方式更節省tokens提供更細粒度的擴展命令協同工作流程OpenSepc新版本協同工作流程如下:如何使用?
需要 Node.js 20.19.0 或更高版本首先更新OpenSpec至最新版本,在命令行終端輸入如下命令:$ npm install -g @fission-ai/openspec@latest更新完成後,新項目直接進入項目根目錄進行初始化$ cd your-project$ openspec init舊項目也是可以用的,作者建議使用新版本命令,可以直接進入項目根目錄進行更新$ cd your-project$ openspec update想了解更多OpenSpec內容,但又看不太習慣英文的小夥伴,可以看OpenSpec社區中文版本,Github倉庫地址:https://github.com/studyzy/OpenSpec-cn,這裏給好心人點個贊基本使用命令行指令OpenSpe…
- OpenSepc新版本新提升
- OpenSepc新版本新提升|重點 2
- OpenSepc新版本新提升|重點 3
- OpenSepc新版本新提升|重點 4
- OpenSepc新版本新提升|重點 5
可記低 Prompt
小夥伴們大家好,我是小溪,見字如面。OpenSpec升級到了1.x版本,玩了2天發現相對於老版本來說還是有不小變動的,不僅提供了更靈活的協同工作流程,還支持了自定義工作流模式。習慣使用老版本和對老版本OpenSpec還不瞭解的小夥伴也可以往…
內容結構
openspec/
├── config.yaml            # 新增,項目上下文和規則配置
├── project.md             # 已移除,項目規範約定
├── AGENTS.md              # 已移除,為Agent提供的OpenSpec使用說明,
├── specs/                 # 源規範目錄,每次變更歸檔後會合併到這裏
│       ├── spec.md        # 源需求和場景規範
│       └── design.md      # 源技術模式
├── changes/                # 提案變更目錄
│   ├── [change-name]/     # 單個提案變更
│   │   ├── proposal.md     # 為什麼,什麼,影響
│   │   ├── tasks.md        # 實施檢查清單
│   │   ├── design.md       # 技術決策(可選;見標準)
│   │   └── specs/          # 增量變更規範
│   │       └── [capability]/
│   │           └── spec.md # ADDED/MODIFIED/REMOVED
│ └── archive/ # 已完成的提案變更整理版
小夥伴們大家好,我是小溪,見字如面。OpenSpec升級到了1.x版本,玩了2天發現相對於老版本來說還是有不小變動的,不僅提供了更靈活的協同工作流程,還支持了自定義工作流模式。習慣使用老版本和對老版本OpenSpec還不瞭解的小夥伴也可以往期內容:初識OpenSpec當前使用版本openspec 1.2.0優勢輕量化、靈活性和可擴展性進一步提高向下兼容,舊版變更可以使用 OPSX 命令繼續,製品結構是兼容的新增Skills技能調用方式更節省tokens提供更細粒度的擴展命令協同工作流程OpenSepc新版本協同工作流程如下:如何使用?需要 Node.js 20.19.0 或更高版本首先更新OpenSpec至最新版本,在命令行終端輸入如下命令:$ npm install -g @fission-ai/openspec@latest更新完成後,新項目直接進入項目根目錄進行初始化$ cd your-project$ openspec init舊項目也是可以用的,作者建議使用新版本命令,可以直接進入項目根目錄進行更新$ cd your-project$ openspec update想了解更多OpenSpec內容,但又看不太習慣英文的小夥伴,可以看OpenSpec社區中文版本,Github倉庫地址:https://github.com/studyzy/OpenSpec-cn,這裏給好心人點個贊基本使用命令行指令OpenSpec擴展了新的命令行指令,在命令行終端輸入 openspec -h 可以查看完整的命令行幫助文檔,這裏只列舉新增的功能,對已存在的指令還不瞭解的小夥伴可以看往期內容:初識OpenSpecconfig:查看並修改全局OpenSpec配置schema:管理工作流程模式feedback:提交OpenSpec反饋completion:管理OpenSpec CLI的Shell補全generate:生成Shell補全腳本install:安裝Shell補全腳本uninstall:卸載Shell補全腳本status:顯示變更的製品完成狀態instructions:輸出用於創建制品或執行任務的增強指引templates:顯示 Schema 中所有制品的解析後模板路徑schemas:列出可用的工作流 Schema 及其描述new:創建一個新的變更OpenSpec新增了CLI Shell自動補管理,我們只需要在命令行終端執行下面命令就會自動安裝$ openspec completion install安裝完成後重啓命令行終端,輸入 openspec comp 按下【Tab】快捷鍵就可以看到命令的自動補全效果了自定義命令和SkillsOpenSpec新版本提供了一套以 /opsx: 前綴的自定義命令 和 以 openspec- 為前綴的SkillsOpenSpec默認提供了4個自定義命令:/opsx:explore:深入思考想法、調查問題、明確需求,用於需求前的頭腦風暴/opsx:propose:開始一個新變更,會一次性生成所有規劃階段的製品如 proposal、specs、design、tasks/opsx:apply:實施變更中的任務,AI 會根據 tasks.md 中的任務清單逐一實現功能/opsx:archive:歸檔已完成的變更,會把整個變更文件夾移入存檔並將增量規範合併到主規範庫除了這套核心命令,OpenSpec還提供了一套更細粒度的擴展命令,需要通過 openspec config命令配置進行開啓。開啓需要在命令行終端輸入 以下命令:$ openspec config profileDelivery:在哪裏安裝工作流,比如在 Skills、CommandsWorkflows:工作流中哪些設計指令是可用的,比如 /opsx:explore、/opsx:new可以靈活選擇配置方式,這裏我選擇【Delivery and workflows】兩者都配置,接下來會先配置Delivery,選擇Both同時生成Skills和Commands然後配置Workflows使用【Space】快捷鍵選中需要的命令最後輸入【Y】確認更新完成後就可以看到更新後的全部配置了OpenSpec其他自定義命令:/opsx:new:開始一個新變更,只創建一個空的變更目錄/opsx:continue:基於依賴關係創建下一個製品,就是一步步創建 proposal、specs、design、tasks/opsx:ff:Fast-Forward 快速一次性創建所有規劃製品 proposal、specs、design、tasks/opsx:verify:校驗實現是否與製品匹配/opsx:sync:將增量規範合併到主規範中,通常不需要手動執行/opsx:bulk-archive:批量歸檔多個變更/opsx:onboard:完整的 OpenSpec 工作流引導教程OpenSpec目錄結構OpenSpec新版本目錄結構也發生了變化,移除了 project.md 和 AGENTS.mdopenspec/├── config.yaml # 新增,項目上下文和規則配置├── project.md # 已移除,項目規範約定├── AGENTS.md # 已移除,為Agent提供的OpenSpec使用說明,├── specs/ # 源規範目錄,每次變更歸檔後會合併到這裏│ ├── spec.md # 源需求和場景規範│ └── design.md # 源技術模式├── changes/ # 提案變更目錄│ ├── [change-name]/ # 單個提案變更│ │ ├── proposal.md # 為什麼,什麼,影響│ │ ├── tasks.md # 實施檢查清單│ │ ├── design.md # 技術決策(可選;見標準)│ │ └── specs/ # 增量變更規範│ │ └── [capability]/│ │ └── spec.md # ADDED/MODIFIED/REMOVED│ └── archive/ # 已完成的提案變更項目初始化使用OpenSpec新版本初始化項目,首先在命令行終端進入到項目根目錄,執行 openspec init,使用【space】快捷鍵選擇自己使用的AI工具確認配置後回車使用IDE打開可以看到如下目錄結構,在 commands/ 目錄下創建了 opsx/ 命令集,在 skills/ 目錄下創建了對應的技能,同時創建了openspec 配置目錄創建變更提案OpenSpec新版本創建變更提案的命令和老版本沒有太大差異,只是做了命令的變更,新版本可以使用 /opsx:propose 需求描述創建 創建變更,也可以使用 /opsx:new 需求描述創建創建變更,甚至可以通過自然語言使用Skills能力創建變更提案創建一個登錄授權功能提案這裏以新版本提供的 /opsx:new 命令為例,記錄一下創建變更提案的流程。首先使用下面命令創建一個變更提案:/opsx:new 創建一個登錄授權功能可以OpenSpec只創建了變更目錄 add-login-auth 和 .openspec.yaml文件並沒有創建我們之前所熟悉的 proposal.md、specs/[capability]/spec.md、design.md 和 tasks.md要創建上面所需的配置文件,我們需要再次執行 /opsx:continue 命令,到這一步OpenSpec才真正開始創建變更提案內容,與AI確定好問題邊界後提交執行完成後,可以看到此時才創建了 add-login-auth/proposal.md相當於單步執行檢查提案沒有問題後再次執行 /opsx:continue 會繼續生成 add-login-auth/design.md待 proposal.md、design.md、tasks.md 都生成後,再次 /opsx:continue OpenSpec會檢查artifacts狀態,告訴我們下一步該執行的操作當然也可以創建提案後直接執行 /opsx:ff,一步完成所有artifacts工作,到這裏變更提案階段就算完成了,下一步就可以實施任務了。實施任務與歸檔實施任務、歸檔操作和舊版本也沒有太大變化,只是將命令調整為了 /opsx:apply 和 /opsx:archive,歸檔後的文件目錄和舊版本也基本是保持一致的自定義項目配置OpenSpec提供了 項目配置、自定義模式、全局覆蓋 3個 級別的自定義:項目配置:針對項目生效,位於 openspec/schemas/,支持設置默認值,注入上下文/規則,適合大多數團隊自定義模式:定義自己的工作流製品,適合有獨特流程的團隊全局模式:針對所有項目生效,位於 ~/.local/share/openspec/schemas/,在所有項目間共享模式,適用於高級用戶項目配置在移除 project.md 和 agent.md 後,OpenSpec新版本中新增了 openspec/config.yaml 文件承擔了部分原本由呢啲文件負責的“項目常識”管理功能。openspec/config.yaml 文件是為團隊自定義OpenSpec的最簡單方法,它允許我們:設置默認模式:在每個命令上跳過 --schema注入項目上下文:AI 看到你的技術棧、約定等添加每個製品的規則:特定製品的自定義規則默認工作模式的配置方式大致如下:# openspec/config.yamlschema: spec-drivencontext: | 技術棧:TypeScript、React、Node.js API 約定:RESTful、JSON 響應 測試:Vitest 用於單元測試、Playwright 用於端到端測試 代碼風格:ESLint 搭配 Prettier、嚴格 TypeScriptrules: proposal: - 包含回滾計劃 - 識別受影響的團隊 specs: - 使用 Given/When/Then 格式描述場景 design: - 為複雜流程包含序列圖自定義模式當項目配置不夠時,創建具有完全自定義工作流的模式。自定義模式位於項目的 openspec/schemas/ 目錄中,並與代碼一起進行版本控制。your-project/├── openspec/│ ├── config.yaml # 項目配置│ ├── schemas/ # 自定義模式在此│ │ └── my-workflow/│ │ ├── schema.yaml│ │ └── templates/│ └── changes/ # 你的變更└── src/創建自定義模式最快的方法是 派生內置模式,即通過克隆複製一份默認的內置模式$ openspec schema fork spec-driven my-workflow呢個命令會將整個 spec-driven 模式複製到 openspec/schemas/my-workflow/ 目錄下文件大致描述如下:openspec/schemas/my-workflow/├── schema.yaml # 工作流定義└── templates/ ├── proposal.md # 提案製品的模板 ├── spec.md # 規範的模板 ├── design.md # 設計的模板 └── tasks.md # 任務的模板系統內置的提示詞模版如下:# schema.yamlname: my-workflowversion: 1description: Default OpenSpec workflow - proposal → specs → design → tasksartifacts:- id: proposal generates: proposal.md description: Initial proposal document outlining the change template: proposal.md instruction: > Create the proposal document that establishes WHY this change is needed. Sections: - **Why**: 1-2 sentences on the problem or opportunity. What problem does this solve? Why now? - **What Changes**: Bullet list of changes. Be specific about new capabilities, modifications, or removals. Mark breaking changes with **BREAKING**. - **Capabilities**: Identify which specs will be created or modified: - **New Capabilities**: List capabilities being introduced. Each becomes a new `specs/<name>/spec.md`. Use kebab-case names (e.g., `user-auth`, `data-export`). - **Modified Capabilities**: List existing capabilities whose REQUIREMENTS are changing. Only include if spec-level behavior changes (not just implementation details). Each needs a delta spec file. Check `openspec/specs/` for existing spec names. Leave empty if no requirement changes. - **Impact**: Affected code, APIs, dependencies, or systems. IMPORTANT: The Capabilities section is critical. It creates the contract between proposal and specs phases. Research existing specs before filling this in. Each capability listed here will need a corresponding spec file. Keep it concise (1-2 pages). Focus on the "why" not the "how" - implementation details belong in design.md. This is the foundation - specs, design, and tasks all build on this. requires: []- id: specs generates: specs/**/*.md description: Detailed specifications for the change template: spec.md instruction: > Create specification files that define WHAT the system should do. Create one spec file per capability listed in the proposal's Capabilities section. - New capabilities: use the exact kebab-case name from the proposal (specs/<capability>/spec.md). - Modified capabilities: use the existing spec folder name from openspec/specs/<capability>/ when creating the delta spec at specs/<capability>/spec.md. Delta operations (use ## headers): - **ADDED Requirements**: New capabilities - **MODIFIED Requirements**: Changed behavior - MUST include full updated content - **REMOVED Requirements**: Deprecated features - MUST include **Reason** and **Migration** - **RENAMED Requirements**: Name changes only - use FROM:/TO: format Format requirements: - Each requirement: `### Requirement: <name>` followed by description - Use SHALL/MUST for normative requirements (avoid should/may) - Each scenario: `#### Scenario: <name>` with WHEN/THEN format - **CRITICAL**: Scenarios MUST use exactly 4 hashtags (`####`). Using 3 hashtags or bullets will fail silently. - Every requirement MUST have at least one scenario. MODIFIED requirements workflow: 1. Locate the existing requirement in openspec/specs/<capability>/spec.md 2. Copy the ENTIRE requirement block (from `### Requirement:` through all scenarios) 3. Paste under `## MODIFIED Requirements` and edit to reflect new behavior 4. Ensure header text matches exactly (whitespace-insensitive) Common pitfall: Using MODIFIED with partial content loses detail at archive time. If adding new concerns without changing existing behavior, use ADDED instead. Example: ``` ## ADDED Requirements ### Requirement: User can export data The system SHALL allow users to export their data in CSV format. #### Scenario: Successful export - **WHEN** user clicks "Export" button - **THEN** system downloads a CSV file with all user data ## REMOVED Requirements ### Requirement: Legacy export **Reason**: Replaced by new export system **Migration**: Use new export endpoint at /api/v2/export ``` Specs should be testable - each scenario is a potential test case. requires: - proposal- id: design generates: design.md description: Technical design document with implementation details template: design.md instruction: > Create the design document that explains HOW to implement the change. When to include design.md (create only if any apply): - Cross-cutting change (multiple services/modules) or new architectural pattern - New external dependency or significant data model changes - Security, performance, or migration complexity - Ambiguity that benefits from technical decisions before coding Sections: - **Context**: Background, current state, constraints, stakeholders - **Goals / Non-Goals**: What this design achieves and explicitly excludes - **Decisions**: Key technical choices with rationale (why X over Y?). Include alternatives considered for each decision. - **Risks / Trade-offs**: Known limitations, things that could go wrong. Format: [Risk] → Mitigation - **Migration Plan**: Steps to deploy, rollback strategy (if applicable) - **Open Questions**: Outstanding decisions or unknowns to resolve Focus on architecture and approach, not line-by-line implementation. Reference the proposal for motivation and specs for requirements. Good design docs explain the "why" behind technical decisions. requires: - proposal- id: tasks generates: tasks.md description: Implementation checklist with trackable tasks template: tasks.md instruction: > Create the task list that breaks down the implementation work. **IMPORTANT: Follow the template below exactly.** The apply phase parses checkbox format to track progress. Tasks not using `- [ ]` won't be tracked. Guidelines: - Group related tasks under ## numbered headings - Each task MUST be a checkbox: `- [ ] X.Y Task description` - Tasks should be small enough to complete in one session - Order tasks by dependency (what must be done first?) Example: ``` ## 1. Setup - [ ] 1.1 Create new module structure - [ ] 1.2 Add dependencies to package.json ## 2. Core Implementation - [ ] 2.1 Implement data export function - [ ] 2.2 Add CSV formatting utilities ``` Reference specs for what needs to be built, design for how to build it. Each task should be verifiable - you know when it's done. requires: - specs - designapply: requires: - tasks tracks: tasks.md instruction: | Read context files, work through pending tasks, mark complete as you go. Pause if you hit blockers or need clarification.# proposal.md## Why<!-- Explain the motivation for this change. What problem does this solve? Why now? -->## What Changes<!-- Describe what will change. Be specific about new capabilities, modifications, or removals. -->## Capabilities### New Capabilities<!-- Capabilities being introduced. Replace <name> with kebab-case identifier (e.g., user-auth, data-export, api-rate-limiting). Each creates specs/<name>/spec.md -->- `<name>`: <brief description of what this capability covers>### Modified Capabilities<!-- Existing capabilities whose REQUIREMENTS are changing (not just implementation). Only list here if spec-level behavior changes. Each needs a delta spec file. Use existing spec names from openspec/specs/. Leave empty if no requirement changes. -->- `<existing-name>`: <what requirement is changing>## Impact<!-- Affected code, APIs, dependencies, systems --># spec.md## ADDED Requirements### Requirement: <!-- requirement name --><!-- requirement text -->#### Scenario: <!-- scenario name -->- **WHEN** <!-- condition -->- **THEN** <!-- expected outcome --> # design.md## Context<!-- Background and current state -->## Goals / Non-Goals**Goals:**<!-- What this design aims to achieve -->**Non-Goals:**<!-- What is explicitly out of scope -->## Decisions<!-- Key design decisions and rationale -->## Risks / Trade-offs<!-- Known risks and trade-offs --># tasks.md## 1. <!-- Task Group Name -->- [ ] 1.1 <!-- Task description -->- [ ] 1.2 <!-- Task description -->## 2. <!-- Task Group Name -->- [ ] 2.1 <!-- Task description -->- [ ] 2.2 <!-- Task description -->當然我們也可以從0開始創建全新的工作流,我們可以自定義一個模式,在每次提案之前需要先進行調研,提案後直接產生tasks為例,在命令行終端輸入如下指令:$ openspec schema init research-first或者$ openspec schema init research-first --description "快速迭代工作流" --artifacts "proposal,specs,tasks"輸入Schema描述,選擇artifacts製品確認配置輸入【y】回車選擇將 research-first 設置為默認Schema創建完成後,我們將得到一個Schema項目# schema.yamlname: research-firstversion: 1description: "調研驅動工作流:Research -> Proposal -> Tasks"artifacts:- id: research generates: research.md description: "初步調研與可行性分析" template: research.md instruction: | 針對用戶需求進行深度調研。 1. 分析當前代碼庫的相關實現。 2. 提出至少兩種可能的實現思路。 3. 評估各方案的優缺點及潛在風險。 requires: []- id: proposal generates: proposal.md description: "最終選定的實施提案" template: proposal.md instruction: | 基於 research.md 的調研結果,確定最終實施方案。 1. 明確變更的具體範圍。 2. 描述對現有系統架構的影響。 3. 定義成功交付的標準。 requires: [ research ]- id: tasks generates: tasks.md description: "可執行的任務清單" template: tasks.md instruction: | 根據 proposal.md 的內容,分解為可直接執行的代碼任務。 1. 任務需具備原子性(每個任務對應 1-2 個文件修改)。 2. 包含必要的測試任務。 requires: [ proposal ]apply: requires: [ tasks ] tracks: tasks.md配置項字段:id:唯一標識符,用於命令和規則generates:輸出文件名(支持通配符如 specs/**/*.md)template:templates/ 目錄中的模板文件instruction:AI 創建此製品的指令requires:依賴項 - 哪些製品必須先存在# research.md# Research: {{change_name}}## 1. 現狀分析## 2. 方案探索### 方案 A: [簡述]- **實現路徑**: - **優點**: - **風險**: ### 方案 B: [簡述]- **實現路徑**: - **優點**: - **風險**: ## 3. 調研結論# proposal.md# Proposal: {{change_name}}## 1. 變更目標## 2. 詳細變更內容- [ ] 修改點 A- [ ] 新增組件 B## 3. 技術約束- 涉及文件: - 性能/安全考慮:# tasks.md# 任務清單## 前置任務- [ ] 完成 research.md 的撰寫和審核- [ ] 完成 proposal.md 的撰寫和審核## 實施任務- [ ] [任務1描述]- [ ] [任務2描述]- [ ] [任務3描述]- [ ] ... ## 測試任務- [ ] [測試任務1描述]- [ ] [測試任務2描述]- [ ] [測試任務3描述]- [ ] ... ## 文檔任務- [ ] 更新相關技術文檔- [ ] 編寫用戶手冊或操作指南- [ ] 記錄變更日誌## 審核任務- [ ] 代碼審核- [ ] 測試報告審核- [ ] 文檔審核接下來修改 openspec/config.yaml 文件,配置 research-first 為默認schema或者使用命令行指定$ openspec new change feature --schema research-first 在使用自定義schema之前,我們需要先對它進行驗證,在命令行終端輸入命令$ openspec schema validate research-first驗證沒有問題後就可以重新創建變更提案了/opsx:propose 添加暗黑模式最終效果如下,OpenSpec按照我們提供的工作流模版輸出了對應的變更提案製品,檢查無誤後就可以實施任務了。全局模式OpenSpec也支持用戶級schema,位於 ~/.local/share/openspec/schemas/,用於跨項目共享,但是更推薦使用項目級schema,因為它們與你的代碼一起進行版本控制,使用方式和自定義一致。點擊關注,及時接收最新消息
各位朋友大家好,我係小溪,見字如面。OpenSpec升級到1.x版本,玩咗兩日發現相比舊版本都有唔少變動,唔單止提供咗更靈活嘅協同工作流程,仲支援咗自定義工作流模式。慣用舊版本同埋對舊版本OpenSpec仲未熟悉嘅朋友都可以睇返往期內容:
目前使用版本
openspec 1.2.0
優勢
輕量化、靈活性同可擴展性進一步提高
向下兼容,舊版變更可以用 OPSX 命令繼續,製品結構係兼容嘅
新增Skills技能調用方式更節省tokens
提供更細粒度嘅擴展命令
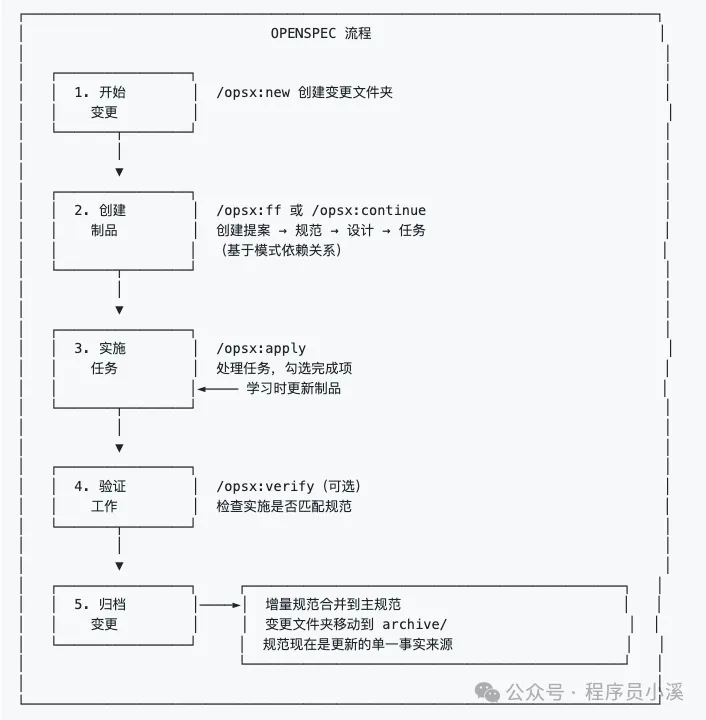
協同工作流程
OpenSpec新版本協同工作流程如下:
點樣用?
需要 Node.js 20.19.0 或更高版本 |
首先要更新OpenSpec到最新版本,喺命令行終端輸入以下命令:
$ npm install -g @fission-ai/openspec@latest更新完成後,新項目直接入去項目根目錄進行初始化
$ cd your-project
$ openspec init
舊項目都係用得嘅,作者建議用新版本命令,可以直接入去項目根目錄進行更新
$ cd your-project
$ openspec update
想了解更多OpenSpec內容,但又唔係咁慣睇英文嘅朋友,可以睇OpenSpec社區中文版本,Github倉庫地址:https://github.com/studyzy/OpenSpec-cn,呢度畀好心人點個讚
基本使用
命令行指令
OpenSpec擴展咗新嘅命令行指令,喺命令行終端輸入 openspec -h 可以睇到完整嘅命令行幫助文檔,呢度只列舉新增嘅功能,對已存在嘅指令仲未熟悉嘅朋友可以睇返往期內容:認識OpenSpec
config:查看同修改全局OpenSpec配置
schema:管理工作流程模式
feedback:提交OpenSpec反饋
completion:管理OpenSpec CLI嘅Shell補全
generate:生成Shell補全腳本
install:安裝Shell補全腳本
uninstall:卸載Shell補全腳本
status:顯示變更嘅製品完成狀態
instructions:輸出用於創建制品或執行任務嘅增強指引
templates:顯示 Schema 中所有制品的解析後模板路徑
schemas:列出可用嘅工作流 Schema 及其描述
new:建立一個新嘅變更
OpenSpec新增咗CLI Shell自動補管理,我哋只需要喺命令行終端執行下面命令就會自動安裝
$ openspec completion install安裝完成後重啟命令行終端,輸入 openspec comp 按下【Tab】快捷鍵就可以睇到命令嘅自動補全效果

自定義命令同Skills
OpenSpec新版本提供咗一套以 /opsx: 前綴嘅自定義命令 同 以 openspec- 為前綴嘅Skills

OpenSpec預設提供咗4個自定義命令:
/opsx:explore:深入思考想法、調查問題、明確需求,用喺需求前嘅腦力激盪
/opsx:propose:開始一個新變更,會一次性生成曬所有規劃階段嘅製品例如 proposal、specs、design、tasks
/opsx:apply:實施變更入面嘅任務,AI 會根據 tasks.md 入面嘅任務清單逐一實現功能
/opsx:archive:歸檔已完成嘅變更,會將成個變更資料夾移入存檔並將增量規範合併到主規範庫
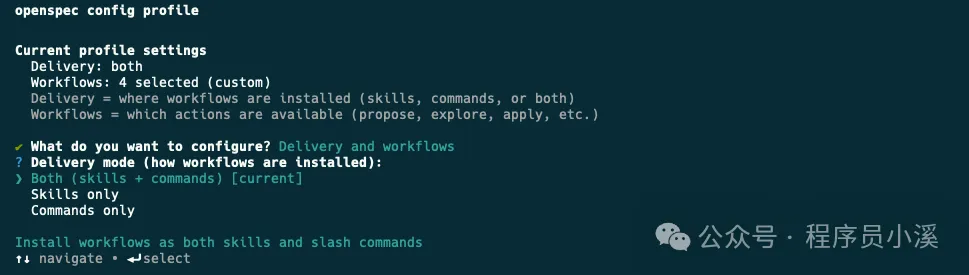
除咗呢套核心命令,OpenSpec仲提供咗一套更細粒度嘅擴展命令,需要經由 openspec config命令配置嚟開啟。開啟需要喺命令行終端輸入 以下命令:
$ openspec config profile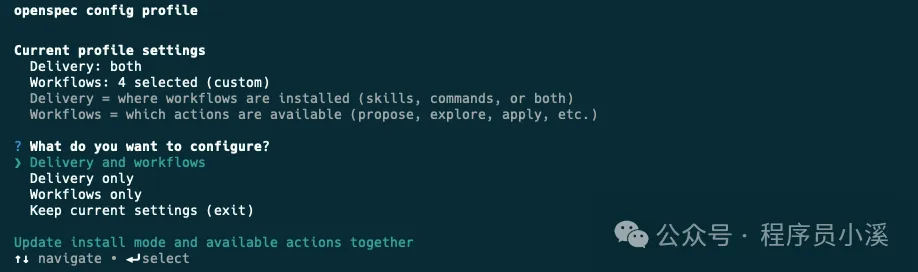
Delivery:喺邊度安裝工作流,例如喺 Skills、Commands
Workflows:工作流入面邊啲設計指令係可用嘅,例如 /opsx:explore、/opsx:new
可以靈活選擇配置方式,呢度我揀【Delivery and workflows】兩者都配置,接下來會先配置Delivery,揀Both同時生成Skills同Commands
然後配置Workflows用【Space】快捷鍵揀需要嘅命令
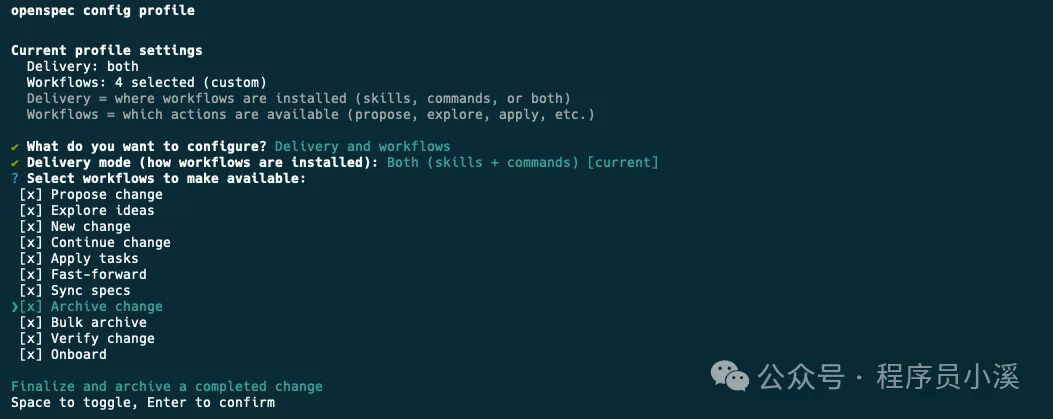
最後輸入【Y】確認
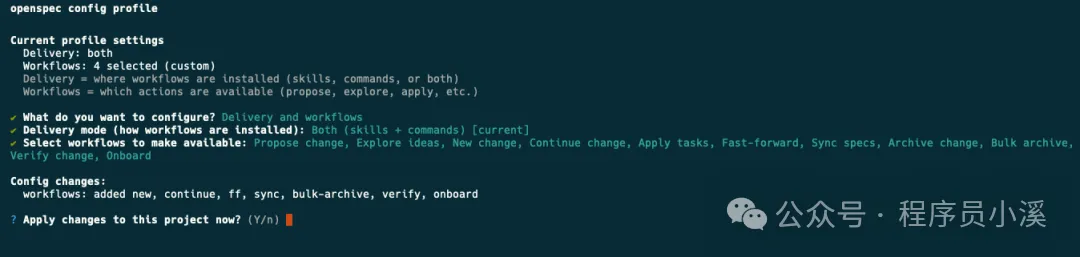
更新完成後就可以睇到更新後嘅全部配置
OpenSpec其他自定義命令:
/opsx:new:開始一個新變更,只建立一個空嘅變更目錄
/opsx:continue:基於依賴關係建立下一個製品,就係一步步建立 proposal、specs、design、tasks
/opsx:ff:Fast-Forward 快速一次性建立曬所有規劃製品 proposal、specs、design、tasks
/opsx:verify:校驗實現係咪同製品匹配
/opsx:sync:將增量規範合併到主規範入面,通常唔需要手動執行
/opsx:bulk-archive:批量歸檔多個變更
/opsx:onboard:完整嘅 OpenSpec 工作流引導教程
OpenSpec目錄結構
OpenSpec新版本目錄結構都發生咗變化,移除咗 project.md 和 AGENTS.md
openspec/
├── config.yaml            # 新增,項目上下文和規則配置
├── project.md             # 已移除,項目規範約定
├── AGENTS.md              # 已移除,為Agent提供的OpenSpec使用說明,
├── specs/                 # 源規範目錄,每次變更歸檔後會合併到這裏
│       ├── spec.md        # 源需求和場景規範
│       └── design.md      # 源技術模式
├── changes/                # 提案變更目錄
│   ├── [change-name]/     # 單個提案變更
│   │   ├── proposal.md     # 為什麼,什麼,影響
│   │   ├── tasks.md        # 實施檢查清單
│   │   ├── design.md       # 技術決策(可選;見標準)
│   │   └── specs/          # 增量變更規範
│   │       └── [capability]/
│   │           └── spec.md # ADDED/MODIFIED/REMOVED
│   └── archive/            # 已完成的提案變更
項目初始化
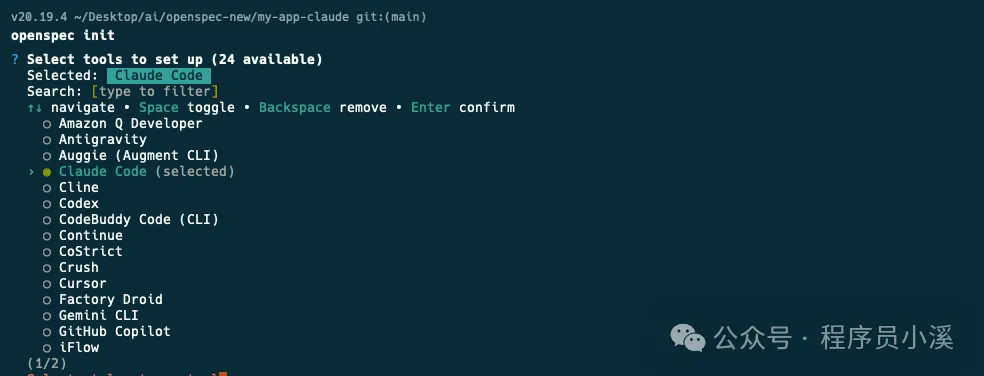
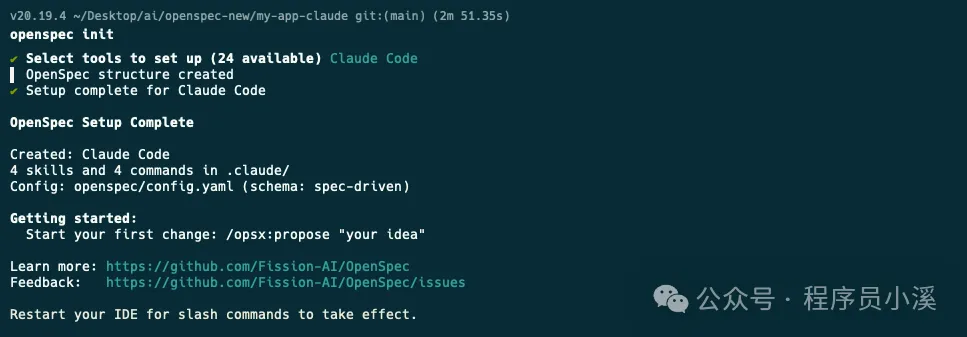
使用OpenSpec新版本初始化項目,首先要喺命令行終端入到項目根目錄,執行 openspec init,用【space】快捷鍵揀自己用開嘅AI工具
確認配置後回車
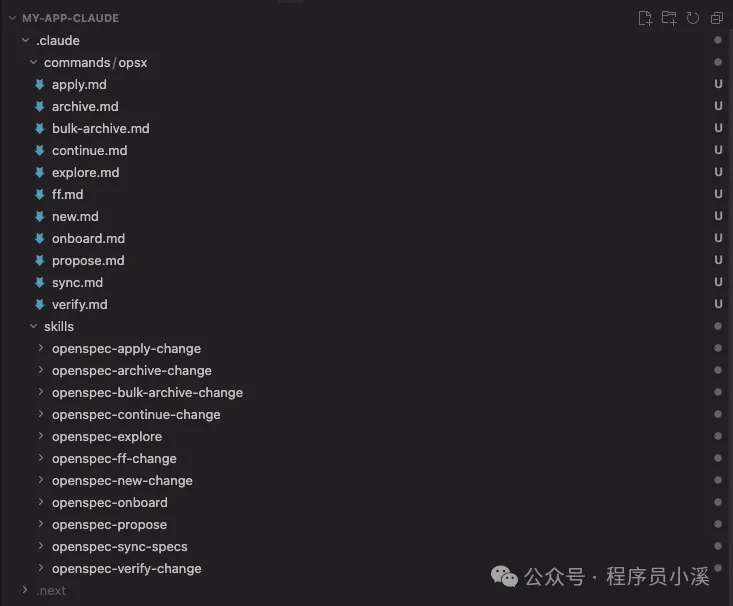
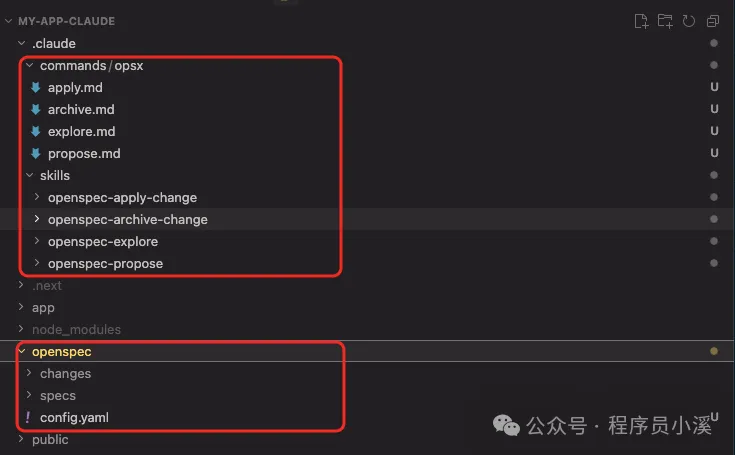
用IDE打開就可以睇到以下目錄結構,喺 commands/ 目錄下建立咗 opsx/ 命令集,喺 skills/ 目錄下建立咗對應嘅技能,同時建立咗openspec 配置目錄
建立變更提案
OpenSpec新版本建立變更提案嘅命令同舊版本冇太大分別,只係做咗命令嘅變更,新版本可以用 /opsx:propose 需求描述建立 建立變更,亦可以用 /opsx:new 需求描述建立建立變更,甚至可以經由自然語言用Skills能力建立變更提案
創建一個登錄授權功能提案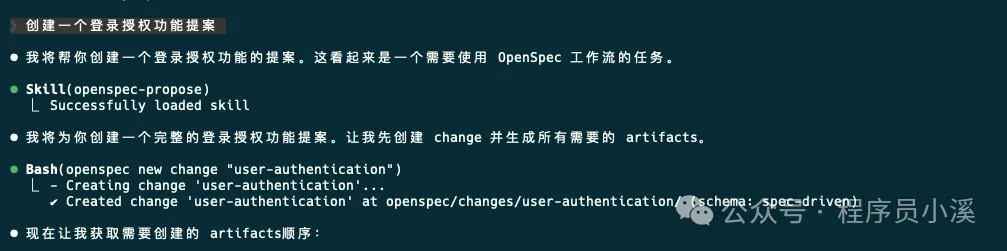
呢度以新版本提供嘅 /opsx:new 命令做例子,記錄一下建立變更提案嘅流程。首先用下面命令建立一個變更提案:
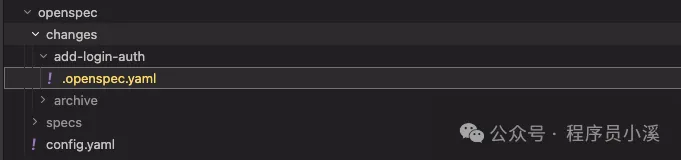
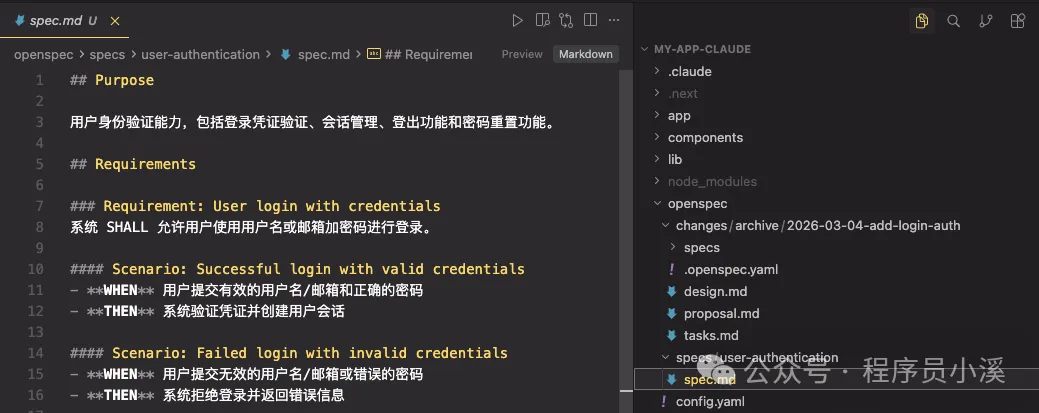
/opsx:new 創建一個登錄授權功能可以睇到OpenSpec只係建立咗變更目錄 add-login-auth 和 .openspec.yaml檔案並冇建立我哋之前熟識嘅 proposal.md、specs/[capability]/spec.md、design.md 和 tasks.md
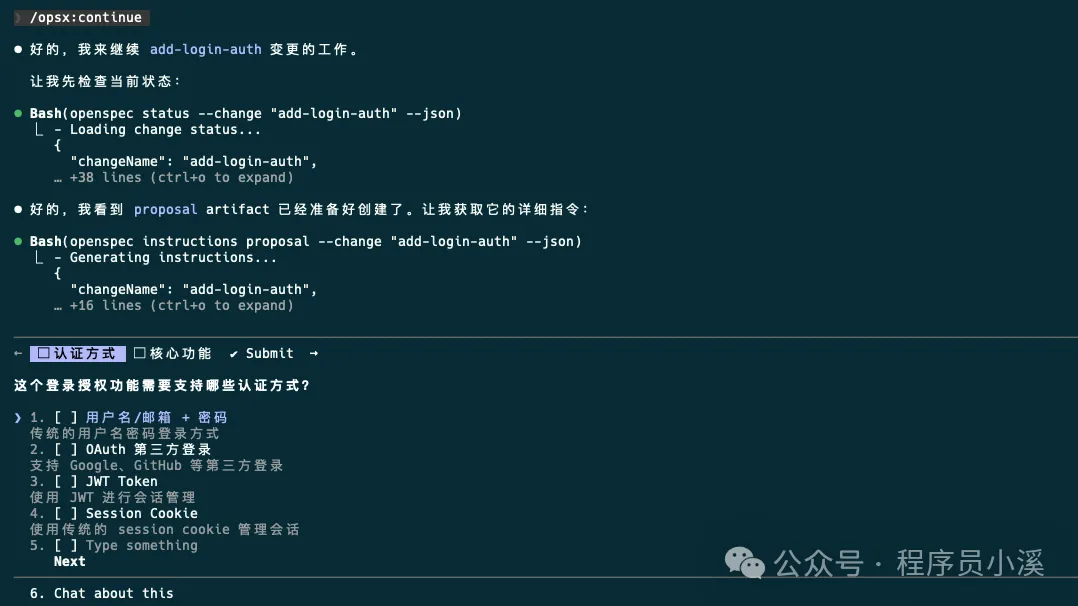
要建立上面需要嘅配置檔案,我哋需要再次執行 /opsx:continue 命令,到呢一步OpenSpec先至真正開始建立變更提案內容,同AI確定好問題邊界之後提交
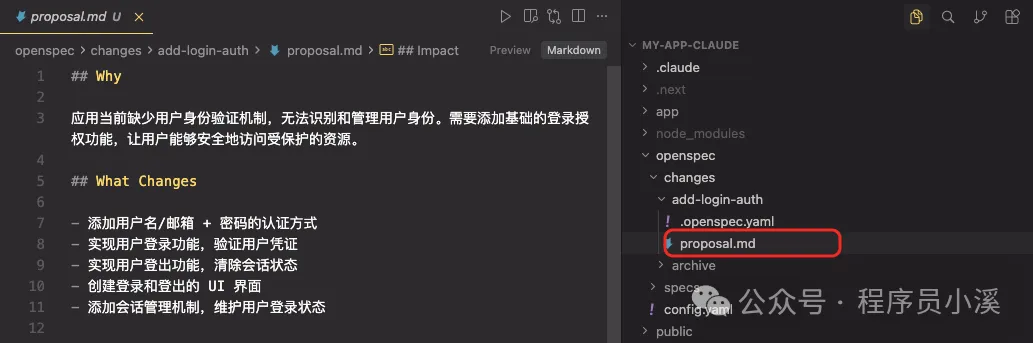
執行完成後,可以睇到呢個時候先建立咗 add-login-auth/proposal.md相當於單步執行
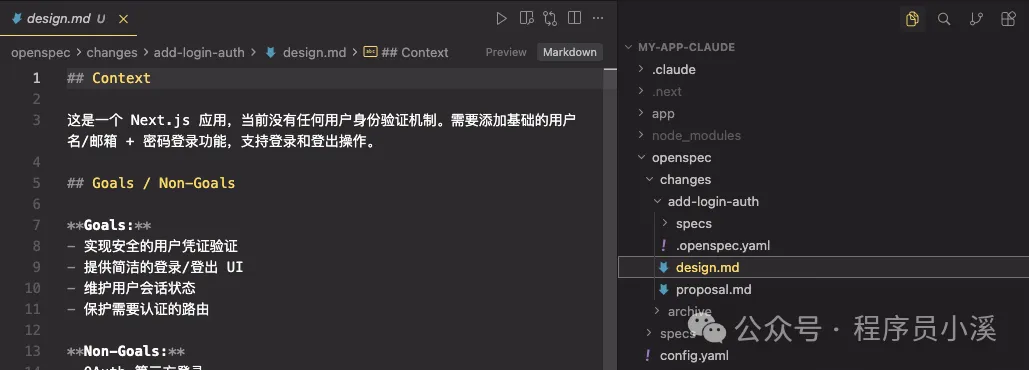
檢查提案冇問題之後再次執行 /opsx:continue 會繼續生成 add-login-auth/design.md
待 proposal.md、design.md、tasks.md 都生成之後,再次 /opsx:continue OpenSpec會檢查artifacts狀態,話畀我哋知下一步應該執行嘅操作
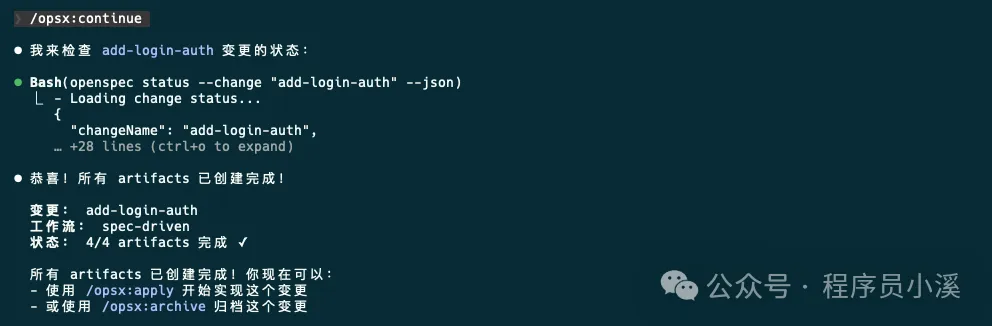
當然都可以建立提案之後直接執行 /opsx:ff,一步完成曬所有artifacts工作,到呢度變更提案階段就算完成咗,下一步就可以實施任務喇。
實施任務同歸檔
實施任務、歸檔操作同舊版本都冇太大變化,只係將命令調整做 /opsx:apply 和 /opsx:archive,歸檔後嘅檔案目錄同舊版本都大致一致
自定義項目配置
OpenSpec提供咗 項目配置、自定義模式、全局覆蓋 3個 級別嘅自定義:
項目配置:針對項目生效,位於 openspec/schemas/,支援設定預設值,注入上下文/規則,適合大多數團隊
自定義模式:定義自己嘅工作流製品,適合有獨特流程嘅團隊
全局模式:針對所有項目生效,位於 ~/.local/share/openspec/schemas/,喺所有項目之間共享模式,適用於高級用戶
項目配置
在移除 project.md 和 agent.md 之後,OpenSpec新版本新增咗 openspec/config.yaml 檔案承擔咗部分原本由呢啲檔案負責嘅「項目常識」管理功能。
openspec/config.yaml 檔案係為團隊自定義OpenSpec最簡單嘅方法,佢允許我哋:
設定預設模式:喺每個命令上跳過 --schema
注入項目上下文:AI 睇到你嘅技術棧、約定等等
加入每個製品嘅規則:特定製品嘅自定義規則
預設工作模式嘅配置方式大致如下:
# openspec/config.yaml
schema: spec-driven
context: |
  技術棧:TypeScript、React、Node.js
  API 約定:RESTful、JSON 響應
  測試:Vitest 用於單元測試、Playwright 用於端到端測試
  代碼風格:ESLint 搭配 Prettier、嚴格 TypeScript
rules:
  proposal:
    - 包含回滾計劃
    - 識別受影響的團隊
  specs:
    - 使用 Given/When/Then 格式描述場景
  design:
    - 為複雜流程包含序列圖
自定義模式
當項目配置唔夠嗰陣,建立具有完全自定義工作流嘅模式。自定義模式位於項目嘅 openspec/schemas/ 目錄入面,並同代碼一齊進行版本控制。
your-project/
├── openspec/
│   ├── config.yaml        # 項目配置
│   ├── schemas/           # 自定義模式在此
│   │   └── my-workflow/
│   │       ├── schema.yaml
│   │       └── templates/
│   └── changes/           # 你的變更
└── src/
建立自定義模式最快嘅方法係 派生內置模式,即係經由clone複製一份預設嘅內置模式
$ openspec schema fork spec-driven my-workflow呢個命令會將成個 spec-driven 模式複製到 openspec/schemas/my-workflow/ 目錄下
檔案大致描述如下:
openspec/schemas/my-workflow/
├── schema.yaml           # 工作流定義
└── templates/
    ├── proposal.md       # 提案製品的模板
    ├── spec.md           # 規範的模板
    ├── design.md         # 設計的模板
    └── tasks.md          # 任務的模板
系統內置嘅提示詞模板如下:
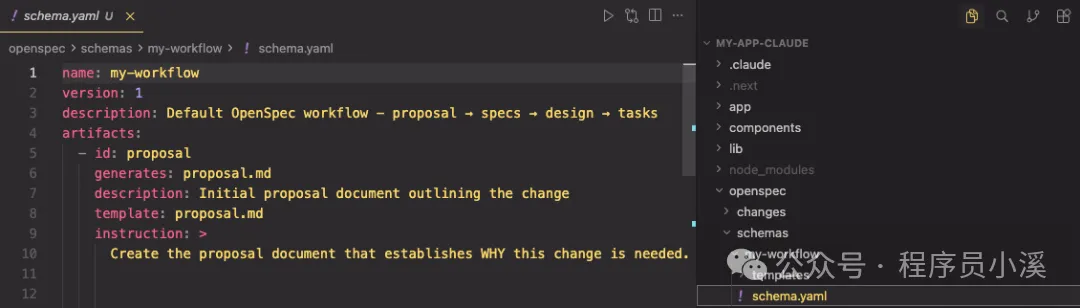
# schema.yaml
name: my-workflow
version: 1
description: Default OpenSpec workflow - proposal → specs → design → tasks
artifacts:
- id: proposal
  generates: proposal.md
  description: Initial proposal document outlining the change
  template: proposal.md
  instruction: >
    Create the proposal document that establishes WHY this change is needed.
    Sections:
    - **Why**: 1-2 sentences on the problem or opportunity. What problem does this solve? Why now?
    - **What Changes**: Bullet list of changes. Be specific about new capabilities, modifications, or removals. Mark breaking changes with **BREAKING**.
    - **Capabilities**: Identify which specs will be created or modified:
      - **New Capabilities**: List capabilities being introduced. Each becomes a new `specs/<name>/spec.md`. Use kebab-case names (e.g., `user-auth`, `data-export`).
      - **Modified Capabilities**: List existing capabilities whose REQUIREMENTS are changing. Only include if spec-level behavior changes (not just implementation details). Each needs a delta spec file. Check `openspec/specs/` for existing spec names. Leave empty if no requirement changes.
    - **Impact**: Affected code, APIs, dependencies, or systems.
    IMPORTANT: The Capabilities section is critical. It creates the contract between
    proposal and specs phases. Research existing specs before filling this in.
    Each capability listed here will need a corresponding spec file.
    Keep it concise (1-2 pages). Focus on the "why" not the "how" -
    implementation details belong in design.md.
    This is the foundation - specs, design, and tasks all build on this.
  requires: []
- id: specs
  generates: specs/**/*.md
  description: Detailed specifications for the change
  template: spec.md
  instruction: >
    Create specification files that define WHAT the system should do.
    Create one spec file per capability listed in the proposal's Capabilities section.
    - New capabilities: use the exact kebab-case name from the proposal (specs/<capability>/spec.md).
    - Modified capabilities: use the existing spec folder name from openspec/specs/<capability>/ when creating the delta spec at specs/<capability>/spec.md.
    Delta operations (use ## headers):
    - **ADDED Requirements**: New capabilities
    - **MODIFIED Requirements**: Changed behavior - MUST include full updated content
    - **REMOVED Requirements**: Deprecated features - MUST include **Reason** and **Migration**
    - **RENAMED Requirements**: Name changes only - use FROM:/TO: format
    Format requirements:
    - Each requirement: `### Requirement: <name>` followed by description
    - Use SHALL/MUST for normative requirements (avoid should/may)
    - Each scenario: `#### Scenario: <name>` with WHEN/THEN format
    - **CRITICAL**: Scenarios MUST use exactly 4 hashtags (`####`). Using 3 hashtags or bullets will fail silently.
    - Every requirement MUST have at least one scenario.
    MODIFIED requirements workflow:
    1. Locate the existing requirement in openspec/specs/<capability>/spec.md
    2. Copy the ENTIRE requirement block (from `### Requirement:` through all scenarios)
    3. Paste under `## MODIFIED Requirements` and edit to reflect new behavior
    4. Ensure header text matches exactly (whitespace-insensitive)
    Common pitfall: Using MODIFIED with partial content loses detail at archive time.
    If adding new concerns without changing existing behavior, use ADDED instead.
    Example:
    ```
    ## ADDED Requirements
    ### Requirement: User can export data
    The system SHALL allow users to export their data in CSV format.
    #### Scenario: Successful export
    - **WHEN** user clicks "Export" button
    - **THEN** system downloads a CSV file with all user data
    ## REMOVED Requirements
    ### Requirement: Legacy export
    **Reason**: Replaced by new export system
    **Migration**: Use new export endpoint at /api/v2/export
    ```
    Specs should be testable - each scenario is a potential test case.
  requires:
  - proposal
- id: design
  generates: design.md
  description: Technical design document with implementation details
  template: design.md
  instruction: >
    Create the design document that explains HOW to implement the change.
    When to include design.md (create only if any apply):
    - Cross-cutting change (multiple services/modules) or new architectural pattern
    - New external dependency or significant data model changes
    - Security, performance, or migration complexity
    - Ambiguity that benefits from technical decisions before coding
    Sections:
    - **Context**: Background, current state, constraints, stakeholders
    - **Goals / Non-Goals**: What this design achieves and explicitly excludes
    - **Decisions**: Key technical choices with rationale (why X over Y?). Include alternatives considered for each decision.
    - **Risks / Trade-offs**: Known limitations, things that could go wrong. Format: [Risk] → Mitigation
    - **Migration Plan**: Steps to deploy, rollback strategy (if applicable)
    - **Open Questions**: Outstanding decisions or unknowns to resolve
    Focus on architecture and approach, not line-by-line implementation.
    Reference the proposal for motivation and specs for requirements.
    Good design docs explain the "why" behind technical decisions.
  requires:
  - proposal
- id: tasks
  generates: tasks.md
  description: Implementation checklist with trackable tasks
  template: tasks.md
  instruction: >
    Create the task list that breaks down the implementation work.
    **IMPORTANT: Follow the template below exactly.** The apply phase parses
    checkbox format to track progress. Tasks not using `- [ ]` won't be tracked.
    Guidelines:
    - Group related tasks under ## numbered headings
    - Each task MUST be a checkbox: `- [ ] X.Y Task description`
    - Tasks should be small enough to complete in one session
    - Order tasks by dependency (what must be done first?)
    Example:
    ```
    ## 1. Setup
    - [ ] 1.1 Create new module structure
    - [ ] 1.2 Add dependencies to package.json
    ## 2. Core Implementation
    - [ ] 2.1 Implement data export function
    - [ ] 2.2 Add CSV formatting utilities
    ```
    Reference specs for what needs to be built, design for how to build it.
    Each task should be verifiable - you know when it's done.
  requires:
  - specs
  - design
apply:
  requires:
  - tasks
  tracks: tasks.md
  instruction: |
    Read context files, work through pending tasks, mark complete as you go.
    Pause if you hit blockers or need clarification.
# proposal.md
## Why
<!-- Explain the motivation for this change. What problem does this solve? Why now? -->
## What Changes
<!-- Describe what will change. Be specific about new capabilities, modifications, or removals. -->
## Capabilities
### New Capabilities
<!-- Capabilities being introduced. Replace <name> with kebab-case identifier (e.g., user-auth, data-export, api-rate-limiting). Each creates specs/<name>/spec.md -->
- `<name>`: <brief description of what this capability covers>
### Modified Capabilities
<!-- Existing capabilities whose REQUIREMENTS are changing (not just implementation).
Only list here if spec-level behavior changes. Each needs a delta spec file.
Use existing spec names from openspec/specs/. Leave empty if no requirement changes. -->
- `<existing-name>`: <what requirement is changing>
## Impact
<!-- Affected code, APIs, dependencies, systems --># spec.md
## ADDED Requirements
### Requirement: <!-- requirement name -->
<!-- requirement text -->
#### Scenario: <!-- scenario name -->
- **WHEN** <!-- condition -->
- **THEN** <!-- expected outcome --># design.md
## Context
<!-- Background and current state -->
## Goals / Non-Goals
**Goals:**
<!-- What this design aims to achieve -->
**Non-Goals:**
<!-- What is explicitly out of scope -->
## Decisions
<!-- Key design decisions and rationale -->
## Risks / Trade-offs
<!-- Known risks and trade-offs --># tasks.md
## 1. <!-- Task Group Name -->
- [ ] 1.1 <!-- Task description -->
- [ ] 1.2 <!-- Task description -->
## 2. <!-- Task Group Name -->
- [ ] 2.1 <!-- Task description -->
- [ ] 2.2 <!-- Task description -->當然我哋都可以由零開始建立全新嘅工作流,我哋可以自定義一個模式,以每次提案之前需要先進行調研,提案後直接產生tasks做例子,喺命令行終端輸入以下指令:
$ openspec schema init research-first
或者
$ openspec schema init research-first --description "快速迭代工作流" --artifacts "proposal,specs,tasks"
輸入Schema描述,揀artifacts製品
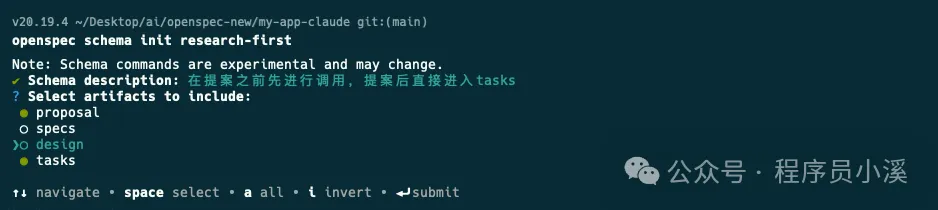
確認配置輸入【y】回車揀將 research-first 設定為預設Schema

建立完成後,我哋會得到一個Schema項目
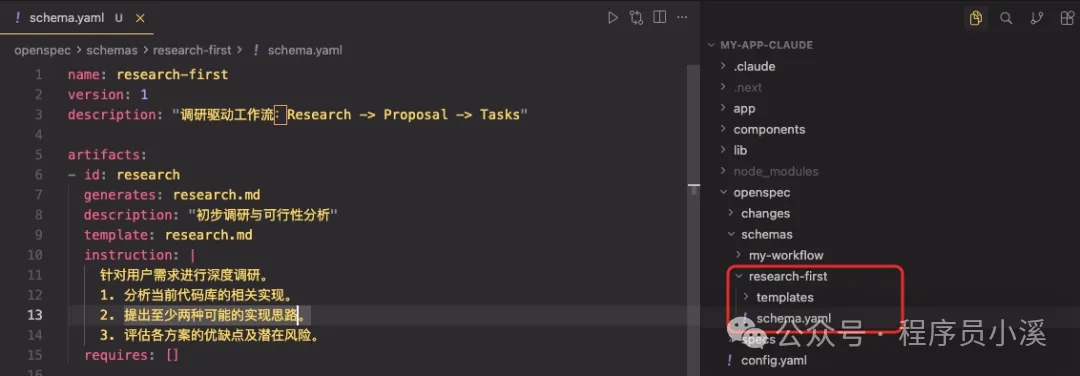
# schema.yaml
name: research-first
version: 1
description: "調研驅動工作流:Research -> Proposal -> Tasks"
artifacts:
- id: research
  generates: research.md
  description: "初步調研與可行性分析"
  template: research.md
  instruction: |
    針對用戶需求進行深度調研。
    1. 分析當前代碼庫的相關實現。
    2. 提出至少兩種可能的實現思路。
    3. 評估各方案的優缺點及潛在風險。
  requires: []
- id: proposal
  generates: proposal.md
  description: "最終選定的實施提案"
  template: proposal.md
  instruction: |
    基於 research.md 的調研結果,確定最終實施方案。
    1. 明確變更的具體範圍。
    2. 描述對現有系統架構的影響。
    3. 定義成功交付的標準。
  requires: [ research ]
- id: tasks
  generates: tasks.md
  description: "可執行的任務清單"
  template: tasks.md
  instruction: |
    根據 proposal.md 的內容,分解為可直接執行的代碼任務。
    1. 任務需具備原子性(每個任務對應 1-2 個文件修改)。
    2. 包含必要的測試任務。
  requires: [ proposal ]
apply:
  requires: [ tasks ]
  tracks: tasks.md
配置項字段:
id:唯一標識符,用於命令同規則
generates:輸出檔案名(支援通配符例如 specs/**/*.md)
template:templates/ 目錄入面嘅模板檔案
instruction:AI 建立呢個製品嘅指令
requires:依賴項 - 邊啲製品必須先存在
# research.md
# Research: {{change_name}}
## 1. 現狀分析
## 2. 方案探索
### 方案 A: [簡述]
- **實現路徑**:
- **優點**:
- **風險**:
### 方案 B: [簡述]
- **實現路徑**:
- **優點**:
- **風險**:
## 3. 調研結論
# proposal.md
# Proposal: {{change_name}}
## 1. 變更目標
## 2. 詳細變更內容
- [ ] 修改點 A
- [ ] 新增組件 B
## 3. 技術約束
- 涉及文件:
- 性能/安全考慮:# tasks.md
# 任務清單
## 前置任務
- [ ] 完成 research.md 的撰寫和審核
- [ ] 完成 proposal.md 的撰寫和審核
## 實施任務
- [ ] [任務1描述]
- [ ] [任務2描述]
- [ ] [任務3描述]
- [ ] ...
## 測試任務
- [ ] [測試任務1描述]
- [ ] [測試任務2描述]
- [ ] [測試任務3描述]
- [ ] ...
## 文檔任務
- [ ] 更新相關技術文檔
- [ ] 編寫用戶手冊或操作指南
- [ ] 記錄變更日誌
## 審核任務
- [ ] 代碼審核
- [ ] 測試報告審核
- [ ] 文檔審核接下來修改 openspec/config.yaml 檔案,配置 research-first 做預設schema
或者用命令行指定
$ openspec new change feature --schema research-first喺用自定義schema之前,我哋需要先對佢進行驗證,喺命令行終端輸入命令
$ openspec schema validate research-first
驗證冇問題之後就可以重新建立變更提案
/opsx:propose 添加暗黑模式最終效果如下,OpenSpec按照我哋提供嘅工作流模板輸出咗對應嘅變更提案製品,檢查冇誤之後就可以實施任務喇。
全局模式
OpenSpec都支援用戶級schema,位於 ~/.local/share/openspec/schemas/,用於跨項目共享,但係更推薦用項目級schema,因為佢哋同你嘅代碼一齊進行版本控制,使用方式同自定義一致。
撳關注,及時接收最新消息
小夥伴們大家好,我是小溪,見字如面。OpenSpec升級到了1.x版本,玩了2天發現相對於老版本來說還是有不小變動的,不僅提供了更靈活的協同工作流程,還支持了自定義工作流模式。習慣使用老版本和對老版本OpenSpec還不瞭解的小夥伴也可以往期內容:
當前使用版本
openspec 1.2.0
優勢
輕量化、靈活性和可擴展性進一步提高
向下兼容,舊版變更可以使用 OPSX 命令繼續,製品結構是兼容的
新增Skills技能調用方式更節省tokens
提供更細粒度的擴展命令
協同工作流程
OpenSepc新版本協同工作流程如下:
如何使用?
需要 Node.js 20.19.0 或更高版本 |
首先更新OpenSpec至最新版本,在命令行終端輸入如下命令:
$ npm install -g @fission-ai/openspec@latest更新完成後,新項目直接進入項目根目錄進行初始化
$ cd your-project
$ openspec init
舊項目也是可以用的,作者建議使用新版本命令,可以直接進入項目根目錄進行更新
$ cd your-project
$ openspec update
想了解更多OpenSpec內容,但又看不太習慣英文的小夥伴,可以看OpenSpec社區中文版本,Github倉庫地址:https://github.com/studyzy/OpenSpec-cn,這裏給好心人點個贊
基本使用
命令行指令
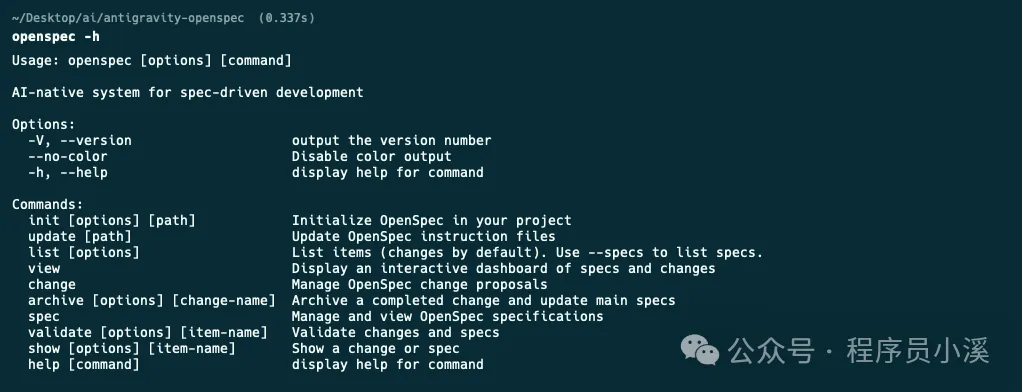
OpenSpec擴展了新的命令行指令,在命令行終端輸入 openspec -h 可以查看完整的命令行幫助文檔,這裏只列舉新增的功能,對已存在的指令還不瞭解的小夥伴可以看往期內容:初識OpenSpec
config:查看並修改全局OpenSpec配置
schema:管理工作流程模式
feedback:提交OpenSpec反饋
completion:管理OpenSpec CLI的Shell補全
generate:生成Shell補全腳本
install:安裝Shell補全腳本
uninstall:卸載Shell補全腳本
status:顯示變更的製品完成狀態
instructions:輸出用於創建制品或執行任務的增強指引
templates:顯示 Schema 中所有制品的解析後模板路徑
schemas:列出可用的工作流 Schema 及其描述
new:創建一個新的變更
OpenSpec新增了CLI Shell自動補管理,我們只需要在命令行終端執行下面命令就會自動安裝
$ openspec completion install安裝完成後重啓命令行終端,輸入 openspec comp 按下【Tab】快捷鍵就可以看到命令的自動補全效果了
自定義命令和Skills
OpenSpec新版本提供了一套以 /opsx: 前綴的自定義命令 和 以 openspec- 為前綴的Skills
OpenSpec默認提供了4個自定義命令:
/opsx:explore:深入思考想法、調查問題、明確需求,用於需求前的頭腦風暴
/opsx:propose:開始一個新變更,會一次性生成所有規劃階段的製品如 proposal、specs、design、tasks
/opsx:apply:實施變更中的任務,AI 會根據 tasks.md 中的任務清單逐一實現功能
/opsx:archive:歸檔已完成的變更,會把整個變更文件夾移入存檔並將增量規範合併到主規範庫
除了這套核心命令,OpenSpec還提供了一套更細粒度的擴展命令,需要通過 openspec config命令配置進行開啓。開啓需要在命令行終端輸入 以下命令:
$ openspec config profile
Delivery:在哪裏安裝工作流,比如在 Skills、Commands
Workflows:工作流中哪些設計指令是可用的,比如 /opsx:explore、/opsx:new
可以靈活選擇配置方式,這裏我選擇【Delivery and workflows】兩者都配置,接下來會先配置Delivery,選擇Both同時生成Skills和Commands
然後配置Workflows使用【Space】快捷鍵選中需要的命令
最後輸入【Y】確認
更新完成後就可以看到更新後的全部配置了
OpenSpec其他自定義命令:
/opsx:new:開始一個新變更,只創建一個空的變更目錄
/opsx:continue:基於依賴關係創建下一個製品,就是一步步創建 proposal、specs、design、tasks
/opsx:ff:Fast-Forward 快速一次性創建所有規劃製品 proposal、specs、design、tasks
/opsx:verify:校驗實現是否與製品匹配
/opsx:sync:將增量規範合併到主規範中,通常不需要手動執行
/opsx:bulk-archive:批量歸檔多個變更
/opsx:onboard:完整的 OpenSpec 工作流引導教程
OpenSpec目錄結構
OpenSpec新版本目錄結構也發生了變化,移除了 project.md 和 AGENTS.md
openspec/
├── config.yaml            # 新增,項目上下文和規則配置
├── project.md             # 已移除,項目規範約定
├── AGENTS.md              # 已移除,為Agent提供的OpenSpec使用說明,
├── specs/                 # 源規範目錄,每次變更歸檔後會合併到這裏
│       ├── spec.md        # 源需求和場景規範
│       └── design.md      # 源技術模式
├── changes/                # 提案變更目錄
│   ├── [change-name]/     # 單個提案變更
│   │   ├── proposal.md     # 為什麼,什麼,影響
│   │   ├── tasks.md        # 實施檢查清單
│   │   ├── design.md       # 技術決策(可選;見標準)
│   │   └── specs/          # 增量變更規範
│   │       └── [capability]/
│   │           └── spec.md # ADDED/MODIFIED/REMOVED
│   └── archive/            # 已完成的提案變更
項目初始化
使用OpenSpec新版本初始化項目,首先在命令行終端進入到項目根目錄,執行 openspec init,使用【space】快捷鍵選擇自己使用的AI工具
確認配置後回車
使用IDE打開可以看到如下目錄結構,在 commands/ 目錄下創建了 opsx/ 命令集,在 skills/ 目錄下創建了對應的技能,同時創建了openspec 配置目錄
創建變更提案
OpenSpec新版本創建變更提案的命令和老版本沒有太大差異,只是做了命令的變更,新版本可以使用 /opsx:propose 需求描述創建 創建變更,也可以使用 /opsx:new 需求描述創建創建變更,甚至可以通過自然語言使用Skills能力創建變更提案
創建一個登錄授權功能提案
這裏以新版本提供的 /opsx:new 命令為例,記錄一下創建變更提案的流程。首先使用下面命令創建一個變更提案:
/opsx:new 創建一個登錄授權功能可以OpenSpec只創建了變更目錄 add-login-auth 和 .openspec.yaml文件並沒有創建我們之前所熟悉的 proposal.md、specs/[capability]/spec.md、design.md 和 tasks.md
要創建上面所需的配置文件,我們需要再次執行 /opsx:continue 命令,到這一步OpenSpec才真正開始創建變更提案內容,與AI確定好問題邊界後提交
執行完成後,可以看到此時才創建了 add-login-auth/proposal.md相當於單步執行
檢查提案沒有問題後再次執行 /opsx:continue 會繼續生成 add-login-auth/design.md
待 proposal.md、design.md、tasks.md 都生成後,再次 /opsx:continue OpenSpec會檢查artifacts狀態,告訴我們下一步該執行的操作
當然也可以創建提案後直接執行 /opsx:ff,一步完成所有artifacts工作,到這裏變更提案階段就算完成了,下一步就可以實施任務了。
實施任務與歸檔
實施任務、歸檔操作和舊版本也沒有太大變化,只是將命令調整為了 /opsx:apply 和 /opsx:archive,歸檔後的文件目錄和舊版本也基本是保持一致的
自定義項目配置
OpenSpec提供了 項目配置、自定義模式、全局覆蓋 3個 級別的自定義:
項目配置:針對項目生效,位於 openspec/schemas/,支持設置默認值,注入上下文/規則,適合大多數團隊
自定義模式:定義自己的工作流製品,適合有獨特流程的團隊
全局模式:針對所有項目生效,位於 ~/.local/share/openspec/schemas/,在所有項目間共享模式,適用於高級用戶
項目配置
在移除 project.md 和 agent.md 後,OpenSpec新版本中新增了 openspec/config.yaml 文件承擔了部分原本由這些文件負責的“項目常識”管理功能。
openspec/config.yaml 文件是為團隊自定義OpenSpec的最簡單方法,它允許我們:
設置默認模式:在每個命令上跳過 --schema
注入項目上下文:AI 看到你的技術棧、約定等
添加每個製品的規則:特定製品的自定義規則
默認工作模式的配置方式大致如下:
# openspec/config.yaml
schema: spec-driven
context: |
  技術棧:TypeScript、React、Node.js
  API 約定:RESTful、JSON 響應
  測試:Vitest 用於單元測試、Playwright 用於端到端測試
  代碼風格:ESLint 搭配 Prettier、嚴格 TypeScript
rules:
  proposal:
    - 包含回滾計劃
    - 識別受影響的團隊
  specs:
    - 使用 Given/When/Then 格式描述場景
  design:
    - 為複雜流程包含序列圖
自定義模式
當項目配置不夠時,創建具有完全自定義工作流的模式。自定義模式位於項目的 openspec/schemas/ 目錄中,並與代碼一起進行版本控制。
your-project/
├── openspec/
│   ├── config.yaml        # 項目配置
│   ├── schemas/           # 自定義模式在此
│   │   └── my-workflow/
│   │       ├── schema.yaml
│   │       └── templates/
│   └── changes/           # 你的變更
└── src/
創建自定義模式最快的方法是 派生內置模式,即通過克隆複製一份默認的內置模式
$ openspec schema fork spec-driven my-workflow這個命令會將整個 spec-driven 模式複製到 openspec/schemas/my-workflow/ 目錄下
文件大致描述如下:
openspec/schemas/my-workflow/
├── schema.yaml           # 工作流定義
└── templates/
    ├── proposal.md       # 提案製品的模板
    ├── spec.md           # 規範的模板
    ├── design.md         # 設計的模板
    └── tasks.md          # 任務的模板
系統內置的提示詞模版如下:
# schema.yaml
name: my-workflow
version: 1
description: Default OpenSpec workflow - proposal → specs → design → tasks
artifacts:
- id: proposal
  generates: proposal.md
  description: Initial proposal document outlining the change
  template: proposal.md
  instruction: >
    Create the proposal document that establishes WHY this change is needed.
    Sections:
    - **Why**: 1-2 sentences on the problem or opportunity. What problem does this solve? Why now?
    - **What Changes**: Bullet list of changes. Be specific about new capabilities, modifications, or removals. Mark breaking changes with **BREAKING**.
    - **Capabilities**: Identify which specs will be created or modified:
      - **New Capabilities**: List capabilities being introduced. Each becomes a new `specs/<name>/spec.md`. Use kebab-case names (e.g., `user-auth`, `data-export`).
      - **Modified Capabilities**: List existing capabilities whose REQUIREMENTS are changing. Only include if spec-level behavior changes (not just implementation details). Each needs a delta spec file. Check `openspec/specs/` for existing spec names. Leave empty if no requirement changes.
    - **Impact**: Affected code, APIs, dependencies, or systems.
    IMPORTANT: The Capabilities section is critical. It creates the contract between
    proposal and specs phases. Research existing specs before filling this in.
    Each capability listed here will need a corresponding spec file.
    Keep it concise (1-2 pages). Focus on the "why" not the "how" -
    implementation details belong in design.md.
    This is the foundation - specs, design, and tasks all build on this.
  requires: []
- id: specs
  generates: specs/**/*.md
  description: Detailed specifications for the change
  template: spec.md
  instruction: >
    Create specification files that define WHAT the system should do.
    Create one spec file per capability listed in the proposal's Capabilities section.
    - New capabilities: use the exact kebab-case name from the proposal (specs/<capability>/spec.md).
    - Modified capabilities: use the existing spec folder name from openspec/specs/<capability>/ when creating the delta spec at specs/<capability>/spec.md.
    Delta operations (use ## headers):
    - **ADDED Requirements**: New capabilities
    - **MODIFIED Requirements**: Changed behavior - MUST include full updated content
    - **REMOVED Requirements**: Deprecated features - MUST include **Reason** and **Migration**
    - **RENAMED Requirements**: Name changes only - use FROM:/TO: format
    Format requirements:
    - Each requirement: `### Requirement: <name>` followed by description
    - Use SHALL/MUST for normative requirements (avoid should/may)
    - Each scenario: `#### Scenario: <name>` with WHEN/THEN format
    - **CRITICAL**: Scenarios MUST use exactly 4 hashtags (`####`). Using 3 hashtags or bullets will fail silently.
    - Every requirement MUST have at least one scenario.
    MODIFIED requirements workflow:
    1. Locate the existing requirement in openspec/specs/<capability>/spec.md
    2. Copy the ENTIRE requirement block (from `### Requirement:` through all scenarios)
    3. Paste under `## MODIFIED Requirements` and edit to reflect new behavior
    4. Ensure header text matches exactly (whitespace-insensitive)
    Common pitfall: Using MODIFIED with partial content loses detail at archive time.
    If adding new concerns without changing existing behavior, use ADDED instead.
    Example:
    ```
    ## ADDED Requirements
    ### Requirement: User can export data
    The system SHALL allow users to export their data in CSV format.
    #### Scenario: Successful export
    - **WHEN** user clicks "Export" button
    - **THEN** system downloads a CSV file with all user data
    ## REMOVED Requirements
    ### Requirement: Legacy export
    **Reason**: Replaced by new export system
    **Migration**: Use new export endpoint at /api/v2/export
    ```
    Specs should be testable - each scenario is a potential test case.
  requires:
  - proposal
- id: design
  generates: design.md
  description: Technical design document with implementation details
  template: design.md
  instruction: >
    Create the design document that explains HOW to implement the change.
    When to include design.md (create only if any apply):
    - Cross-cutting change (multiple services/modules) or new architectural pattern
    - New external dependency or significant data model changes
    - Security, performance, or migration complexity
    - Ambiguity that benefits from technical decisions before coding
    Sections:
    - **Context**: Background, current state, constraints, stakeholders
    - **Goals / Non-Goals**: What this design achieves and explicitly excludes
    - **Decisions**: Key technical choices with rationale (why X over Y?). Include alternatives considered for each decision.
    - **Risks / Trade-offs**: Known limitations, things that could go wrong. Format: [Risk] → Mitigation
    - **Migration Plan**: Steps to deploy, rollback strategy (if applicable)
    - **Open Questions**: Outstanding decisions or unknowns to resolve
    Focus on architecture and approach, not line-by-line implementation.
    Reference the proposal for motivation and specs for requirements.
    Good design docs explain the "why" behind technical decisions.
  requires:
  - proposal
- id: tasks
  generates: tasks.md
  description: Implementation checklist with trackable tasks
  template: tasks.md
  instruction: >
    Create the task list that breaks down the implementation work.
    **IMPORTANT: Follow the template below exactly.** The apply phase parses
    checkbox format to track progress. Tasks not using `- [ ]` won't be tracked.
    Guidelines:
    - Group related tasks under ## numbered headings
    - Each task MUST be a checkbox: `- [ ] X.Y Task description`
    - Tasks should be small enough to complete in one session
    - Order tasks by dependency (what must be done first?)
    Example:
    ```
    ## 1. Setup
    - [ ] 1.1 Create new module structure
    - [ ] 1.2 Add dependencies to package.json
    ## 2. Core Implementation
    - [ ] 2.1 Implement data export function
    - [ ] 2.2 Add CSV formatting utilities
    ```
    Reference specs for what needs to be built, design for how to build it.
    Each task should be verifiable - you know when it's done.
  requires:
  - specs
  - design
apply:
  requires:
  - tasks
  tracks: tasks.md
  instruction: |
    Read context files, work through pending tasks, mark complete as you go.
    Pause if you hit blockers or need clarification.
# proposal.md
## Why
<!-- Explain the motivation for this change. What problem does this solve? Why now? -->
## What Changes
<!-- Describe what will change. Be specific about new capabilities, modifications, or removals. -->
## Capabilities
### New Capabilities
<!-- Capabilities being introduced. Replace <name> with kebab-case identifier (e.g., user-auth, data-export, api-rate-limiting). Each creates specs/<name>/spec.md -->
- `<name>`: <brief description of what this capability covers>
### Modified Capabilities
<!-- Existing capabilities whose REQUIREMENTS are changing (not just implementation).
Only list here if spec-level behavior changes. Each needs a delta spec file.
Use existing spec names from openspec/specs/. Leave empty if no requirement changes. -->
- `<existing-name>`: <what requirement is changing>
## Impact
<!-- Affected code, APIs, dependencies, systems --># spec.md
## ADDED Requirements
### Requirement: <!-- requirement name -->
<!-- requirement text -->
#### Scenario: <!-- scenario name -->
- **WHEN** <!-- condition -->
- **THEN** <!-- expected outcome --># design.md
## Context
<!-- Background and current state -->
## Goals / Non-Goals
**Goals:**
<!-- What this design aims to achieve -->
**Non-Goals:**
<!-- What is explicitly out of scope -->
## Decisions
<!-- Key design decisions and rationale -->
## Risks / Trade-offs
<!-- Known risks and trade-offs --># tasks.md
## 1. <!-- Task Group Name -->
- [ ] 1.1 <!-- Task description -->
- [ ] 1.2 <!-- Task description -->
## 2. <!-- Task Group Name -->
- [ ] 2.1 <!-- Task description -->
- [ ] 2.2 <!-- Task description -->當然我們也可以從0開始創建全新的工作流,我們可以自定義一個模式,在每次提案之前需要先進行調研,提案後直接產生tasks為例,在命令行終端輸入如下指令:
$ openspec schema init research-first
或者
$ openspec schema init research-first --description "快速迭代工作流" --artifacts "proposal,specs,tasks"
輸入Schema描述,選擇artifacts製品
確認配置輸入【y】回車選擇將 research-first 設置為默認Schema
創建完成後,我們將得到一個Schema項目
# schema.yaml
name: research-first
version: 1
description: "調研驅動工作流:Research -> Proposal -> Tasks"
artifacts:
- id: research
  generates: research.md
  description: "初步調研與可行性分析"
  template: research.md
  instruction: |
    針對用戶需求進行深度調研。
    1. 分析當前代碼庫的相關實現。
    2. 提出至少兩種可能的實現思路。
    3. 評估各方案的優缺點及潛在風險。
  requires: []
- id: proposal
  generates: proposal.md
  description: "最終選定的實施提案"
  template: proposal.md
  instruction: |
    基於 research.md 的調研結果,確定最終實施方案。
    1. 明確變更的具體範圍。
    2. 描述對現有系統架構的影響。
    3. 定義成功交付的標準。
  requires: [ research ]
- id: tasks
  generates: tasks.md
  description: "可執行的任務清單"
  template: tasks.md
  instruction: |
    根據 proposal.md 的內容,分解為可直接執行的代碼任務。
    1. 任務需具備原子性(每個任務對應 1-2 個文件修改)。
    2. 包含必要的測試任務。
  requires: [ proposal ]
apply:
  requires: [ tasks ]
  tracks: tasks.md
配置項字段:
id:唯一標識符,用於命令和規則
generates:輸出文件名(支持通配符如 specs/**/*.md)
template:templates/ 目錄中的模板文件
instruction:AI 創建此製品的指令
requires:依賴項 - 哪些製品必須先存在
# research.md
# Research: {{change_name}}
## 1. 現狀分析
## 2. 方案探索
### 方案 A: [簡述]
- **實現路徑**:
- **優點**:
- **風險**:
### 方案 B: [簡述]
- **實現路徑**:
- **優點**:
- **風險**:
## 3. 調研結論
# proposal.md
# Proposal: {{change_name}}
## 1. 變更目標
## 2. 詳細變更內容
- [ ] 修改點 A
- [ ] 新增組件 B
## 3. 技術約束
- 涉及文件:
- 性能/安全考慮:# tasks.md
# 任務清單
## 前置任務
- [ ] 完成 research.md 的撰寫和審核
- [ ] 完成 proposal.md 的撰寫和審核
## 實施任務
- [ ] [任務1描述]
- [ ] [任務2描述]
- [ ] [任務3描述]
- [ ] ...
## 測試任務
- [ ] [測試任務1描述]
- [ ] [測試任務2描述]
- [ ] [測試任務3描述]
- [ ] ...
## 文檔任務
- [ ] 更新相關技術文檔
- [ ] 編寫用戶手冊或操作指南
- [ ] 記錄變更日誌
## 審核任務
- [ ] 代碼審核
- [ ] 測試報告審核
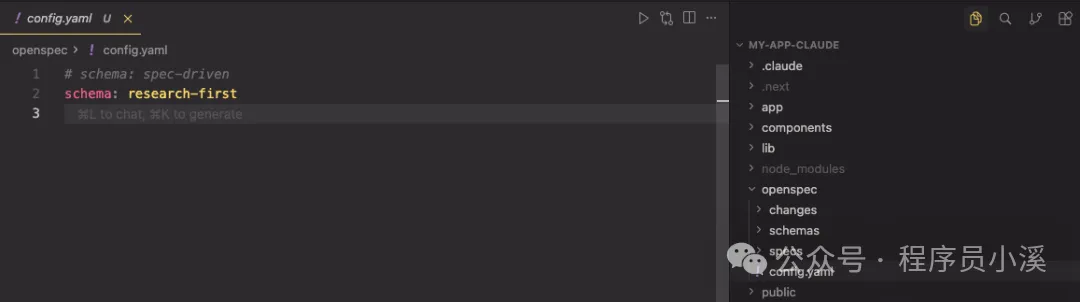
- [ ] 文檔審核接下來修改 openspec/config.yaml 文件,配置 research-first 為默認schema
或者使用命令行指定
$ openspec new change feature --schema research-first在使用自定義schema之前,我們需要先對它進行驗證,在命令行終端輸入命令
$ openspec schema validate research-first
驗證沒有問題後就可以重新創建變更提案了
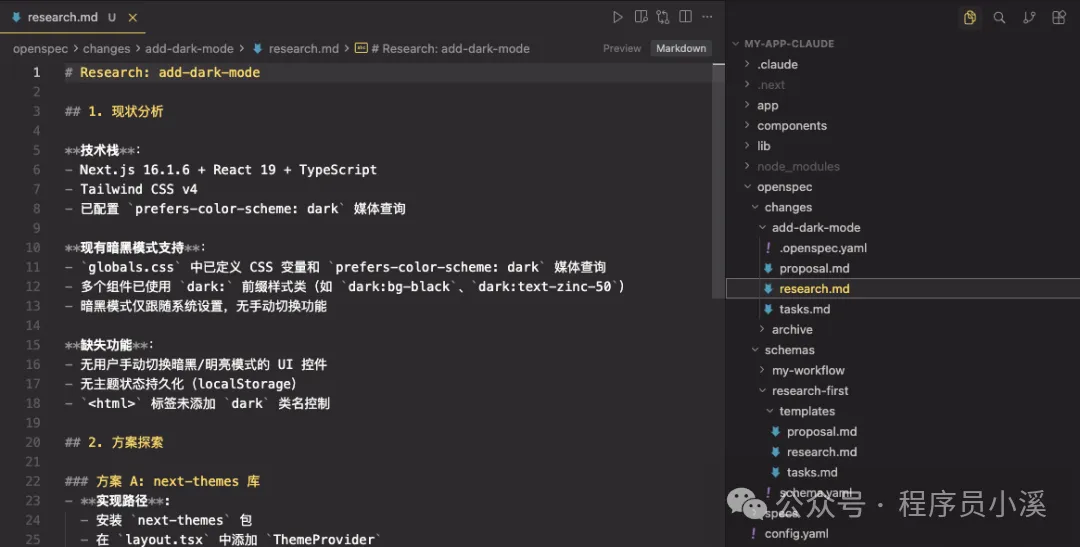
/opsx:propose 添加暗黑模式最終效果如下,OpenSpec按照我們提供的工作流模版輸出了對應的變更提案製品,檢查無誤後就可以實施任務了。
全局模式
OpenSpec也支持用戶級schema,位於 ~/.local/share/openspec/schemas/,用於跨項目共享,但是更推薦使用項目級schema,因為它們與你的代碼一起進行版本控制,使用方式和自定義一致。
點擊關注,及時接收最新消息