Playwright測試Agent三劍客:Planner_Generator_Healer操作指南_v1
整理版優先睇
Playwright v1.56 引入 Planner、Generator、Healer 三大 AI 測試 Agent,將測試工程師由「寫代碼」變為「審查代碼」,實測效率提升約 90%。
呢篇文章主要面向測試工程師同 SDET,系統介紹 Playwright v1.56 引入嘅三大 AI 測試 Agent——Planner(規劃器)、Generator(生成器)同 Healer(修復器)。作者先點出傳統手工編寫 E2E 測試嘅三大痛點:編寫耗時(一個功能模塊要 11-17 小時)、維護成本高(假陽性消耗大量人力)、覆蓋唔完整(容易漏邊界條件)。為咗解決呢啲問題,Playwright 團隊開發咗 Test Agents 機制,透過 Model Context Protocol(MCP)連接 LLM 同真實瀏覽器,用無障礙樹(Accessibility Tree)而唔係屏幕截圖嚟理解頁面結構,從而輸出穩定嘅語義化定位器。整體結論係:呢個 Planner-Generator-Healer 三 Agent 循環可以將測試工程師從「編寫代碼」解放為「審查代碼」,實測效率提升約 90%,而且生成嘅測試係標準 Playwright 測試,唔需要 Agent 運行時就可以直接喺 CI/CD 管道執行。
Planner 負責探索應用並生成結構化測試計劃(Markdown),Generator 將計劃轉換為可執行嘅 .spec.ts 代碼,Healer 則喺測試失敗時自動診斷修復。三個 Agent 可以獨立用、順序調用或者鏈式組合成完整嘅 Agentic Loop。文章仲詳細講解咗安裝配置、快速上手步驟、功能操作、配置定製…
- 結論:Playwright Test Agents 透過 Planner-Generator-Healer 循環,將測試編寫效率提升約 90%,生成嘅測試係標準 Playwright 測試,可直接喺 CI/CD 運行。
- 方法:使用無障礙樹(AOM)代替像素截圖,輸出 getByRole() 等語義化定位器,比傳統 CSS 選擇器更穩定。
- 差異:Agent 將工程師角色由「編寫代碼」變為「審查代碼」;Healer 可自動修復約 80% 嘅脆性測試,但人類審查迴路仍然必要。
- 啟發:種子測試係整個循環嘅核心——設計好種子測試(含 fixtures、認證、hooks),直接影響所有生成測試嘅質量。
- 可行動點:立即更新 Playwright 到 v1.56,執行 npx playwright init-agents 初始化 Agent,從一個簡單種子測試開始體驗 5 分鐘搭建 Agentic Loop。
Planner 高質量提示詞範例
@planner Generate a test plan for the guest checkout flow, covering: Happy path, Error states, Boundary conditions, Performance. Use the category hierarchy from our PRD in docs/checkout-prd.md.
Generator 提示詞範例
@generator Generate tests from specs/checkout-plan.md. Follow these conventions: Use getByRole() whenever possible, fall back to getByTestId(); Separate test.describe blocks for each scenario category; Add explicit waitForURL() after navigation actions.
Playwright Test Agents 初始化步驟
1. npm install -D @playwright/test@latest 2. npx playwright install chromium 3. npx playwright init-agents --loop=vscode 4. 編輯 tests/seed.spec.ts 5. npx playwright test tests/seed.spec.ts
Playwright Test Agents 官方文檔
官方文檔連結
背景與核心概念:點解要用 AI Agent 寫測試
手工編寫端到端測試長期以嚟有三個核心問題:編寫耗時——一個完整功能模塊嘅測試套件要 11-17 個鐘;維護成本高——前端重組導致選擇器漂移,產生大量假陽性;覆蓋唔完整——容易漏邊界條件同異常路徑。Playwright v1.56 引入嘅 Test Agents 就係為咗解決呢啲問題。
呢三個 Agent——Planner(規劃器)、Generator(生成器)同Healer(修復器)——透過 Model Context Protocol(MCP)連接 LLM 同真實瀏覽器,用無障礙樹(Accessibility Tree)而唔係屏幕截圖嚟理解頁面結構,所以輸出嘅定位器更穩定。
- 1 Planner:輸入種子測試同運行中嘅應用,輸出 Markdown 測試計劃(放喺 specs/ 目錄)。
- 2 Generator:讀取測試計劃,喺真實 DOM 驗證選擇器,輸出 .spec.ts 測試文件(放喺 tests/ 目錄)。
- 3 Healer:輸入失敗測試,重放步驟、分析根因(選擇器漂移、時序問題、數據問題),輸出修復後嘅測試。
快速上手與功能詳解:5 分鐘搭建第一個 Agentic Loop
以 TodoMVC 為例,先寫一個最簡單嘅種子測試,淨係得 page.goto()。然後喺 VS Code Copilot Chat 輸入 @planner 要求生成測試計劃,Planner 會自動瀏覽應用,幾分鐘後就喺 specs/ 目錄產出結構化計劃。
跟住輸入 @generator 令 Generator 讀取計劃生成代碼,佢會用 getByRole() 等語義化定位器,每個步驟都有清晰註釋。如果測試失敗,就輸入 @healer 叫 Healer 自動修復。Healer 會以 debug 模式重放失敗步驟,收集 console 日誌同網絡請求,判斷係邊類問題,然後生成修補並自動重跑,直至通過或者達到保護上限。
import { test, expect } from './fixtures';
test('seed', async ({ page, auth }) => {
 await auth.login('testuser@example.com', 'password123');
 await page.goto('https://your-app.com/dashboard');
 await expect(page.getByText('Welcome back')).toBeVisible();
});- Planner 會自動發現快樂路徑、錯誤狀態、邊界條件同安全場景,實際案例中為註冊功能發現 30 個場景,為結賬流程發現 37 個場景。
- Generator 使用 getByRole() 優先,並會跟從種子測試嘅定位器風格;生成嘅代碼可能包含初始錯誤,但可交畀 Healer 自動修復。
- Healer 有 guardrails 限制重試次數,如果應用本身有 bug,佢會將測試標記為 skipped 而唔係繞過真實 bug。
配置與最佳實踐:令 Agent 生得更靚嘅測試
想 Agent 生得好,首先 playwright.config.ts 要 set 好:建議開啟 trace: 'on-first-retry' 同 screenshot: 'only-on-failure',咁 Healer 同人工排查都有足夠資訊。重試次數就 CI 用 2 次,本地用 0 次以保持快反應。
定位器策略方面,Agent 預設跟 Playwright 嘅內置優先級:getByRole() 排第一,跟住 getByLabel()、getByPlaceholder()、getByTestId()</highlight-inline>,最後先用 CSS 層級。你可以喺種子測試入面顯式使用優先定位器,Agent 就會學習你嘅風格。
- 1 數據隔離:每個測試前用工廠端點重置數據,用 Date.now() 生成唯一時間戳,避免跨測試衝突。
- 2 認證狀態複用:用 storageState 保存登入狀態,唔使每個測試都 Login 一次。
- 3 人類審查迴路:Healer 修復後一定要做 Code Review,如果 Healer 合併率約 80% 算正常,太高可能係審查唔夠嚴格,太低就要調整配置。
import { defineConfig, devices } from '@playwright/test';
export default defineConfig({
 testDir: './tests',
 fullyParallel: true,
 forbidOnly: !!process.env.CI,
 retries: process.env.CI ? 2 : 0,
 workers: process.env.CI ? 4 : undefined,
 reporter: [
 ['html', { open: 'never' }],
 ['json', { outputFile: 'test-results.json' }],
 ],
 use: {
 baseURL: process.env.BASE_URL || 'http://localhost:3000',
 trace: 'on-first-retry',
 screenshot: 'only-on-failure',
 video: 'retain-on-failure',
 },
 projects: [
 { name: 'chromium', use: { ...devices['Desktop Chrome'] } },
 { name: 'firefox', use: { ...devices['Desktop Firefox'] } },
 { name: 'webkit', use: { ...devices['Desktop Safari'] } },
 ],
});實戰案例同故障排除:真實世界嘅經驗教訓
Spritle 團隊喺 2025 年嘅實踐數據好有參考價值:為一個用戶管理模塊生成測試,手工預估 11-17 個鐘,Agent 淨係用咗約 1.5 個鐘(效率提升約 90%);Planner 自動發現咗 90+ 測試場景;Generator 產出 1500+ 行 TypeScript 代碼,首次通過率 100%;Healer 喺 30 日內自動修復咗約 12 次 CI 管道斷裂。關鍵成功因素包括種子測試預配置咗完整認證 fixtures,同埋用 PRD 做 Planner 嘅輸入。
不過實際用起上嚟都有幾個常見問題:test.describe() 調用錯誤係 v1.56 嘅已知 bug,通常係因為 MCP 直接 import 測試文件而唔經測試運行器,解決方法係確保種子測試最簡化,同檢查有冇多個 @playwright/test 版本。Agent 無法啟動瀏覽器就要重新 install 瀏覽器;生成嘅選擇器唔穩定</highlight-inline>就要喺種子測試入面強化 getByRole() 同 getByTestId() 嘅使用。
- CI/CD 集成建議:將生成嘅測試直接放入 GitHub Actions,用 matrix 策略跑多瀏覽器;Healer 最好喺本地手動觸發修復,審查完先合併,唔建議全自動修復後直接 push。
- 適用場景:Web 應用 E2E 測試批量生成、現有套件脆性修復、新功能快速覆蓋。唔適用:需要深度領域知識嘅後端邏輯測試、複雜多步驟有狀態工作流、需要特殊硬件嘅測試。
- 學更多嘢:官方文檔(playwright.dev/docs/test-agents)、GitHub 倉庫(microsoft/playwright)、Discord 社區(aka.ms/playwright/discord)。
呢篇文章專為測試工程師同SDET而設,詳細介紹Playwright v1.56引入嘅三個AI測試Agent——Planner(規劃器)、Generator(生成器)同Healer(修復器)嘅安裝設定、操作使用、CI/CD集成同故障排除。文章涵蓋由零搭建Agentic Loop到實戰落地嘅成個流程,包含指令示例、配置模板同真實案例數據。
目錄
概述
1.1 問題背景:人手寫測試嘅痛點
1.2 Playwright Test Agents 係咩嚟
1.3 三大Agent角色同Agentic Loop環境準備與安裝
2.1 系統要求
2.2 安裝步驟
2.3 初始化Agent定義
2.4 驗證安裝快速上手:5分鐘整好你第一個Agentic Loop
3.1 創建種子測試
3.2 啟動 Planner 生成測試計劃
3.3 啟動 Generator 生成測試代碼
3.4 啟動 Healer 修復失敗用例功能操作詳解
4.1 Planner:由應用到測試計劃
4.2 Generator:由計劃到可執行代碼
4.3 Healer:自動修復失敗測試
4.4 目錄結構與產物約定配置與定製
5.1 playwright.config.ts 配置
5.2 種子測試最佳實踐
5.3 MCP 工具配置
5.4 多環境與多項目配置使用技巧與最佳實踐
6.1 定位器優先級策略
6.2 提示詞工程
6.3 人類審查迴路
6.4 數據隔離與確定性狀態常見問題與故障排除
7.1 test.describe() 調用錯誤
7.2 Agent無法啟動瀏覽器
7.3 生成嘅選擇器唔穩定
7.4 Healer 無限循環
7.5 VS Code 版本唔兼容實戰案例
8.1 案例一:TodoMVC 應用全覆蓋
8.2 案例二:用戶管理模塊深度測試
8.3 案例三:CI/CD 管道集成總結
參考文獻
1. 概述
1.1 問題背景:人手寫測試嘅痛點
人手寫端到端(E2E)測試長期以來面對三個核心問題:
編寫需時:一個完整嘅功能模塊測試套件通常需要11至17個鐘嘅編寫時間,包括DOM結構逆向分析、選擇器編寫、斷言設計同邊界條件梳理。 維護成本高:前端組件改名或結構調整之後,選擇器偏移導致大量假失敗。喺一個有1200條用例嘅測試套件上,4%嘅脆弱率意味住每週大約1000次假失敗,消耗3個工程師工作日。 覆蓋唔完整:人工寫測試容易遺漏邊界條件同異常路徑,尤其係權限矩陣、長文字輸入、並發操作呢啲場景。
Playwright v1.56(2025年10月發佈)引入嘅Test Agents機制,透過AI Agent自動化呢三個環節,將測試工程師由「寫測試代碼」變做「審查測試代碼」。
1.2 Playwright Test Agents 係咩嚟
Playwright Test Agents 係三個內置嘅AI Agent,佢哋透過Model Context Protocol(MCP)連接LLM同真實瀏覽器,用無障礙樹(Accessibility Tree)而唔係螢幕截圖嚟理解頁面結構。Agent之間可以獨立使用、順序調用或者鏈式組合,形成完整嘅Agentic Loop。
1.3 三大Agent角色與Agentic Loop
.spec.ts | |||
Agentic Loop嘅工作流程如下:
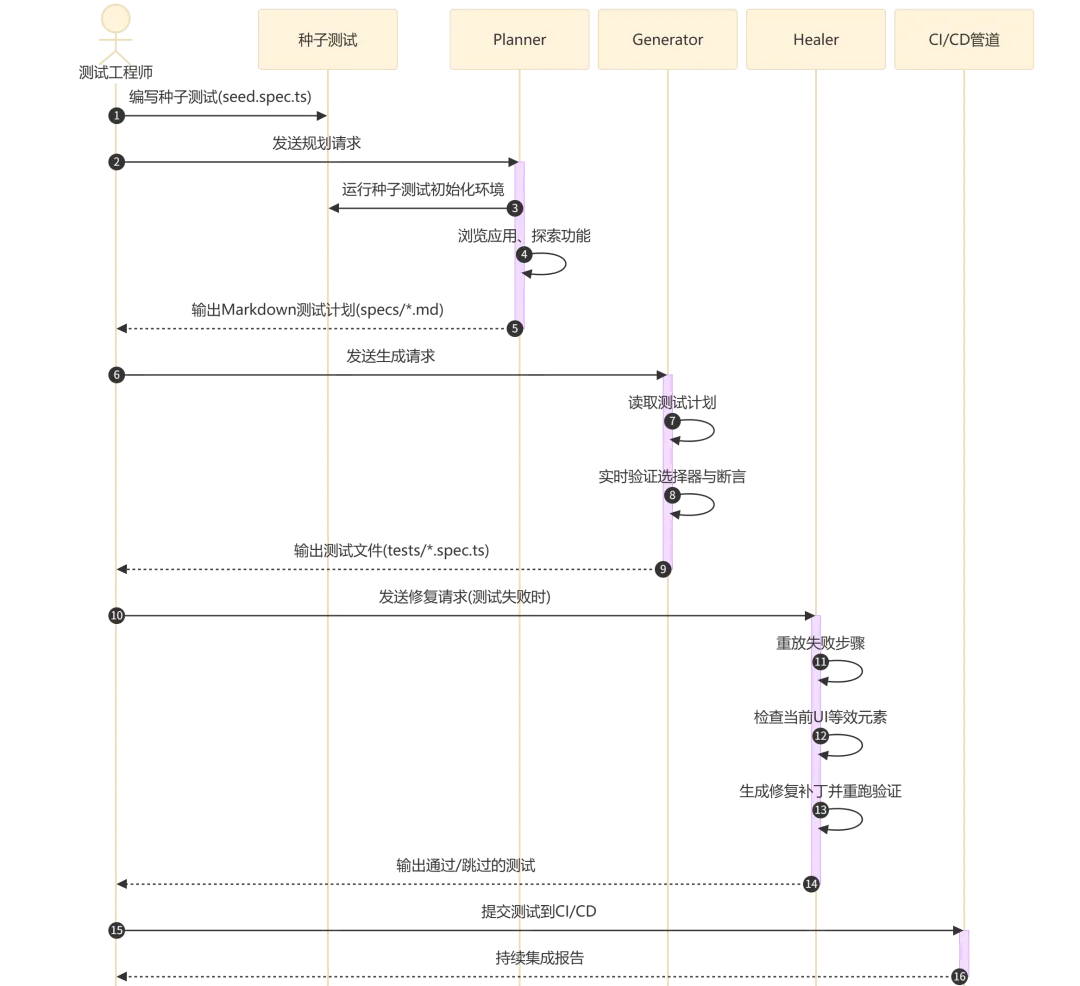
流程執行說明:
步驟1-2:測試工程師只需要寫一個種子測試文件,包含環境初始化邏輯(自訂fixtures、認證、hooks等) 步驟3-5:Planner Agent自動瀏覽應用,生成結構化嘅測試計劃(包含場景、步驟同預期結果),保存到 specs/目錄步驟6-8:Generator Agent讀取測試計劃,喺真實DOM入面驗證每個選擇器,生成可執行嘅Playwright測試代碼 步驟9-13:Healer Agent喺測試失敗時觸發,重放步驟、檢查UI、建議修復並驗證,直到測試通過或者判定功能已損壞 步驟14-15:生成嘅測試係標準Playwright測試,可以直接提交到CI/CD管道運行,唔需要Agent運行時
2. 環境準備與安裝
2.1 系統要求
Node.js 18 或者更高版本 支援嘅AI工具之一: VS Code v1.105+(2025年10月9日發佈)配合GitHub Copilot Claude Code OpenCode Cursor(需要手動配置MCP) 操作系統:Windows、macOS、Linux都支援
2.2 安裝步驟
第一步:安裝Playwright Test最新版本
npm install -D @playwright/test@latest第二步:安裝瀏覽器(至少要安裝Chromium)
npx playwright install chromium如果需要多瀏覽器支援,可以安裝全部瀏覽器:
npx playwright install --with-deps2.3 初始化Agent定義
根據你嘅AI工具揀適合嘅--loop參數:
# VS Code + GitHub Copilot / Cursor
npx playwright init-agents --loop=vscode

# Claude Code
npx playwright init-agents --loop=claude

# OpenCode
npx playwright init-agents --loop=opencode
呢個指令會生成以下文件:
repo/
  .github/agents/              # Agent定義文件(VS Code)
  # 或 .claude/agents/         # Agent定義文件(Claude Code)
  specs/ # 測試計劃輸出目錄
tests/seed.spec.ts # 種子測試模板重要提示:每次升級Playwright之後,一定要重新執行init-agents指令以獲取最新嘅Agent定義同工具。
2.4 驗證安裝
驗證種子測試可以正常運行:
npx playwright test tests/seed.spec.ts預期輸出:
Running 1 test using 1 worker

  ✓  seed (2.3s)

  1 passed (2.5s)
喺VS Code入面,確認Agent已經正確加載:打開命令面板(Ctrl+Shift+P),搜尋「Playwright Agent」,應該會見到planner、generator、healer三個Agent選項。
3. 快速上手:5分鐘整好你第一個Agentic Loop
以TodoMVC示例應用(https://demo.playwright.dev/todomvc)做測試目標。
3.1 創建種子測試
編輯tests/seed.spec.ts:
import { test, expect } from '@playwright/test';

test('seed', async ({ page }) => {
  await page.goto('https://demo.playwright.dev/todomvc');
  // 種子測試負責啓動環境。可以包含:
  // - 自定義fixtures引用
  // - 認證登錄步驟
  // - 任何需要在測試前執行的初始化邏輯
});
執行種子測試確保環境就緒:
npx playwright test tests/seed.spec.ts3.2 啟動 Planner 生成測試計劃
喺VS Code Copilot Chat輸入:
@planner Generate a comprehensive test plan for the TodoMVC application.
Explore all features: adding, completing, editing, deleting todos,
filtering, bulk operations, and edge cases.
或者喺Claude Code用:
使用planner Agent為TodoMVC生成全面測試計劃,涵蓋增刪改查、篩選、
批量操作和邊界條件。Planner會打開瀏覽器自動瀏覽應用,探索所有功能,最終喺specs/目錄生成Markdown測試計劃。
3.3 啟動 Generator 生成測試代碼
喺VS Code Copilot Chat輸入:
@generator Generate tests from specs/todomvc-test-plan.mdGenerator會讀取測試計劃,喺真實DOM入面驗證每個選擇器,然後生成完整嘅.spec.ts測試文件到tests/目錄。
3.4 啟動 Healer 修復失敗用例
當測試失敗時,直接同AI工具講:
@healer Fix the failing test: tests/add-todo.spec.tsHealer會重放失敗步驟,檢查當前UI,建議修復方案,並且反覆重跑直到測試通過。
4. 功能操作詳解
4.1 Planner:由應用到測試計劃
輸入要素:
明確嘅規劃請求(例如「為客人結帳流程生成測試計劃」) 種子測試文件( tests/seed.spec.ts),Planner會將佢納入上下文可選:產品需求文檔(PRD),提供額外嘅業務上下文
工作流程:
Planner Agent首先執行種子測試,以執行所有初始化——包括全局設定、項目依賴以及所有必要嘅fixtures同hooks。種子測試亦都作為後續所有生成測試嘅示例模板。
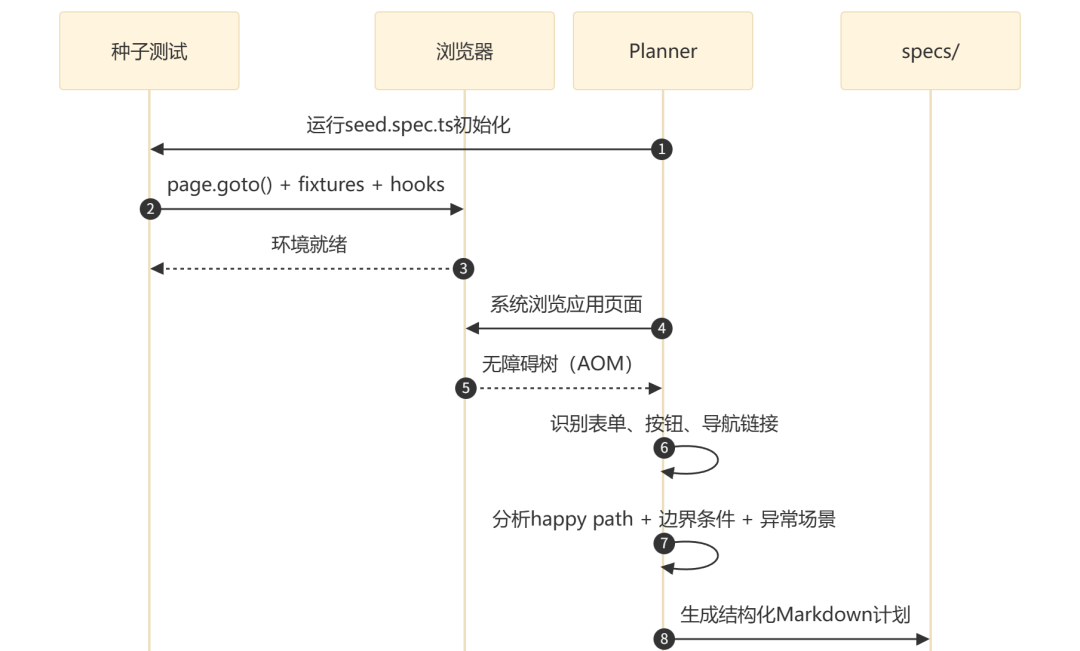
流程執行說明:
Planner使用Accessibility Object Model(AOM)獲取結構化快照,包含元素嘅角色、名稱、狀態同層級關係 呢種方式比起基於像素嘅視覺方法更穩定,因為定位器可以直接映射到 getByRole()等語義化選擇器Planner會系統性地發現:快樂路徑、錯誤狀態、邊界條件同安全場景(XSS、SQL注入等)
輸出示例(specs/todomvc-basic-operations.md):
# TodoMVC Application - Basic Operations Test Plan

## Application Overview
The TodoMVC application is a React-based todo list manager...

## Test Scenarios

### 1. Adding New Todos
**Seed:** `tests/seed.spec.ts`

#### 1.1 Add Valid Todo
**Steps:**
1. Click in the "What needs to be done?" input field
2. Type "Buy groceries"
3. Press Enter key

**Expected Results:**
- Todo appears in the list with unchecked checkbox
- Counter shows "1 item left"
- Input field is cleared and ready for next entry
- Todo list controls become visible
實際案例入面,Planner曾經為註冊功能自動發現30個場景,為結帳流程自動發現37個場景,遠超人工梳理嘅覆蓋範圍。
4.2 Generator:由計劃到可執行代碼
輸入:specs/目錄入面嘅Markdown測試計劃文件
工作流程:
Generator會將Markdown計劃(例如basic-operations.md)納入上下文,遍歷計劃入面嘅每個場景同步驟,喺真實瀏覽器入面執行操作並驗證選擇器嘅有效性。Playwright提供生成提示(generation hints)同斷言目錄,幫Generator進行高效嘅結構同行為驗證。
輸出示例(tests/add-valid-todo.spec.ts):
// spec: specs/basic-operations.md
// seed: tests/seed.spec.ts
import { test, expect } from '../fixtures';

test.describe('Adding New Todos', () => {
  test('Add Valid Todo', async ({ page }) => {
    const todoInput = page.getByRole('textbox',
      { name: 'What needs to be done?' });
    await todoInput.click();
    await todoInput.fill('Buy groceries');
    await todoInput.press('Enter');

    await expect(page.getByText('Buy groceries')).toBeVisible();
    const todoCheckbox = page.getByRole('checkbox',
      { name: 'Toggle Todo' });
    await expect(todoCheckbox).toBeVisible();
    await expect(todoCheckbox).not.toBeChecked();
    await expect(page.getByText('1 item left')).toBeVisible();
    await expect(todoInput).toHaveValue('');
    await expect(todoInput).toBeFocused();
    await expect(page.getByRole('checkbox',
      { name: '❯Mark all as complete' })).toBeVisible();
  });
});
Generator嘅特點:
使用 getByRole()等語義化定位器,而唔係脆弱嘅CSS選擇器每個步驟都基於計劃描述,帶有清晰嘅註釋引用 斷言覆蓋UI可見性、狀態檢查、數值驗證等多維度 生成嘅測試可能包含初始錯誤,但呢啲錯誤可以由Healer Agent自動修復
4.3 Healer:自動修復失敗測試
輸入: 失敗嘅測試名稱
工作流程:

流程執行說明:
Healer以debug模式重放失敗步驟,收集控制枱日誌、網絡請求和頁面快照 根因分析分為三類:選擇器偏移(前端組件改名)、時序問題(加載時間變化)、數據問題(測試數據過期) Healer生成修復補丁後自動重跑驗證,直到測試通過或者達到保護上限(guardrails) 如果應用本身有bug(而唔係測試代碼問題),Healer會將測試標記為skipped,而唔係繞過真實bug
4.4 目錄結構與產物約定
Agent生成嘅完整項目結構:
repo/
  .github/agents/ # Agent定義文件
    planner.chatmode.md
    generator.chatmode.md
    healer.chatmode.md
  specs/ # 人類可讀的測試計劃
    basic-operations.md
    auth-flows.md
    checkout-scenarios.md
  tests/ # 生成的Playwright測試
   seed.spec.ts # 種子測試
    tests/create/add-valid-todo.spec.ts
    tests/create/add-multiple-todos.spec.ts
    tests/edit/edit-todo.spec.ts
    tests/delete/delete-todo.spec.ts
playwright.config.ts.github/agents/:Agent定義文件,包含MCP工具集合同指令。每次升級Playwright之後一定要重新生成。specs/:結構化測試計劃,描述場景、步驟、預期結果同數據,人類可讀而且夠精確嚟驅動代碼生成。tests/:生成嘅可執行測試文件,盡可能同specs一一對齊。tests/seed.spec.ts:提供預配置好嘅page上下文,包含所有fixtures、hooks同初始化邏輯。
5. 配置與定製
5.1 playwright.config.ts 配置
推薦嘅Playwright配置文件:
import { defineConfig, devices } from '@playwright/test';

export default defineConfig({
  testDir: './tests',
  fullyParallel: true,
  forbidOnly: !!process.env.CI,
  retries: process.env.CI ? 2 : 0,
  workers: process.env.CI ? 4 : undefined,
  reporter: [
    ['html', { open: 'never' }],
    ['json', { outputFile: 'test-results.json' }],
  ],
  use: {
    baseURL: process.env.BASE_URL || 'http://localhost:3000',
    trace: 'on-first-retry',
    screenshot: 'only-on-failure',
    video: 'retain-on-failure',
  },
  projects: [
    {
      name: 'chromium',
      use: { ...devices['Desktop Chrome'] },
    },
    {
      name: 'firefox',
      use: { ...devices['Desktop Firefox'] },
    },
    {
      name: 'webkit',
      use: { ...devices['Desktop Safari'] },
    },
  ],
});
關鍵配置項說明:
trace: 'on-first-retry':首次重試時記錄完整trace,用於Healer分析同人工排查screenshot: 'only-on-failure':失敗時截圖,為Healer提供UI狀態快照retries:CI環境設定為2次重試,本地為0以提高反饋速度
5.2 種子測試最佳實踐
種子測試係整個Agentic Loop嘅起點,佢嘅質量直接影響後續所有生成嘅測試:
最小化種子測試(推薦起步):
import { test, expect } from '@playwright/test';

test('seed', async ({ page }) => {
  await page.goto('https://your-app.com');
});
有認證嘅種子測試:
import { test, expect } from './fixtures';

test('seed', async ({ page, auth }) => {
  await auth.login('testuser@example.com', 'password123');
  await page.goto('https://your-app.com/dashboard');
  await expect(page.getByText('Welcome back')).toBeVisible();
});
種子測試設計原則:
保持最小化:只包含環境初始化必需步驟,唔好包含業務驗證邏輯 使用自訂fixtures封裝通用邏輯(認證、數據工廠、API mock) 文件名固定為 seed.spec.ts——Planner默認揾呢個文件避免喺種子測試入面導入複雜嘅測試工具庫——呢啲依賴可能導致MCP工具加載失敗
5.3 MCP 工具配置
Agent透過MCP服務器同瀏覽器互動。以下係完整配置參考:
Claude Code MCP 配置:
claude mcp add playwright npx @playwright/mcp@latestVS Code MCP 配置(.vscode/mcp.json):
{
  "servers": {
    "playwright": {
      "command": "npx",
      "args": ["@playwright/mcp@latest"]
    }
  }
}
MCP 工具類別:
5.4 多環境與多項目配置
多環境配置示例:
// playwright.config.ts
export default defineConfig({
  projects: [
    {
      name: 'staging-chromium',
      use: {
        ...devices['Desktop Chrome'],
        baseURL: 'https://staging.example.com',
      },
    },
    {
      name: 'production-chromium',
      use: {
        ...devices['Desktop Chrome'],
        baseURL: 'https://example.com',
      },
    },
  ],
});
透過環境變數切換測試目標:
BASE_URL=https://staging.example.com npx playwright test --project=staging-chromium6. 使用技巧與最佳實踐
6.1 定位器優先級策略
Playwright Agent默認跟隨內置嘅定位器優先級,但你可以透過喺種子測試同配置入面強化呢個策略嚟得到更好嘅生成質量:
getByRole():最優先——語義化、無障礙友好、對DOM結構變化最穩健getByLabel():表單元素最佳選擇——透過關聯嘅label定位getByPlaceholder():輸入框嘅輔助定位方式getByTestId():當語義定位唔夠用時使用,喺源碼入面加data-testid屬性getByText():文字內容定位——注意多語言場景嘅脆弱性nth-child同CSS層級選擇器:只係最後手段
喺種子測試入面明確使用優先定位器,Agent會學習並模仿你嘅風格。
6.2 提示詞工程
同Agent互動嘅提示詞質量直接影響輸出結果。以下係一啲經過驗證嘅模式:
Planner提示詞示例(高質量):
@planner Generate a test plan for the guest checkout flow, covering:
- Happy path: valid credit card, valid shipping address
- Error states: invalid card number, expired card, empty required fields
- Boundary conditions: maximum order quantity, minimum order value
- Performance: checkout completion within 3 seconds
Use the category hierarchy from our PRD in docs/checkout-prd.md.
Generator提示詞示例(高質量):
@generator Generate tests from specs/checkout-plan.md. Follow these conventions:
- Use getByRole() whenever possible, fall back to getByTestId()
- Separate test.describe blocks for each scenario category
- Add explicit waitForURL() after navigation actions
- Use data-testid attributes where available
關鍵原則:
分拆任務:Azure DevOps團隊驗證嘅兩步提示策略(「獲取測試用例」→「生成腳本」)比單步組合提示更可靠 指定定位器偏好:明確話畀Generator你希望嘅定位器優先級 提供上下文:引用PRD、設計規範、fixture文檔
6.3 人類審查迴路
Healer修復後嘅測試唔係最終版本——一定要經過人工審查:
Healer提出修復 → 人工Review → CI門禁驗證 → 合併設定Healer重試上限:
最多2輪自動修復——超過就最好人工介入 如果Healer合併率大約80%:運作正常 如果成日100%通過:即係審查唔夠嚴謹 如果成日被拒絕:Healer配置需要調整
6.4 數據隔離與確定性狀態
使用工廠端點重置測試數據:每個測試場景前調用 /api/test/reset或者類似端點時間戳動態數據:使用 Date.now()生成唯一測試數據,避免跨測試數據衝突認證狀態複用:透過 storageState保存同加載認證狀態,避免每次測試都做登入
// 保存認證狀態
test('login and save state', async ({ page }) => {
  await page.goto('/login');
  await page.fill('[name="email"]', 'test@example.com');
  await page.fill('[name="password"]', 'password');
  await page.click('button[type="submit"]');
  await page.waitForURL('/dashboard');
  await page.context().storageState({ path: 'auth.json' });
});

// 複用認證狀態
test.use({ storageState: 'auth.json' });
test('authenticated test', async ({ page }) => {
  await page.goto('/dashboard');
  // 直接進入已登錄狀態
});
7. 常見問題與故障排除
7.1 test.describe() 調用錯誤
錯誤信息:
Error: Playwright Test did not expect test.describe() to be called here.
Most common reasons include:
- You are calling test.describe() in a configuration file.
- You are calling test.describe() in a file that is imported by the configuration file.
- You have two different versions of @playwright/test.

   at seed.spec.ts:3
原因: v1.56嘅已知bug——MCP工具喺加載seed.spec.ts時直接import測試文件,而唔係透過測試運行器執行,觸發咗Playwright嘅內部保護機制。
排查步驟:
手動執行種子測試確認語法正確: npx playwright test tests/seed.spec.ts檢查係咪安裝咗多個版本嘅 @playwright/test:npm ls @playwright/test確認 playwright.config.ts冇import測試文件嘗試將種子測試最小化(只保留 page.goto()一行)
GitHub Issue追蹤: #37774[1]、#37749[2]
7.2 Agent無法啟動瀏覽器
症狀: Planner或者Generator報瀏覽器未找到錯誤。
解決方案:
# 重新安裝瀏覽器
npx playwright install --with-deps

# 檢查瀏覽器路徑
npx playwright install --dry-run

# 對於Linux CI環境,確保安裝系統依賴
sudo npx playwright install-deps
7.3 生成嘅選擇器唔穩定
症狀: 測試間中失敗,選擇器揾唔到元素。
解決方案:
喺種子測試入面用 getByRole()和getByTestId()做主要定位方式,Agent會學習呢個模式為關鍵互動元素加 data-testid屬性喺Generator提示詞入面明確指定定位器優先級 用Healer自動修復選擇器偏移
7.4 Healer 無限循環
症狀: Healer不斷嘗試修復同一個測試,陷入循環。
解決方案:
Healer內置guardrails會自動限制重試次數 如果超出限制都未修復,即係可能應用功能真係有問題 手動檢查測試場景對應嘅應用功能係咪正常 喺prompt入面明確話畀Healer:「如果3次嘗試後仍然失敗,標記為skip」
7.5 VS Code 版本唔兼容
症狀: Agent喺VS Code入面睇唔到或者冇反應。
解決方案:
確認VS Code版本 ≥ v1.105(2025年10月9日發佈) 更新VS Code: Help > Check for Updates重新初始化Agent: npx playwright init-agents --loop=vscode檢查GitHub Copilot擴展係咪已經安裝並啟用
8. 實戰案例
8.1 案例一:TodoMVC 應用全覆蓋
場景: 為一個React TodoMVC應用建立完整嘅E2E測試套件。
操作過程:
第一步:創建種子測試
import { test, expect } from '@playwright/test';
test('seed', async ({ page }) => {
  await page.goto('https://demo.playwright.dev/todomvc');
});
第二步:啟動Planner
@planner Generate a comprehensive test plan for the TodoMVC app.
Explore: adding, editing, completing, deleting todos, filtering
(All/Active/Completed), bulk toggle, clear completed, counter
accuracy, and edge cases (empty input, very long text, special characters).
Planner喺幾分鐘內自動瀏覽曬所有功能路徑,生成咗包含8個場景、30幾個子場景嘅結構化測試計劃。
第三步:啟動Generator
@generator Generate tests from specs/todomvc-test-plan.md.
Use getByRole() locators. Follow Playwright best practices.
Generator生成咗30幾個測試用例,覆蓋曬所有場景。
第四步:執行測試並修復
npx playwright test --project=chromium初始通過率大約85%,剩低5個失敗用例交畀Healer修復後全部通過。
效果: 由零到完整測試套件大約15分鐘,而傳統人手寫最少需要4個鐘。
8.2 案例二:用戶管理模塊深度測試
場景: 某CII-ESG診斷平台用戶管理模塊,涉及基於角色嘅權限矩陣。
實際數據(嚟自Spritle團隊2025年實踐):
人手寫時間:預計11-17個鐘 Agent生成時間:大約1.5個鐘(效率提升約90%) Planner自動發現:90幾個測試場景,8個測試套件 Generator產出:1500幾行TypeScript,使用 getByRole()、getByTestId()同時間戳動態數據首次執行通過率:100% 月度維護:Healer喺30日內自動修復咗大約12次CI管道斷裂(前端組件改名導致)
關鍵成功因素:
種子測試預配置咗完整嘅認證fixtures同角色切換邏輯 PRD文檔作為Planner輸入,提供咗權限矩陣嘅精確描述 Generator明確被要求使用 data-testid作為回退定位器
8.3 案例三:CI/CD 管道集成
場景: 將Agent生成嘅測試套件集成到GitHub Actions CI/CD管道。
GitHub Actions 配置:
name: Playwright E2E Tests
on:
  push:
    branches: [main, develop]
  pull_request:
    branches: [main]

jobs:
  e2e:
    name: E2E Tests
    runs-on: ubuntu-latest
    strategy:
      matrix:
        browser: [chromium, firefox, webkit]
    steps:
      - uses: actions/checkout@v4

      - uses: actions/setup-node@v4
        with:
          node-version: 20
          cache: 'npm'

      - name: Install dependencies
        run: npm ci

      - name: Install Playwright browsers
        run: npx playwright install --with-deps ${{ matrix.browser }}

      - name: Run E2E tests
        run: npx playwright test --project=${{ matrix.browser }}

      - name: Upload test report
        if: always()
        uses: actions/upload-artifact@v4
        with:
          name: playwright-report-${{ matrix.browser }}
          path: playwright-report/

      - name: Upload test results
        if: always()
        uses: actions/upload-artifact@v4
        with:
          name: test-results-${{ matrix.browser }}
          path: test-results/
跨平台執行:
strategy:
  matrix:
    os: [ubuntu-latest, windows-latest]
    browser: [chromium]
Healer喺CI入面嘅集成:
喺CI失敗後手動觸發修復(唔建議全自動修復直接合併):
# CI報告失敗後,本地觸發Healer
claude mcp call playwright @healer fix failing-test.spec.ts

# 審查修復內容
git diff tests/

# 通過審查後提交
git add tests/ && git commit -m "修復:Healer修復選擇器漂移問題"
9. 總結
Playwright Test Agents透過Planner-Generator-Healer三個Agentic Loop,將測試工程師由「寫代碼」變做「審查代碼」,實測效率提升約90% Agent使用無障礙樹(AOM)理解頁面結構,輸出語義化定位器( getByRole()、getByTestId()),比像素級分析更穩定種子測試係整個Agentic Loop嘅核心——投入時間設計好嘅種子測試(包含fixtures、認證、hooks),直接影響所有生成測試嘅質量 人類審查迴路唔可以省略——Healer修復後一定要經過Code Review同CI門禁驗證,建議限制最多2輪自動修復 生成嘅測試係標準Playwright測試,唔需要Agent運行時就可以喺任何CI/CD管道入面執行 適用場景:Web應用E2E測試嘅批量生成、現有測試套件嘅脆弱修復、新功能嘅快速測試覆蓋。唔適用場景:需要深度領域知識嘅後端邏輯測試、複雜嘅多步驟有狀態工作流、需要特殊硬件或者物理設備嘅測試 學習資源:官方文檔(playwright.dev/docs/test-agents)、GitHub倉庫(microsoft/playwright)、Discord社區(aka.ms/playwright/discord)
參考文獻
[1] Playwright Test Agents 官方文檔:https://playwright.dev/docs/test-agents
[2] Playwright GitHub 倉庫:https://github.com/microsoft/playwright
[3] Playwright v1.56 Release Notes:https://github.com/microsoft/playwright/releases/tag/v1.56.0
[4] Playwright Agents: Planner, Generator, and Healer in Action(dev.to):https://dev.to/playwright/playwright-agents-planner-generator-and-healer-in-action-5ajh
[5] Playwright Test Agents Guide(TestDino):https://testdino.com/blog/playwright-test-agents/
[6] Why I'll Never Manually Write Test Scripts Again(Spritle):https://www.spritle.com/blog/why-ill-never-manually-write-test-scripts-again-and-you-shouldnt-either/
[7] Every Playwright Needs a Director(monday.com Engineering):https://engineering.monday.com/every-playwright-needs-a-director-how-ai-agents-replace-dom-scraping-with-component-aware-static-analysis/
[8] 9 Strategies to Get the Most Out of Playwright Test Agents(Currents.dev):https://currents.dev/posts/9-strategies-to-get-the-most-out-of-playwright-test-agents
[9] From Manual Testing to AI-Generated Automation(Azure DevOps Blog):https://devblogs.microsoft.com/devops/from-manual-testing-to-ai-generated-automation-our-azure-devops-mcp-playwright-success-story/
[10] GitHub Issue #37774:test.describe() 錯誤:https://github.com/microsoft/playwright/issues/37774
[11] GitHub Issue #37749:seed.spec.ts 加載錯誤:https://github.com/microsoft/playwright/issues/37749
[12] Playwright MCP Server:https://github.com/microsoft/playwright-mcp
[13] Playwright CLI for Coding Agents:https://github.com/microsoft/playwright-cli
[14] How Skills Make Agentic AI Test Automation Efficient(Sogeti):https://labs.sogeti.com/from-test-case-to-running-playwright-spec-how-skills-make-agentic-ai-test-automation-efficient/
[15] Playwright 1.56 - Introducing Playwright Test Agents(YouTube):https://www.youtube.com/watch?v=_AifxZGxwuk
https://github.com/microsoft/playwright/issues/37774 ↩ https://github.com/microsoft/playwright/issues/37749 ↩
本文面向測試工程師和SDET,系統介紹Playwright v1.56引入的三大AI測試Agent——Planner(規劃器)、Generator(生成器)和Healer(修復器)的安裝配置、操作使用、CI/CD集成與故障排除。文章涵蓋從零搭建Agentic Loop到實戰落地全流程,包含命令示例、配置模板和真實案例數據。
目錄
概述
1.1 問題背景:手工編寫測試的痛點
1.2 Playwright Test Agents 是什麼
1.3 三大Agent角色與Agentic Loop環境準備與安裝
2.1 系統要求
2.2 安裝步驟
2.3 初始化Agent定義
2.4 驗證安裝快速上手:5分鐘搭建你的第一個Agentic Loop
3.1 創建種子測試
3.2 啓動 Planner 生成測試計劃
3.3 啓動 Generator 生成測試代碼
3.4 啓動 Healer 修復失敗用例功能操作詳解
4.1 Planner:從應用到測試計劃
4.2 Generator:從計劃到可執行代碼
4.3 Healer:自動修復失敗測試
4.4 目錄結構與產物約定配置與定製
5.1 playwright.config.ts 配置
5.2 種子測試最佳實踐
5.3 MCP 工具配置
5.4 多環境與多項目配置使用技巧與最佳實踐
6.1 定位器優先級策略
6.2 提示詞工程
6.3 人類審查迴路
6.4 數據隔離與確定性狀態常見問題與故障排除
7.1 test.describe() 調用錯誤
7.2 Agent無法啓動瀏覽器
7.3 生成的選擇器不穩定
7.4 Healer 無限循環
7.5 VS Code 版本不兼容實戰案例
8.1 案例一:TodoMVC 應用全覆蓋
8.2 案例二:用戶管理模塊深度測試
8.3 案例三:CI/CD 管道集成總結
參考文獻
1. 概述
1.1 問題背景:手工編寫測試的痛點
手工編寫端到端(E2E)測試長期以來面臨三個核心問題:
編寫耗時:一個完整的功能模塊測試套件通常需要11-17小時的編寫時間,其中包括DOM結構逆向分析、選擇器編寫、斷言設計和邊界條件梳理。 維護成本高:前端組件重命名或結構調整後,選擇器漂移導致大量虛假失敗。在一個1200條用例的測試套件上,4%的脆性率意味着每週約1000次虛假失敗,消耗3個工程師日。 覆蓋不完整:人工編寫測試容易遺漏邊界條件和異常路徑,尤其是權限矩陣、長文本輸入、併發操作等場景。
Playwright v1.56(2025年10月發佈)引入的Test Agents機制,通過AI Agent自動化這三個環節,將測試工程師從"編寫測試代碼"轉變為"審查測試代碼"。
1.2 Playwright Test Agents 是什麼
Playwright Test Agents 是三個內置的AI Agent,它們通過Model Context Protocol(MCP)連接LLM與真實瀏覽器,使用無障礙樹(Accessibility Tree)而非屏幕截圖來理解頁面結構。Agent之間可以獨立使用、順序調用或鏈式組合,形成完整的Agentic Loop。
1.3 三大Agent角色與Agentic Loop
.spec.ts | |||
Agentic Loop的工作流如下:
流程執行說明:
步驟1-2:測試工程師只需編寫一個種子測試文件,包含環境初始化邏輯(自定義fixtures、認證、hooks等) 步驟3-5:Planner Agent自動瀏覽應用,生成結構化的測試計劃(包含場景、步驟和預期結果),保存到 specs/目錄步驟6-8:Generator Agent讀取測試計劃,在真實DOM中驗證每個選擇器,生成可執行的Playwright測試代碼 步驟9-13:Healer Agent在測試失敗時觸發,重放步驟、檢查UI、建議修復並驗證,直到測試通過或判定功能已損壞 步驟14-15:生成的測試是標準Playwright測試,可直接提交到CI/CD管道運行,無需Agent運行時
2. 環境準備與安裝
2.1 系統要求
Node.js 18 或更高版本 支持的AI工具之一: VS Code v1.105+(2025年10月9日發佈)配合GitHub Copilot Claude Code OpenCode Cursor(需要手動配置MCP) 操作系統:Windows、macOS、Linux均支持
2.2 安裝步驟
第一步:安裝Playwright Test最新版本
npm install -D @playwright/test@latest第二步:安裝瀏覽器(至少安裝Chromium)
npx playwright install chromium如需多瀏覽器支持,可安裝全部瀏覽器:
npx playwright install --with-deps2.3 初始化Agent定義
根據你的AI工具選擇合適的--loop參數:
# VS Code + GitHub Copilot / Cursor
npx playwright init-agents --loop=vscode

# Claude Code
npx playwright init-agents --loop=claude

# OpenCode
npx playwright init-agents --loop=opencode
此命令會生成以下文件:
repo/
  .github/agents/              # Agent定義文件(VS Code)
  # 或 .claude/agents/         # Agent定義文件(Claude Code)
  specs/ # 測試計劃輸出目錄
tests/seed.spec.ts # 種子測試模板重要提示:每次升級Playwright後,務必重新運行init-agents命令以獲取最新的Agent定義和工具。
2.4 驗證安裝
驗證種子測試可正常運行:
npx playwright test tests/seed.spec.ts預期輸出:
Running 1 test using 1 worker

  ✓  seed (2.3s)

  1 passed (2.5s)
在VS Code中,確認Agent已正確加載:打開命令面板(Ctrl+Shift+P),搜索"Playwright Agent",應看到planner、generator、healer三個Agent選項。
3. 快速上手:5分鐘搭建你的第一個Agentic Loop
以TodoMVC示例應用(https://demo.playwright.dev/todomvc)為測試目標。
3.1 創建種子測試
編輯tests/seed.spec.ts:
import { test, expect } from '@playwright/test';

test('seed', async ({ page }) => {
  await page.goto('https://demo.playwright.dev/todomvc');
  // 種子測試負責啓動環境。可以包含:
  // - 自定義fixtures引用
  // - 認證登錄步驟
  // - 任何需要在測試前執行的初始化邏輯
});
運行種子測試確保環境就緒:
npx playwright test tests/seed.spec.ts3.2 啓動 Planner 生成測試計劃
在VS Code Copilot Chat中輸入:
@planner Generate a comprehensive test plan for the TodoMVC application.
Explore all features: adding, completing, editing, deleting todos,
filtering, bulk operations, and edge cases.
或者在Claude Code中使用:
使用planner Agent為TodoMVC生成全面測試計劃,涵蓋增刪改查、篩選、
批量操作和邊界條件。Planner會打開瀏覽器自動瀏覽應用,探索所有功能,最終在specs/目錄生成Markdown測試計劃。
3.3 啓動 Generator 生成測試代碼
在VS Code Copilot Chat中輸入:
@generator Generate tests from specs/todomvc-test-plan.mdGenerator會讀取測試計劃,在真實DOM中驗證每個選擇器,然後生成完整的.spec.ts測試文件到tests/目錄。
3.4 啓動 Healer 修復失敗用例
當測試失敗時,直接告訴AI工具:
@healer Fix the failing test: tests/add-todo.spec.tsHealer會重放失敗步驟,檢查當前UI,建議修復方案,並反覆重跑直到測試通過。
4. 功能操作詳解
4.1 Planner:從應用到測試計劃
輸入要素:
明確的規劃請求(如"為客人結賬流程生成測試計劃") 種子測試文件( tests/seed.spec.ts),Planner會將其納入上下文可選:產品需求文檔(PRD),提供額外的業務上下文
工作流程:
Planner Agent首先運行種子測試以執行所有初始化——包括全局設置、項目依賴以及所有必要的fixtures和hooks。種子測試也作為所有後續生成測試的示例模板。
流程執行說明:
Planner使用Accessibility Object Model(AOM)獲取結構化快照,包含元素的角色、名稱、狀態和層級關係 這種方式比基於像素的視覺方法更穩定,因為定位器可以直接映射到 getByRole()等語義化選擇器Planner會系統性地發現:快樂路徑、錯誤狀態、邊界條件和安全場景(XSS、SQL注入等)
輸出示例(specs/todomvc-basic-operations.md):
# TodoMVC Application - Basic Operations Test Plan

## Application Overview
The TodoMVC application is a React-based todo list manager...

## Test Scenarios

### 1. Adding New Todos
**Seed:** `tests/seed.spec.ts`

#### 1.1 Add Valid Todo
**Steps:**
1. Click in the "What needs to be done?" input field
2. Type "Buy groceries"
3. Press Enter key

**Expected Results:**
- Todo appears in the list with unchecked checkbox
- Counter shows "1 item left"
- Input field is cleared and ready for next entry
- Todo list controls become visible
實際案例中,Planner曾為註冊功能自動發現30個場景,為結賬流程自動發現37個場景,遠超人工梳理的覆蓋範圍。
4.2 Generator:從計劃到可執行代碼
輸入:specs/目錄中的Markdown測試計劃文件
工作流程:
Generator將Markdown計劃(如basic-operations.md)納入上下文,遍歷計劃中的每個場景和步驟,在真實瀏覽器中執行操作並驗證選擇器的有效性。Playwright提供生成提示(generation hints)和斷言目錄,幫助Generator進行高效的結構和行為驗證。
輸出示例(tests/add-valid-todo.spec.ts):
// spec: specs/basic-operations.md
// seed: tests/seed.spec.ts
import { test, expect } from '../fixtures';

test.describe('Adding New Todos', () => {
  test('Add Valid Todo', async ({ page }) => {
    const todoInput = page.getByRole('textbox',
      { name: 'What needs to be done?' });
    await todoInput.click();
    await todoInput.fill('Buy groceries');
    await todoInput.press('Enter');

    await expect(page.getByText('Buy groceries')).toBeVisible();
    const todoCheckbox = page.getByRole('checkbox',
      { name: 'Toggle Todo' });
    await expect(todoCheckbox).toBeVisible();
    await expect(todoCheckbox).not.toBeChecked();
    await expect(page.getByText('1 item left')).toBeVisible();
    await expect(todoInput).toHaveValue('');
    await expect(todoInput).toBeFocused();
    await expect(page.getByRole('checkbox',
      { name: '❯Mark all as complete' })).toBeVisible();
  });
});
Generator的特點:
使用 getByRole()等語義化定位器,而非脆弱的CSS選擇器每個步驟都基於計劃描述,帶有清晰的註釋引用 斷言覆蓋UI可見性、狀態檢查、數值驗證等多維度 生成的測試可能包含初始錯誤,但這些錯誤可以由Healer Agent自動修復
4.3 Healer:自動修復失敗測試
輸入: 失敗的測試名稱
工作流程:
流程執行說明:
Healer以debug模式重放失敗步驟,收集控制枱日誌、網絡請求和頁面快照 根因分析分為三類:選擇器漂移(前端組件重命名)、時序問題(加載時間變化)、數據問題(測試數據過期) Healer生成修復補丁後自動重跑驗證,直到測試通過或達到保護上限(guardrails) 如果應用本身存在bug(而非測試代碼問題),Healer會將測試標記為skipped,而不是繞過真實bug
4.4 目錄結構與產物約定
Agent生成的完整項目結構:
repo/
  .github/agents/ # Agent定義文件
    planner.chatmode.md
    generator.chatmode.md
    healer.chatmode.md
  specs/ # 人類可讀的測試計劃
    basic-operations.md
    auth-flows.md
    checkout-scenarios.md
  tests/ # 生成的Playwright測試
   seed.spec.ts # 種子測試
    tests/create/add-valid-todo.spec.ts
    tests/create/add-multiple-todos.spec.ts
    tests/edit/edit-todo.spec.ts
    tests/delete/delete-todo.spec.ts
playwright.config.ts.github/agents/:Agent定義文件,包含MCP工具集合和指令。每次升級Playwright後必須重新生成。specs/:結構化測試計劃,描述場景、步驟、預期結果和數據,人類可讀且足夠精確以驅動代碼生成。tests/:生成的可執行測試文件,儘可能與specs一一對齊。tests/seed.spec.ts:提供預配置好的page上下文,包含所有fixtures、hooks和初始化邏輯。
5. 配置與定製
5.1 playwright.config.ts 配置
推薦的Playwright配置文件:
import { defineConfig, devices } from '@playwright/test';

export default defineConfig({
  testDir: './tests',
  fullyParallel: true,
  forbidOnly: !!process.env.CI,
  retries: process.env.CI ? 2 : 0,
  workers: process.env.CI ? 4 : undefined,
  reporter: [
    ['html', { open: 'never' }],
    ['json', { outputFile: 'test-results.json' }],
  ],
  use: {
    baseURL: process.env.BASE_URL || 'http://localhost:3000',
    trace: 'on-first-retry',
    screenshot: 'only-on-failure',
    video: 'retain-on-failure',
  },
  projects: [
    {
      name: 'chromium',
      use: { ...devices['Desktop Chrome'] },
    },
    {
      name: 'firefox',
      use: { ...devices['Desktop Firefox'] },
    },
    {
      name: 'webkit',
      use: { ...devices['Desktop Safari'] },
    },
  ],
});
關鍵配置項說明:
trace: 'on-first-retry':首次重試時記錄完整trace,用於Healer分析和人工排查screenshot: 'only-on-failure':失敗時截圖,為Healer提供UI狀態快照retries:CI環境設置為2次重試,本地為0以提高反饋速度
5.2 種子測試最佳實踐
種子測試是整個Agentic Loop的起點,其質量直接影響後續所有生成的測試:
最小化種子測試(推薦起步):
import { test, expect } from '@playwright/test';

test('seed', async ({ page }) => {
  await page.goto('https://your-app.com');
});
含認證的種子測試:
import { test, expect } from './fixtures';

test('seed', async ({ page, auth }) => {
  await auth.login('testuser@example.com', 'password123');
  await page.goto('https://your-app.com/dashboard');
  await expect(page.getByText('Welcome back')).toBeVisible();
});
種子測試設計原則:
保持最小化:只包含環境初始化必需步驟,不要包含業務驗證邏輯 使用自定義fixtures封裝通用邏輯(認證、數據工廠、API mock) 文件名固定為 seed.spec.ts——Planner默認查找此文件避免在種子測試中導入複雜的測試工具庫——這些依賴可能導致MCP工具加載失敗
5.3 MCP 工具配置
Agent通過MCP服務器與瀏覽器交互。以下是完整配置參考:
Claude Code MCP 配置:
claude mcp add playwright npx @playwright/mcp@latestVS Code MCP 配置(.vscode/mcp.json):
{
  "servers": {
    "playwright": {
      "command": "npx",
      "args": ["@playwright/mcp@latest"]
    }
  }
}
MCP 工具類別:
5.4 多環境與多項目配置
多環境配置示例:
// playwright.config.ts
export default defineConfig({
  projects: [
    {
      name: 'staging-chromium',
      use: {
        ...devices['Desktop Chrome'],
        baseURL: 'https://staging.example.com',
      },
    },
    {
      name: 'production-chromium',
      use: {
        ...devices['Desktop Chrome'],
        baseURL: 'https://example.com',
      },
    },
  ],
});
通過環境變量切換測試目標:
BASE_URL=https://staging.example.com npx playwright test --project=staging-chromium6. 使用技巧與最佳實踐
6.1 定位器優先級策略
Playwright Agent默認遵循內置的定位器優先級,但你可以通過在種子測試和配置中強化這一策略來獲得更好的生成質量:
getByRole():最優先——語義化、無障礙友好、對DOM結構變化最健壯getByLabel():表單元素最佳選擇——通過關聯的label定位getByPlaceholder():輸入框的輔助定位方式getByTestId():當語義定位不夠時使用,在源碼中添加data-testid屬性getByText():文本內容定位——注意多語言場景的脆弱性nth-child和CSS層級選擇器:僅作為最後手段
在種子測試中顯式使用優先定位器,Agent會學習並模仿你的風格。
6.2 提示詞工程
與Agent交互的提示詞質量直接影響輸出結果。以下是一些經過驗證的模式:
Planner提示詞示例(高質量):
@planner Generate a test plan for the guest checkout flow, covering:
- Happy path: valid credit card, valid shipping address
- Error states: invalid card number, expired card, empty required fields
- Boundary conditions: maximum order quantity, minimum order value
- Performance: checkout completion within 3 seconds
Use the category hierarchy from our PRD in docs/checkout-prd.md.
Generator提示詞示例(高質量):
@generator Generate tests from specs/checkout-plan.md. Follow these conventions:
- Use getByRole() whenever possible, fall back to getByTestId()
- Separate test.describe blocks for each scenario category
- Add explicit waitForURL() after navigation actions
- Use data-testid attributes where available
關鍵原則:
分拆任務:Azure DevOps團隊驗證的兩步提示策略("獲取測試用例"→"生成腳本")比單步組合提示更可靠 指定定位器偏好:明確告訴Generator你希望的定位器優先級 提供上下文:引用PRD、設計規範、fixture文檔
6.3 人類審查迴路
Healer修復後的測試並非最終版本——必須經過人工審查:
Healer提出修復 → 人工Review → CI門禁驗證 → 合併設置Healer重試上限:
最多2輪自動修復——超出則以人工干預為佳 如果Healer合併率約80%:工作正常 如果總是100%通過:說明審查不夠嚴格 如果總是被拒絕:Healer配置需要調整
6.4 數據隔離與確定性狀態
使用工廠端點重置測試數據:每個測試場景前調用 /api/test/reset或類似端點時間戳動態數據:使用 Date.now()生成唯一測試數據,避免跨測試數據衝突認證狀態複用:通過 storageState保存和加載認證狀態,避免每次測試都執行登錄
// 保存認證狀態
test('login and save state', async ({ page }) => {
  await page.goto('/login');
  await page.fill('[name="email"]', 'test@example.com');
  await page.fill('[name="password"]', 'password');
  await page.click('button[type="submit"]');
  await page.waitForURL('/dashboard');
  await page.context().storageState({ path: 'auth.json' });
});

// 複用認證狀態
test.use({ storageState: 'auth.json' });
test('authenticated test', async ({ page }) => {
  await page.goto('/dashboard');
  // 直接進入已登錄狀態
});
7. 常見問題與故障排除
7.1 test.describe() 調用錯誤
錯誤信息:
Error: Playwright Test did not expect test.describe() to be called here.
Most common reasons include:
- You are calling test.describe() in a configuration file.
- You are calling test.describe() in a file that is imported by the configuration file.
- You have two different versions of @playwright/test.

   at seed.spec.ts:3
原因: v1.56的已知bug——MCP工具在加載seed.spec.ts時直接import測試文件,而非通過測試運行器執行,觸發了Playwright的內部保護機制。
排查步驟:
手動運行種子測試確認語法正確: npx playwright test tests/seed.spec.ts檢查是否安裝了多個版本的 @playwright/test:npm ls @playwright/test確認 playwright.config.ts沒有import測試文件嘗試將種子測試最小化(僅保留 page.goto()一行)
GitHub Issue追蹤: #37774[1]、#37749[2]
7.2 Agent無法啓動瀏覽器
症狀: Planner或Generator報瀏覽器未找到錯誤。
解決方案:
# 重新安裝瀏覽器
npx playwright install --with-deps

# 檢查瀏覽器路徑
npx playwright install --dry-run

# 對於Linux CI環境,確保安裝系統依賴
sudo npx playwright install-deps
7.3 生成的選擇器不穩定
症狀: 測試偶發性失敗,選擇器找不到元素。
解決方案:
在種子測試中使用 getByRole()和getByTestId()作為主要定位方式,Agent會學習此模式為關鍵交互元素添加 data-testid屬性在Generator提示詞中明確指定定位器優先級 使用Healer自動修復選擇器漂移
7.4 Healer 無限循環
症狀: Healer不斷嘗試修復同一測試,陷入循環。
解決方案:
Healer內置guardrails會自動限制重試次數 如果超出限制仍未修復,說明可能是應用功能真的出了問題 手動檢查測試場景對應的應用功能是否正常 在prompt中明確告訴Healer:"如果3次嘗試後仍然失敗,標記為skip"
7.5 VS Code 版本不兼容
症狀: Agent在VS Code中不可見或不工作。
解決方案:
確認VS Code版本 ≥ v1.105(2025年10月9日發佈) 更新VS Code: Help > Check for Updates重新初始化Agent: npx playwright init-agents --loop=vscode檢查GitHub Copilot擴展是否已安裝並啓用
8. 實戰案例
8.1 案例一:TodoMVC 應用全覆蓋
場景: 為一個React TodoMVC應用建立完整的E2E測試套件。
操作過程:
第一步:創建種子測試
import { test, expect } from '@playwright/test';
test('seed', async ({ page }) => {
  await page.goto('https://demo.playwright.dev/todomvc');
});
第二步:啓動Planner
@planner Generate a comprehensive test plan for the TodoMVC app.
Explore: adding, editing, completing, deleting todos, filtering
(All/Active/Completed), bulk toggle, clear completed, counter
accuracy, and edge cases (empty input, very long text, special characters).
Planner在數分鐘內自動瀏覽了所有功能路徑,生成了包含8個場景、30+個子場景的結構化測試計劃。
第三步:啓動Generator
@generator Generate tests from specs/todomvc-test-plan.md.
Use getByRole() locators. Follow Playwright best practices.
Generator生成了30+個測試用例,覆蓋了所有場景。
第四步:運行測試並修復
npx playwright test --project=chromium初始通過率約85%,剩餘5個失敗用例交給Healer修復後全部通過。
效果: 從零到完整測試套件約15分鐘,而傳統手工編寫至少需要4小時。
8.2 案例二:用戶管理模塊深度測試
場景: 某CII-ESG診斷平台用戶管理模塊,涉及基於角色的權限矩陣。
實際數據(來自Spritle團隊2025年實踐):
手工編寫時間:預估11-17小時 Agent生成時間:約1.5小時(效率提升約90%) Planner自動發現:90+測試場景,8個測試套件 Generator產出:1500+行TypeScript,使用 getByRole()、getByTestId()和時間戳動態數據首次運行通過率:100% 月度維護:Healer在30天內自動修復了約12次CI管道斷裂(前端組件重命名導致)
關鍵成功因素:
種子測試預配置了完整的認證fixtures和角色切換邏輯 PRD文檔作為Planner輸入,提供了權限矩陣的精確描述 Generator明確被要求使用 data-testid作為回退定位器
8.3 案例三:CI/CD 管道集成
場景: 將Agent生成的測試套件集成到GitHub Actions CI/CD管道。
GitHub Actions 配置:
name: Playwright E2E Tests
on:
  push:
    branches: [main, develop]
  pull_request:
    branches: [main]

jobs:
  e2e:
    name: E2E Tests
    runs-on: ubuntu-latest
    strategy:
      matrix:
        browser: [chromium, firefox, webkit]
    steps:
      - uses: actions/checkout@v4

      - uses: actions/setup-node@v4
        with:
          node-version: 20
          cache: 'npm'

      - name: Install dependencies
        run: npm ci

      - name: Install Playwright browsers
        run: npx playwright install --with-deps ${{ matrix.browser }}

      - name: Run E2E tests
        run: npx playwright test --project=${{ matrix.browser }}

      - name: Upload test report
        if: always()
        uses: actions/upload-artifact@v4
        with:
          name: playwright-report-${{ matrix.browser }}
          path: playwright-report/

      - name: Upload test results
        if: always()
        uses: actions/upload-artifact@v4
        with:
          name: test-results-${{ matrix.browser }}
          path: test-results/
跨平台運行:
strategy:
  matrix:
    os: [ubuntu-latest, windows-latest]
    browser: [chromium]
Healer在CI中的集成:
在CI失敗後手動觸發修復(不推薦全自動修復直接合並):
# CI報告失敗後,本地觸發Healer
claude mcp call playwright @healer fix failing-test.spec.ts

# 審查修復內容
git diff tests/

# 通過審查後提交
git add tests/ && git commit -m "修復:Healer修復選擇器漂移問題"
9. 總結
Playwright Test Agents通過Planner-Generator-Healer三Agentic Loop,將測試工程師從"編寫代碼"轉變為"審查代碼",實測效率提升約90% Agent使用無障礙樹(AOM)理解頁面結構,輸出語義化定位器( getByRole()、getByTestId()),比像素級分析更穩定種子測試是整個Agentic Loop的核心——投入時間設計好的種子測試(含fixtures、認證、hooks),直接影響所有生成測試的質量 人類審查迴路不可省略——Healer修復後必須經過Code Review和CI門禁驗證,建議限定最多2輪自動修復 生成的測試是標準Playwright測試,無需Agent運行時即可在任何CI/CD管道中運行 適用場景:Web應用E2E測試的批量生成、已有測試套件的脆性修復、新功能的快速測試覆蓋。不適用場景:需要深度領域知識的後端邏輯測試、複雜的多步驟有狀態工作流、需要特殊硬件或物理設備的測試 學習資源:官方文檔(playwright.dev/docs/test-agents)、GitHub倉庫(microsoft/playwright)、Discord社區(aka.ms/playwright/discord)
參考文獻
[1] Playwright Test Agents 官方文檔:https://playwright.dev/docs/test-agents
[2] Playwright GitHub 倉庫:https://github.com/microsoft/playwright
[3] Playwright v1.56 Release Notes:https://github.com/microsoft/playwright/releases/tag/v1.56.0
[4] Playwright Agents: Planner, Generator, and Healer in Action(dev.to):https://dev.to/playwright/playwright-agents-planner-generator-and-healer-in-action-5ajh
[5] Playwright Test Agents Guide(TestDino):https://testdino.com/blog/playwright-test-agents/
[6] Why I'll Never Manually Write Test Scripts Again(Spritle):https://www.spritle.com/blog/why-ill-never-manually-write-test-scripts-again-and-you-shouldnt-either/
[7] Every Playwright Needs a Director(monday.com Engineering):https://engineering.monday.com/every-playwright-needs-a-director-how-ai-agents-replace-dom-scraping-with-component-aware-static-analysis/
[8] 9 Strategies to Get the Most Out of Playwright Test Agents(Currents.dev):https://currents.dev/posts/9-strategies-to-get-the-most-out-of-playwright-test-agents
[9] From Manual Testing to AI-Generated Automation(Azure DevOps Blog):https://devblogs.microsoft.com/devops/from-manual-testing-to-ai-generated-automation-our-azure-devops-mcp-playwright-success-story/
[10] GitHub Issue #37774:test.describe() 錯誤:https://github.com/microsoft/playwright/issues/37774
[11] GitHub Issue #37749:seed.spec.ts 加載錯誤:https://github.com/microsoft/playwright/issues/37749
[12] Playwright MCP Server:https://github.com/microsoft/playwright-mcp
[13] Playwright CLI for Coding Agents:https://github.com/microsoft/playwright-cli
[14] How Skills Make Agentic AI Test Automation Efficient(Sogeti):https://labs.sogeti.com/from-test-case-to-running-playwright-spec-how-skills-make-agentic-ai-test-automation-efficient/
[15] Playwright 1.56 - Introducing Playwright Test Agents(YouTube):https://www.youtube.com/watch?v=_AifxZGxwuk
https://github.com/microsoft/playwright/issues/37774 ↩ https://github.com/microsoft/playwright/issues/37749 ↩